Download

1 / 35
530 likes | 2.37k Vues
Nursing student documentation in epic. Click on the Citrix icon bottom right hand corner of screen. Select Epic 2010 and from there select HyperSpace PLY. Log in screen in PLY - Playground. User ID: RNstudent Password: model Logins NOT CASE

E N D
Log in screen in PLY - Playground • User ID: RNstudent • Password: model Logins NOT CASE SENSITIVE
When you log in you will get the screen for the Default Cosigner – normally you will enter that patient’s bedside nurse’s name– the nurse responsible for each of your patient’s is the name you will put it as the “default cosigner”For practice type in TRN19121 through TRN19151
Select any Keisha patient (each student should select a different one). Do not select the Zzipmaster ,Keisha (this is for build purposes only). Double click on your Keisha patient to open her chart.
Chart layout – left side of the chart are Activities – you will utilize Doc Flowsheets, MAR.
Within Doc Flowsheets you will document on Vital Signs,general and Assessment,general. • When you are working in the ICU’s, you will utilize the appropriate Doc Flowsheets for those units.
To see which flowsheets are available, click on the magnifying glass and you will see a list of all the available flowsheets. • When you have completed all of your documentation, you will click on the Pend button. The bedside nurse will have also completed an assessment and he/she will compare it to what you have already charted and then make changes if he/she wants to change documentation. When he/she is done they will be able to file the documentation.
Details Box-can select from here-if multi-select hit enter to move on to next section Click on magnifying glass to get the drop down box to select the appropriate choice
If you have an assessment that you feel is not WDL (as defined in the details box) and you are the first person to document it that way for the day, when you place the X a Cascade opens automatically With the details window open you can see what is considered within defined limits (WDL)
You only want to select the appropriate rows that you wish to document on.
For this example we want to address the fontanel. We can highlight Fontanel and then click on the Add button or we can just double click on Fontanel and it will move to the right hand side. Click OK and it will appear on the Doc Flowsheet for you to chart your assessment.
Documenting Intake and Output – you will need to be in the I&O Doc Flowsheet.
I&O is fairly intuitive. One area that causes a little confusion is Urine Not Measured and Stool not weighed
There were 3 diapers on the patient’s bed that do not need to be weighed – just place a “3” in the box.
With stool, click on the magnifying glass by Spontaneous, not weighed and click on the appropriate description and click on Accept.
Go to Intake and Output Activity – read only and where the Math is done. You can see from here that there were 3 non-measured urine encounters and 1 non measured stool encounters – but you achieved the results two different ways.
Whenever documenting the insertion of an NGT or a Foley, you must be in an Assessment Flowsheet before clicking on Add LDA
Type in a few letters of what you are inserting (NG/Foley) or use the magnifying glass – in Epic, “Less is Best”
Your choice appears and then you fill in the informationYou will NOT answer pre-existing LDAInserted by is “you” because you are logged in and charting so you do not need to add your name
The NG tube now appears on the Assessment of the Doc Flowsheet and you can complete an assessment.If you “hover” over the blue hyper-link, you are able to see all the properties for the NG tube you inserted.
MAR DOCUMENTATION The correct order for administering medications: - scan the patient - scan the medication - review the order details - administer the medication - click Accept
We are giving the 0800 Amoxicillin - we have following the scanning procedure stated above.
The time will default to the time the MAR opened. Check that everything is correct and then click “Accept”
Your instructor will click on “Verify” and will get the screen for them to do the co-sign.
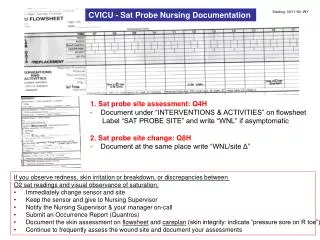
IV Assessment When you are in each box of the assessment you can use the details window on the left to select what is appropriate – when it states “multiple options”, after you select all that are appropriate then you need to press “enter to move on.”
If you hover over the green documentation, a pop-up box opens to give the details concerning the medications
Students Will Not: • Acknowledge patient orders • Write Patient Notes
Now you need to take your test Enjoy documenting in Epic!