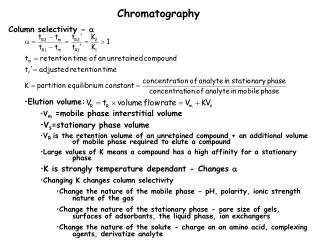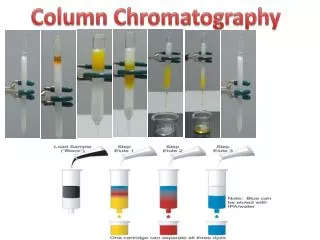
Column Chromatography
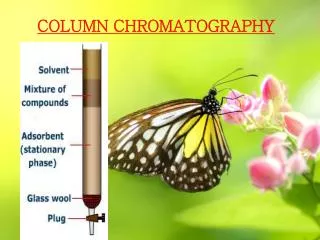
Chemistry 101 Laboratory. Column Chromatography. Separating a mixture of food coloring. A disposable pipette tip will save you from having to manipulate hot glass tubing. With a small glass rod, push a LOOSE pellet of cotton into the pipette tip. DON’T PACK IT TIGHTLY!!.


Column Chromatography
E N D
Presentation Transcript
Chemistry 101 Laboratory Column Chromatography Separating a mixture of food coloring.
A disposable pipette tip will save you from having to manipulate hot glass tubing. With a small glass rod, push a LOOSE pellet of cotton into the pipette tip. DON’T PACK IT TIGHTLY!!
You will be provided with a two-foot length of glass tubing. You must cut the tubing into TWO 1-foot lengths. This will give two columns (which you can share)!
Don’t put the hot glass down on a cold bench top. Don’t pick it up again until you are SURE it has cooled.
Fit the glass column onto the pipette tip. If the fit is not secure, a bit of scotch tape will help secure the tip to the column.
If the hole is too small, use the rat-tail file; if it is too big, cut a slot out of it.
With a piece of tubing, fit a small funnel to the top of the column. This will make it easier to pack the column.
Fit the column through the cork stopper; and clamp it to a ring stand. Obtain several grams of chromato-graphic alumina and prepare to pack the column.
FIRST, add a bit of clean sand on top of the cotton. No need to overdo it!
Now, add the alumina to within 10 cm (3-4 inches) from the top! This may be more difficult than you expect; and will test your patience. If you rush it, it will cause you even more difficulties.
Now, add a bit more sand to the top of the alumina. Remove the funnel, and prepare the 70 percent methanol eluent.
Liquids do not mix well in small diameter vessels; (remember pousse café?) So, -- pour the mixture into a beaker and MIX IT THOROUGHLY.
When all is ready, add 3 – 4 drops of the dye mixture to the top of the column. Some of the mixture may cling to the glass walls of the column.
FIRST,let the dye mixture go just below the layer of sand. THEN, rinse the walls of the column with a few drops of the 70% methanol eluent.
As the column drains, continue to add eluent to the top of the column. When the leading color is half way down, fill the column. Label it with your name, and leave it to drain until the next lab.
Place your column into the beaker provided for your section. They will be drained and dry by your next lab period.