
Configuring Digital Extensions on a PBX Base Station: Handset Setup Guide
This guide provides detailed instructions for setting up digital extensions via a PBX base station. Learn how to register handsets and associate them with specific group numbers for inbound and outbound calls. Handsets can share extensions, allowing for effective communication across multiple lines. Follow simple steps, including how to access menus on your handset, add group numbers, and program lines to ensure seamless connectivity. Ideal for both beginners and experienced users looking to optimize their digital communication setup.

Configuring Digital Extensions on a PBX Base Station: Handset Setup Guide
E N D
Presentation Transcript
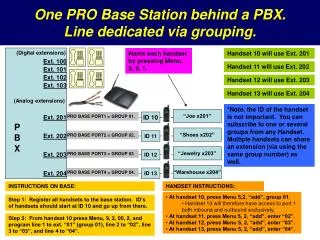
One PRO Base Station behind a PBX. Line dedicated via grouping. (Digital extensions) Name each handset by pressing Menu, 5, 5, 1. Handset 10 will use Ext. 201 Ext. 100 Handset 11 will use Ext. 202 Ext. 101 Ext. 102 Handset 12 will use Ext. 203 Ext. 103 Handset 13 will use Ext. 204 (Analog extensions) *Note, the ID of the handset is not important. You can subscribe to one or several groups from any Handset. Multiple handsets can share an extension (via using the same group number) as well. “Joe x201” Ext. 201 PRO BASE PORT1 = GROUP 01. ID 10 PBX “Shoes x202” Ext. 202 PRO BASE PORT2 = GROUP 02. ID 11 “Jewelry x203” Ext. 203 PRO BASE PORT3 = GROUP 03 ID 12 “Warehouse x204” Ext. 204 PRO BASE PORT4 = GROUP 04. ID 13 INSTRUCTIONS ON BASE: HANDSET INSTRUCTIONS: • At handset 10, press Menu 5,2, “add”, group 01. • Handset 10 will therefore have access to port 1 both inbound and outbound exclusively. • At handset 11, press Menu 5, 2, “add”, enter “02”. • At handset 12, press Menu 5, 2, “add”, enter “03”. • At handset 13, press Menu 5, 2, “add”, enter “04”. Step 1: Register all handsets to the base station. ID’s of handsets should start at ID 10 and go up from there. Step 2: From handset 10 press Menu, 9, 2, 00, 2, and program line 1 to ext. “01” (group 01), line 2 to “02”, line 3 to “03”, and line 4 to “04”.