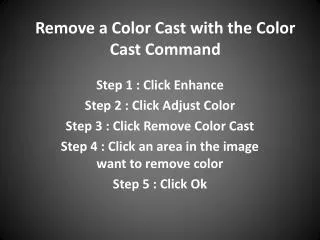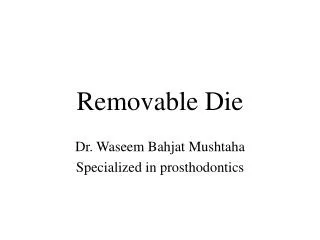
Working cast with removable die
610 likes | 4.04k Vues
Working cast with removable die. The working (master) cast is the replica of the prepared teeth, ridge areas, and other parts of the dental arch.

Working cast with removable die
E N D
Presentation Transcript
The working (master) cast is the replica of the prepared teeth, ridge areas, and other parts of the dental arch. The die is the positive reproduction of the prepared tooth and consists of suitable hard substance of sufficient accuracy ( usually an improved stone, resin or metal).
Ideal requirements The cast that will be used to make the fixed restoration must meet certain requirements: It must reproduce all details captured in the impression and should be free of defects. It must reproduce both prepared and unprepared tooth surface; the unprepared teeth immediately adjacent to the preparation must be free of voids. All surface of anterior or posterior teeth must allow for precise articulation of the opposing casts
All soft tissues should be reproduced in the working cast, including all edentulous spaces and residual ridge contours that will be involved in the fixed prosthesis.
the die for fixed restoration also must meets certain requirement - it must reproduced the prepared tooth exactly; all surface must be accurately duplicated and air bubbles or voids can be accepted. -The remaining unprepared tooth structure immediately cervical to the finish line should be easily discernible on the die, ideally with 0.5 to 1 mm visible.
Materials * Gypsum This material is in expensive, easy to use, and able to produce consistent results. Dental gypsum products are available in four forms (types I to IV) impression plaster, model plaster, dental stone and high strength dental stone . The gypsum component are identical chemically. The setting reaction is due to hydration of calcium sulfate hemi hydrate. CaSO4. ½ H2O --------- CaSO4. 2H2O Hand mixing of gypsum product is easy, but results are better when mixing is done mechanically in vacuum.
Porosity is reduced, with increase in the strength, after only 15 seconds of mechanical mixing. Newly produced casts should be left undisturbed for at least 30 minutes; superior results are achieved at 1 hour, although these time may vary from brand to brand. The greatest disadvantage of gypsum is its relatively poor resistance to abrasion. Gypsum hardeners (colloidal silica) are used to improve abrasion resistance. Another alternative is to impregnate the surface of the die with low viscosity resin such as cyanoacrylate. Again the abrasion resistance improved but care the resin have no significant thickness.
* Resin Resins are used as a die material to overcome the low strength and abrasion resistance of die stone. Available resin die materials are epoxy resin and polyurethane. Epoxy resin can be cured at room temperature without expensive or complicated equipment. Its abrasion resistance is many time greater than that of gypsum products. However its more expensive than gypsum and undergoes some shrinkage during polymerization. Prosthesis fabricated on resin dies will fit more than those made on gypsum. Polysulfide and hydrocolloid are not compatible with resin; how ever good result are achieved with silicon and polyether.
* Electroplated die Electroplating can be used to overcome the poor abrasion resistance of gypsum. This technique involve the deposition of a coat of pure silver or copper on the impression. The area to be electroplated are first coated with finely powdered silver on graphite to make then conduct electricity, and the impression is then placed in an electroplating bath. A layer of pure metal is deposited on the impression and is supported with type IV stone or resin. Some problems remain with this technique; variable degree
Of distortion commonly occur, and the technique must be preformed slowly, the time required to produce cohesive film of metal (typically 8 hr) is ample for the developments of dimensional changes in the impression, however when don properly, an electroplated die can be as accurate as die stone. Not all impression material are compatible with electroplating; silicon have low surface energy so difficult to be electroplated. Polyether impression because of their hydrophilic nature, imbibe water and become distorted. Polysulfide polymers can be silver plated, but it is difficult to copper plate them. The main drawback of silver is cyanide solution so special precaution because of its extreme toxicity.
Selection criteria The materials used for constriction of cast-and-die system 1. Have high stability and excellent dimensionally accuracy 2. Have high mechanical strength properties to withstand handling without being fractured or destroyed. 3. Have high surface hardness to resist scratching and abrasion during wax pattern construction. 4. Reproduce surface detail accurately.
5. Be available in color that contrasts with the wax used, so the preparation margin can be seen . 6. Be compatible with separating agent that will be used, so the wax pattern dose not stick. 7. Be easily wet table by the wax. 8. Be compatible with the impression material.
Working cast and die systems There are two basic working cast and die systems: 1- working cast with separate die. 2- working cast with a removable die, which include the following techniques: Dowel pin technique. Di-lock tray technique. Pindex system. 3- single die
Dowel pin technique: The cast is made of two pours of type IV stone of contrasting colors: the first forming the teeth, the second forming the base of the cast, the area to be removed is coated with a separating agent before the second layer is poured. The location and the orientation of the dowels are critical; improperly placed; they will not allow the die of the prepared teeth to be withdrawn from the cast.
Surround the impression by boxing wax and pour it with die stone covering the cervical margin by 1.5 mm. Before setting the die stone, insert the following: Dowel pins In the prepared teeth, pins should be flat from one side to prevent the rotation, parallel to the long axis of the preparation, and must not touch the impression. Paper clips To provide retention for the base that will be added. These retentive devices should be placed in the other parts of the model that are not to be removed from the completed cast.
After complete setting of the first pour, place a small ball Of soft utility wax on the tip of each dowel pin. -Lubricate the area each dowel with a thin coat- separating agent to permit easy separation of the dies from the working cast. Pour the rest of the impression with a second mix with contrast color to form the base of the cast. After complete setting of the second pour, remove the impression andtrim the excess on a model trimmer . Use a sharp knife to uncover the utility wax and remove them
When the stone is hard and dry, use a saw frame with a thin blade to cut through the layer of die stone. There should be a cut on the mesial and distal side of each die, and the cut should be tapered toward each other slightly from the occlusal to gingival. Loosen the die gently using an instrument handle.
Trim away any excess stone gingival to the finish line, with an acrylic bur, and then mark the finish line with the red pencil. Repeat the procedure for each die on the cast. Reseat the dies to make certain that they will seat completely and will be stable. Place wax around the tips of the dowels to protect them from plaster contamination Soak the cast in water an mount it on the articulator, using mounting plaster. After hardening of the plaster remove the wax covering the tips of the dowels.
Di-lock tray technique Procedure -Pour the entire full-arch impression with die stone, restricted to the U- shape arch, building it up to a height of approximately 1.0 inch (2.5 cm). After complete setting of the stone set, separate it from the impression. The U- shaped cast, with open lingual area, must be trimmed so that it will fit into a Di-lock tray. Trim the buccal and the lingual sides of the cast on a model trimmer, tapering towards the base, then try the cast into the Di-lock tray to make sure that that it will fit.
One or two horizontal groove are placed on the inner and the outer aspect of the cast to provide undercuts for holding the cast in stone in the tray , soak the base of the cast in water for about five minutes. Mix stone and vibrate it into the tray is approximately three-quarters full. Seat the cast into the tray; the cervical lines of the teeth should be about 4 mm above the edge of the tray, when the cast has been seated, allow the stone to sit until it is hard and dry. After complete hardening of the stone, the cast be removed from the tray.
Disassemble the tray by lifting the back up, and then slide the buccal segment forward. With a saw frame and a thin saw blade, cut between the prepared tooth and the adjacent tooth. The occlusal saw cut should extent approximately three-quarters off the way through the stone base. Using finger pressure to break the die and attached teeth from the cast. Repeat the process every prepared tooth on the cast. - Remove the excess stone cervical to the finish line, and clean the tray completely; reassemble the die and other parts of the cast in the tray . Mount the tray on the articulator using mounting plaster.
Pindex system In the pindex system a reverse drill is used to create a master cast with dies that can be removed and replaced repeatedly with great precision. The impression is poured without positioning and attaching dowel pins before hand. The machine accurately drills parallel holes from the underside of a trimmed cast.
Technique - Pour the impression in a usual manner, adding approximately 20 mm of stone beyond the edge of the tray. Allow the cast to set 60 minutes and remove it from the impression, trim the side and the bottom of the cast, The cast should be trimmed until all rough, irregular, and undercut areas are removed from its underside. The cast should perfectly flat on the tabletop, and its thickness from the base to preparation finish must be a minimum of 15 mm. if the bottom of the cast is flat, it insures that the pinholes drilled into it will be parallel.
Mark the location of each dowel on the occlusal surface. Tow dowels are need to stabilize each segment. (alternative single pins are used for small preparation). Position the cast on the drill stage; a light indicate the location of the drill.
Hold the cast firmly and press the lever; this activate the drill, which penetrates into the cast. Each hole should be cleanly drilled. Try in the pins and locate them to place. For accessibility, the shorter locating pins should be used on the lingual surface . Position the plastic sleeves.
Coat the base with petroleum to ensure clean separation. Place the assembly in the special former. Make the second pour of stone in to the mold.
Marking the saw cut with a pencil. Sawing the die. With pindex system, removing the first pour and using it as a block and sawing from the base is some times helpful.
After the dies are sectioned, trim them in the conventional manner. Mark the finish line with a red pencil.