Download
1 / 29
290 likes | 497 Vues
Blackboard Collaborate Live Classroom Orientation. Lynne Gibb – Coonara Community House. About This Presentation. This orientation session introduces you to the Blackboard Collaborate (BBC) online classroom

E N D
Blackboard Collaborate Live Classroom Orientation Lynne Gibb – Coonara Community House
About This Presentation • This orientation session introduces you to the Blackboard Collaborate (BBC) online classroom • Click through the slides to work through them consecutively or click on a link in the next slide (Index) to take you to a particular slide. • Each slide has a link back to the Index and a forward and backward arrow which take you to the next slide and the previous slide so you can navigate your way around the presentation. By the time you reach the end you will have a good idea of how it works – enjoy! NOTE: The online classroom was previously called Elluminate Live Classroom. It has recently been taken over by Blackboard Collaborate (BBC). In this presentation it may be referred to as either of the above or just simply as BBC, however, it all means the same thing.
Getting into BBC • Type your name and click the LOGIN button. Back to Index Click on the link sent to your email. The following image appears
Adding Java If nothing appears to be happening, your browser may be set to stop popups. Look at the top of your screen and you will see a pale yellow box going all the way across your screen warning you that it requires your OK to keep downloading. Enable this by clicking on the box and doing whatever it tells you. Then java should start to download. Java will begin downloading automatically. If it doesn’t you may get a message asking you to OK for it to be downloaded. In that case click OK or do whateveryour browser tells you as Elluminate requires java to be able to open. Any other problems click on this link to get the free download before you go any further. http://java.com/en/download/inc/windows_upgrade_xpi.jsp
You only need to set up once! Setting up first time can take a while so best to try to get it set up before the first session. You only have to do the whole setup once. When it is on your computer, next time you click on the link it will only take a few seconds to get into the classroom depending on the speed of your internet connection. The Department of Education and early childhood development site has some reall really good information about setting up elluminate and also a video which some of you may find more useful than this powerpoint. You can actually go into their training room to play or you can click on our link and go into Coonara’s room at any time. http://www.education.vic.gov.au/researchinnovation/virtualconferencecentre/use/start.htm
Setting your connection speed This box will probably come up when you log in anyway When you join the session, the first thing you need to do is to set your connection speed so that BBC can efficiently manage the data that it sends and receives. This only needs to be done once because BBC will remember the setting the next time you join a session. On a PC, select Tools > Preferences > Session > Connection. On a Mac, preferences are found under the ElluminateLive! menu. Click APPLY
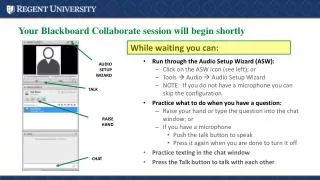
Checking your Speaker and Microphone Setup Prior to Joining Your Session Make sure all the cable connectors are securely plugged into the correct sockets. Are your speakers functioning? Check the speaker's indicator light. Do your speakers have power going to them? Are they plugged into a power source? Are the batteries charged? Make sure that the power switch on your speaker is turned on and the volume is set. If your microphone has a switch, make sure that it is on. Do you have the correct drivers for your sound card? If you can hear normal sounds through your speakers it should be OK. Still not working? Phone Lynne 0407 856 044
How to set up your Audio Checking your Speaker and Microphone Setup during Your Session Elluminate Live!™ provides a utility to configure your audio settings. You can access this utility at anytime during your session from Tools → Audio → Audio Setup Wizard... A series of panels will guide you through the steps.
Select Your Audio Output Device (Headset) You may have more than one device that can play audio received from others (e.g. speakers). Select the desired output device. If it is an unplugged USB device, plug it in, and wait for the system to recognize it by highlighting it. Click the Refresh button to add the device to the list if necessary Click OK
Select Your Audio Input Device(Microphone) Now, select the microphone you use to send your audio to others during the session. If you are using a USB microphone, (they all are these days) plug it in, wait a few seconds, then click the Refresh button. Select the device and click OK.
Setting Your Speaker Volume Click the Play button to hear a short recording. While this plays, adjust the speaker volume slider to a comfortable listening level. Then click "Yes". (Obviously you will have your headset on at this time!)
Setting your Microphone level Next, test your microphone by recording your voice. Click the Record button and speak into the microphone. Adjust the slider so that it mostly shows green. Click Stop. Listen to your recorded voice and confirm that your microphone is working properly. Choose Multiple Talkers only if you are using a room microphone with more than one participant. (eg if you have someone else sitting beside you in the room who will be using the microphone)
Once you have completed your audio setup – the class begins!
The view you get once inside the classroom The classroom has four main windows
Raising your hand To ask a question, raise your hand using the button in the Participants window.
Using emoticon mood indicators At any time, or in answer to a question, you can click on any one of the emotion indicators to provide feedback to the moderator. It also recognises the usual keyboard shorcuts for emoticons eg :) will turn into a smiley face.
Using audio - Talking Click the Talk button or use the hot key of Ctrl+F2 when you want to speak. The Talk button turns yellow while your audio is activated. When you are done talking, click the Talk button or Ctrl+F2 to release your microphone. Remember to always release your microphone after talking so others can reply. By default, only one person can speak at a time. The moderator can increase it up to four simultaneous speakers (but may choose not as it can get confusing).
Using audio – Adjusting Audio evels Use the Microphone and the Speaker sliders to adjust the volume for your microphone and speakers. The gauges below the sliders show the audio levels when you or someone else is speaking. Use the following guidelines to set your Mic slider when you are speaking:
Using audio: Recognising who is talking The microphone icon in the Participants Window displays a yellow halo around the microphone of the person who is speaking.
Using text chat Type your message in the chat box and then click Send or hit Enter on your keyboard
Directing your chat You can send your message to everyone in the session, just the moderator, another participant or several participants. Depending on the session configuration, your moderator may see all the messages sent in the Chat area, including private messages that you send to other participants. The eye icon indicates that private chat is supervised by the moderator.
Using the whiteboard The whiteboard is where you can view a presentation or collaborate using the whiteboard tools.
Whiteboard Tools The whiteboard tools are located on the side of the whiteboard. To use a tool, click on it to make it active. Once a tool is selected, you can change the various properties using the colour palette and menus available at the bottom of the whiteboard.
Printing the whiteboard You may wish to print off the slides on the whiteboard for later viewing at your leisure You can print the whiteboard screens directly from within the online classroom Click File/Print/Whiteboard If you want to print the text chat, its easier to copy and paste it into a Word document and then print it out.
Saving the whiteboard You can save your whiteboard screens to a file that you can review later. The screens can be saved in three formats: as a whiteboard (.wbd) file or as a whiteboard PDF (.pdf) file or individually as images files (.png) The text messages during the session can also be saved as a text (.txt) file. The Whiteboard menu option will be greyed out if the moderator has protected the whiteboard content.
How to leave courteously Click this icon to indicate that you have stepped away from the session. Eg getting a drink etc. The tutor can see you are not physically present although you are still shown as “in” the classroom. This is a good idea if you have to leave temporarily because it means you do not have to go though the reconnection procedure again & people will know not to ask you a question or try to talk to you. Disconnects you from the session. This command changes to a Connect button when you are disconnected from a session. BBC will remain open on your screen but you will have exited the classroom & your name will have gone from the participant list. To re-join the session, click the Connect Button. You can also leave the session permanently by clicking on the red X at the top RHS of the screen. In this case. BBC shuts down completely. Connects you to the session. This command changes to a Disconnect button when you are connected to a session. If you find that you have “dropped out” and cannot hear anything or things don’t appear to be happening, click the connect button to reconnect or leave the room and log in again. This sometimes happens if your internet connection is a bit weak.
Help! • Congratulations! • You have successfully completed the Coonara Blackboard Collaborate Online Classroom Orientation Session. You are now ready to connect to your session and enjoy your online classroom experience. • If you have any problems getting into the classroom or managing things in there stay calm & follow these steps: • Read your directions again before contacting Lynne • Try again • If still no luck, then contact Lynne on her mobile BUT ONLY IF THIS IS DURING AN ACTUAL SESSION. Please be patient – the phone may be engaged as she is possibly assisting another student. • For help setting up Blackboard Collaborate prior to the session or at any other time, contact Lynne on lynne@coonarahouse.org.au or message her through the wiki. • For help getting into the online classroom during a session, phone 0407 856 044.
If you miss a session Common courtesy applies as for every other class. Please email your tutor to let her know. If you miss a session and there is an assessment completed during that session, you will need to contact your tutor and find out how you can complete that assessment on your own. It is your responsibility to catch up on what you missed! There will be a recording made of each online session and a link to it will be put up on the ONLINE CLASSROOM page on the class wiki. Don your headset, click on the link, type your name and email address in the spaces provided and you will be able to watch & listen to the whole session. You can fast-forward or backtrack at any time to repeat or skip sections.