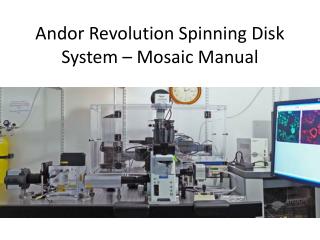
Nikon Spinning Disk
Nikon Spinning Disk. Imaging & Training Support. Find your cells with DIC in Live Preview. The green DIA Lamp, used for DIC, should be on. 2. Condenser Analyzer - must be “in” (i.e., green light is on) 3. Light Path – switch to “eye”

Nikon Spinning Disk
E N D
Presentation Transcript
Nikon Spinning Disk Imaging & Training Support
Find your cells with DIC in Live Preview The green DIA Lamp, used for DIC, should be on. 2. Condenser Analyzer - must be “in” (i.e., green light is on) 3. Light Path – switch to “eye” 4. Filter – Switch it to the “open” position 5. Shutter – Flip 1st switch up on shutter controller box. *Note: This one sticks sometimes. If no light, flip it off then on again.
Find your cells with DIC in Live Preview Tell software that you are using the CoolSnap camera for Live Preview - Select “Camera” option - Select “Select Camera” - Click “OK” by camera 6. Find cells - Use knob on scope for coarse adjustment - Use box with dial for fine - Joystick moves the stage
Find your cells with FL in Live Preview 1. Turn DIC off on shutter box 2. Turn on FL on shutter box (2nd switch) Select filter cube you want to use Turn on PF 5. Turn off analyzer
Find your cells with FL in Live Preview Tell software that you are using the Cascade camera for Live Preview - Select “Camera” option - Select “Select Camera” - Click “OK” by camera Select Live Preview Click Ludl Filter Wheel 1 - Select the lasers you will use Click AOTF - The AOTF must match the Ludl Filter Wheel selection. - Once you hit AOTF, cells are illuminated
Find your cells with FL in Live Preview • Notes: • Live Preview window is small. Go to “Zoom In” and select it one time. *DO NOT MAXIMIZE THE WINDOW. • Leave on “Auto Enhance Contrast”. • Select Exposure time (i.e., 100 for dim or 600 ms for bright). • You can make adjustments to the histogram (i.e., white & black points). • DO NOT ADJUST GAMMA. It should be at 1.00. • Once the Perfect Focus is on, you must use the dial on the PF box to make final focus adjustments. • Stop the Live Preview when you are ready to run your script.