Download
1 / 38
380 likes | 419 Vues
This PowerPoint demonstration serves as a guided tour of the PubMed interface, particularly focusing on how to use the My NCBI facility for personalized searches and saved results. Learn how to register, set filters, save searches, and manage saved results efficiently.

E N D
MODULE 4 How to use PubMed Part 5 – My NCBI Instructions This part of the course is a PowerPoint demonstration intended to give a guided tour of the PubMed interface. This part of the module is off-line and intended as an information resource for reference use. This part of the module should be taken before using the live tutorial on the PubMed and does not required a HINARI training password.
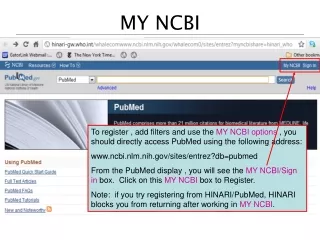
Before logging into PubMed, you must Login to the HINARI website using the URL http://www.who.int/hinari/
HINARI Log-In 2 You will need to insert your HINARI User Name and Password in the Login box and click on the Login button.
From the main HINARI webpage, you can access PubMed by clicking on Search HINARI journal articles through PubMed (Medline).
Welcome to the PubMed Homepage. Part 5 of the tutorial will look at the My NCBI facility.
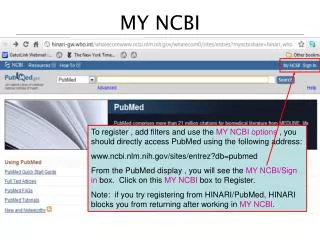
To access My NCBI, there are [Sign In] [Register] options on the top right-hand side of the webpage. We will now Register for My NCBI.
We now have to fill in a short Registration page. We will need to select a Username and a Password. Make sure this is written down for future reference. We will also need to set up a security question in case we need to ask PubMed to supply us with a new password.
An e-mail address is required. When completed, click on Register.
We will receive a confirmation e-mail from NCBI. When we receive the e-mail, we will need to click on the link in the body of the e-mail message to verify our new My NCBI account.
To access My NCBI, we will need to Sign In with our Username and Password
We enter our Username and Password into the boxes and click on the Sign In button
When we are signed into My NCBI, our Username appears in the My NCBI box.
To set up filters in My NCBI, enter My NCBI by clicking on the hyperlink.
Once in My NCBI, choose the Filters option from the left-hand menu.
Commonly requested filters are listed on the filter selection page. When we choose a filter, My NCBI will refresh and apply the filter. In this example, we will choose the Free Full Text Filter.
In this example, the Free Full Text Filter has been applied – see check in box.
HINARI Within the Search Filters option, enter HINARI in the search box and press Go.
Filters matching our Search will appear below. We click on the matching filter to apply it to our My NCBI account.
Check the box next to Add a result tab for all items that match this filter.
The filter will now be applied. Now, return to PubMed to see the new results tabs.
We have now done a search for Public Health Policy. There are now three results tabs – All, Free full text, and HINARI. Note: These three tabs are the default configuration when completing a HINARI/PubMed search.
When we click on the HINARI tab, we can now access the whole result set. Via the Abstract Display, you will see a HINARI icon.
If we would like to save the search, we can do so by clicking on the Save Search hyperlink.
We now have the option to save the search either with or without automatic e-mail updates. In this example, we will choose No automatic updates and click OK.
We can now run a new search. We will choose to Save Search in My NCBI.
This time we have chosen to save the search and receive regular e-mail updates. We can choose some options for e-mail delivery.
The first option is delivery day. From the dropdown menu, this can be either daily, weekly, or monthly on a specified day.
From the dropdown menu, we can also specify the record display format from the standard PubMed Display options.
We can also specify the record format as either HTML or Text. HTML e-mails will contain hyperlinks back to PubMed.
From the dropdown menu, we can choose a Maximum number of items to send per update between 0 – 500. Once we have chosen the number of records, click the OK button.
When we enter the My NCBI area, we can see a list of our saved searches. From this page, we can re-run a search by clicking on the appropriate box.
We also can alter the delivery details by clicking on the Details icon.
We also can see what has been added to PubMed for selected searches. We can delete saved searches if they are no longer required.
This is the end of Module 4 Part 5. There is a workbook to accompany this part of the module. The workbook will take you through a live session covering topics included in this demonstration with working examples. Updated 07 2007