Download
1 / 6
110 likes | 728 Vues
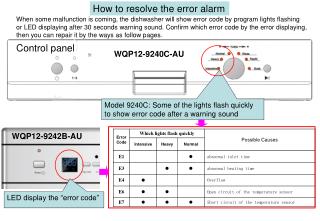
How to resolve the error alarm. When some malfunction is coming, the dishwasher will show error code by program lights flashing or LED displaying after 30 seconds warning sound. Confirm which error code by the error displaying, then you can repair it by the ways as follow pages. Control panel.

E N D
How to resolve the error alarm When some malfunction is coming, the dishwasher will show error code by program lights flashing or LED displaying after 30 seconds warning sound. Confirm which error code by the error displaying, then you can repair it by the ways as follow pages. Control panel WQP12-9240C-AU Model 9240C: Some of the lights flash quickly to show error code after a warning sound WQP12-9242B-AU LED display the “error code”
E1 : abnormal inlet time How to do: Turn on the dishwasher and run it, the dishwasher will drain water for 60 seconds, then enter the water, you can hear the sound of water entering to judge if there was any water entering in in the tub: Hang up it correctly, and it is not blocked or kinked Drain hose hang fault There was some water entering in Make sure it is connected firmly Wire connection of flow-meter is loose Make sure it is connected firmly Wire connection from drain pump to PCB Malfunction of flow-meter, drain pump, or PCB Replace the fault element Wire connection of PCB and inlet value is loosing Make sure it is connected firmly There was not any water entering in Open it The water tap is not open Replace the fault element Malfunction of aqua-stop, inlet value, or PCB 3. Drain hose hang fault, make sure drain hose is not blocked or kinked; √ 1.Make sure the water tap is turn on and the water pressure is normal (0.04~1.0Mpa). 2. AQUASTOP is fault; replace it (only for the dishwasher with AQUASTOP device)
E1 : abnormal inlet time How to check the wire connection: Check the wiring between flow-meter , inlet value , drain pump and PCB, make sure they are connected firmly and correctly. 4. Check the wiring between flow-meter , inlet value and PCB 5.Check the wiring between drain pump and PCB Wire connection of flow-meter, 9240 is marked “P0&FM” , 9242B is marked “FM” on PCB Connection to drain pump flow-meter terminal Wire connection of Inlet value, marked “EV1” Wire connection of Inlet value
E3 : abnormal heating time How to do :First open the door, check if the water is hot or cold after E3 alarm: The temperature sensor is not contact with the bottom of tub Make sure it contact well with the bottom of tub The water in tub is hot Malfunction of temperature sensor Replace the temperature sensor Malfunction of PCB Replace it Replace it Malfunction protect switch The wire connection between PCB and heating element is loose Make sure they connected firmly The water in tub is cold Replace it Malfunction of theheating element Malfunction of protect switch Replace it Replace it Malfunction of PCB protect switch Make sure it contact well with the bottom of tub Check the connection in heating element (heat) (without protect switch) Check the connection in PCB (heat) Check the connection in heating element (heat) (with protect switch)
E4 : Overflow First check if there is any water in the bottom tray: Find out where is leaking, replacing the leaking element There is water in bottom tray some connect pipes, drain pump or washing motor is leaking The float is blocked, it make the micro-switch acting Make sure the float is not blocked There is no water in bottom pan Marked “IASQ” on PCB, make sure the terminals and wire are connected firmly. Confirm connection of micro-switch and PCB are connected tightly and correctly Make sure the terminals and micro-switch are connected firmly and correctly. Make sure the float is not blocked bottom tray float
E6 : Open circuit of the temperature sensor E7 : Short circuit of the temperature sensor How to repair: First, replace the temperature sensor, if it no use, then check the wire terminal connection, make sure they are connected firmly, if it still no use, replace the PCB. Malfunction of temperature sensor Replace it Malfunction of PCB Replace it Make sure it connected firmly The wire connection from temperature senor to PCB is loose Here marked with “RE” Make sure the terminals are firmly connected Make sure the terminal of temperature sensor is firmly connected