Comprehensive Guide to Drawing and Trimming Circles in CAD
This guide provides step-by-step instructions on creating and modifying circles using CAD software. It covers the principles of establishing center points, defining radii, and trimming lines for precise designs. Learn how to incorporate tangents and offsets for accurate alignment, and utilize OSNAP tools for efficiency. Each page details specific actions, including drawing circles of varying sizes, creating intersections, and applying cutting lines. This resource is ideal for enhancing skills in technical drafting and improving workflow in CAD projects.

Comprehensive Guide to Drawing and Trimming Circles in CAD
E N D
Presentation Transcript
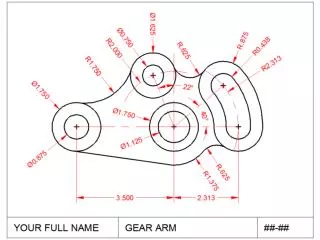
Page 1 1. Circles (2), center point 2.5, 4 .4375 radius & .875 radius Line, start 2.5, 4. 3.5” length 2. Circles (2), center point (right end of line) .5625 radius & .875 radius Line, start (center of circle). 2.3125” length 4. Circle, center point (center of middle circle) 2.3125” radius 3. Circles (2), center point – end of line .4375 radius & .875 radius (or copy 1st set)
Page 2 5. Line, start – center point of middle circle. type: @2.5<40 6. Circle, center point – intersection of line/big circle .4375 radius & .875 radius (or copy circle on the right) 8. Circles (2), center point of middle circle 1.4375 radius & 3.1875 radius (or use OSNAP Center and Tangent) 7. Delete big circle and lines
Page 3 X X X 9. Trim, Cutting lines – red, Trim X on blue lines. 10. Trim, Cutting lines – red, Trim X on blue lines. X X 12. Trim, Cutting lines – red, Trim X on blue lines. 11. Circles (2), center point of middle circle 1.875 radius & 2.75 radius (or use OSNAP Center and Tangent)
Page 4 X X 13. Trim, Cutting lines – red, Trim X on blue lines. 14. It should look like this 16. Offset line .75” Circle, center point of middle circle, 2” radius 15. Line, start at center of middle circle 2.5” length.
Page 5 17. Circles (2), 8125 radius & .375 radius. 18. Delete red circle and lines 20. Line from circle to circle. Clear all OSNAPs – use OSNAP Tangent only 19. Circle, 1.375 radius
Page 6 X X X 21. Circle Tan Tan Radius 1.75” radius Pick tangents on Xs 22. Trim, Cutting lines – red, Trim X on blue. X X X X X X 24. Trim, Cutting lines – red, Trim X on blue. 23. Circles (2) TTR .625” radius Pick tangents on Xs
Page 7 X 25. Trim, Cutting lines – red, Trim X on blue. 26. Circle, 2” radius. Lines – use OSNAP Midpoint 27. Trim to resemble above, change to a centerline 28. Circle, 2.3125” radius, Trim using blue circles Change to a centerline.
Page 8 29. Should resemble above. 30. Add Center Lines, then add dimensions as shown on first slide.