Download

1 / 20
200 likes | 219 Vues
Learn how to configure a subnet of 8 IPs using a helpful online calculator. Follow step-by-step instructions to set up gateway, subnet mask, and more on the ST605M modem. Enable Telnet on Vista and Windows 7 and disable NAT for enhanced networking capabilities.

E N D
Calculating The Subnet of 8IPs • To calculateSubnets of 8 IPs go to http://jodies.de/ipcalc • This website enables you to calculate different ranges • Ex: /29, /30
Dissecting the Website • We will take the Following IP as an Example and we will dissect the results given by the website. (http://jodies.de/ipcalc) 89.108.171.56/29
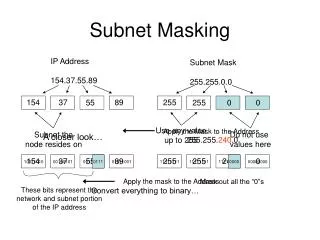
In the first Rectangle you need to enter the Real IP. (In this case 89.108.171.56) On the second Rectangle you have to specify the range. (in this case /29) After entering these two figures you have to Click on “Calculate” and wait for the results Results
Defining the IPCalc Results This is the Network ID (Never Used) This is the Subnet Mask (Should be Configured on the modem with the Gateway) This is the Broadcast IP (Never Used) This is the Gateway (Should be Configured on the modem with the Subnet) This is the Gateway (the first IP that can be used by the customer) This is the last IP that we can use This is number of IPs that the customer can use in a defined range
Go to “Internet Explorer”, enter the “192.168.1.254”, • On the Left you have the “Menu”, select “Office Network”, • Select “Interfaces”, and it will show on the middle of the Page. • Below The interfaces Select the Local Network (in this case “Lan1”)
When you select the “Local Network” (in this case “Lan1”) • You will be redirected to another page showing the “TCP/IP Configuration” • On the upper right you need to select “Configure” to be redirected to the configuration page.
First you need to enter “The Gateway” and the “Subnet mask” and then click “Add” • Delete the 10.0.0.138/24 Gateway (You can proceed as well without deleting it) • You need to disable the “DHCP Server” by unmarking it. • Then click “Apply” to save your changes
Enabling “Telnet” onVista & Win7 • On Vista: • Start • Control Panel • Programs and Features • Turn Windows Features On or OFF • Select “Telnet Client” • Then OK • On Windows 7: • Start • Control Panel • Programs • Programs and Features • Turn Windows Features On or OFF • Select “Telnet Client” • Then OK
Disabling the “nat” Open Command Prompt • Start Run CMD (WinXp) • Start Start Search CMD (Win Vista) • Start Start Search CMD (Win 7) On the CMD page Write: • Telnet 192.168.1.254 (Enter) • Username: Administrator (Enter) • Password: (Empty) (Enter) (The Username and Password must be Identically like the ones stated on the modem) • {Administrator}=> nat flush (Enter) • {Administrator}=> saveall (Enter) (Must be in lower case or it will give you “Unknown Command”)