Team 5 3D Braille Display
Team 5 3D Braille Display. Steven Chao Kodai Ishikawa Daniel Olbrys Terry Pharaon Michael Wang. Sponsor: MSU Resource Center for Persons with Disabilities & Dr. Satish Udpa Facilitator: Dr. Tongtong Li. Background. Braille printers, 3D printed Braille, Braille displays

Team 5 3D Braille Display
E N D
Presentation Transcript
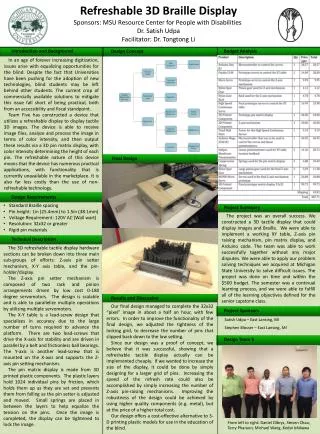
Team 53D Braille Display Steven Chao Kodai Ishikawa Daniel Olbrys Terry Pharaon Michael Wang Sponsor: MSU Resource Center for Persons with Disabilities & Dr. Satish Udpa Facilitator: Dr. Tongtong Li
Background • Braille printers, 3D printed Braille, Braille displays • Currently, there are no refreshable 3D displays for the blind • Lack of resources for blind students • Some uses: 3D waveforms and curves, maps, pictures, etc.
Problem Statement Develop a system able to: Receive image files Process said images Output results via pin matrix display
Design Specifications • Understanding design parameters • Providing explicit information about the requirements of the products • Why the design is built this way • Importance of design specification based on usage • Most important to lease important design specification
Design Considerations: Pin Movement • Push Up: • Initially set down (reset down) • During pin setting, must maintain set height • Must be locked into place during use • Pull Down: • Initially set/reset up using springs • Pulled down by attached wires • Will maintain set height, provides resistance to touch, fast refresh rate • Difficult to coordinate individual rod control, very complex, not very robust
Design Considerations: Pin Type • Smooth Rods • Must maintain set height, and needs a locking mechanism for use • Easier to design and manufacture, variable pin height • Difficult to hold in place • Notched Rods • Notches will allow easier locking, with the downside of quantifying pin heights • More difficult to design, but more effective with locking mechanism
Design Considerations: Locking Mechanism • Sliding Plate • Easier to implement, but necessitates uniform locking of pins • More uniform distribution of locking resistance to each pin • External Compression • Series of panels with pins interspaced • Hard to implement, but allows a row-by-row locking of the pins
Design • Refreshable Display • Z Axis pin mechanism • X-Y Axes controlled by step motors, gears move pin mechanism into place to raise pin • Smooth pins • Pins held in place via friction • Max height of one inch • Controlled by Arduino • Receives processed “image” over USB and begins pin setting routine
Current Progress • Small array – 4 x 4 • Test different pin characteristics • Material • Shape • Single Pin actuator • Step Motors
End Semester Goals • Large Array – 64x 64 pins • Big enough for entire hand • Parallel Operation – Multiple Pin Actuators • Increase speed of image creation • More countable height levels • Higher resolution • More advanced images
Software • Convert image to grayscale • Resize image • Normalize image • Convert pixel intensity into a corresponding height • Send data to Arduino through serial USB
Budget • 3D Printed Components - $150 • Step Motors - $100 • Gears/Track - $40 • Arduino Uno R3 - $30 • Metal Pins - $30 Approximate Total: $350
Questions? Thank you for your time.