Download
1 / 10
100 likes | 205 Vues
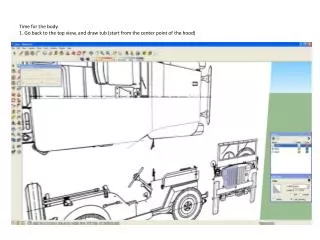
This comprehensive tutorial walks you through the detailed process of creating a Jeep body tub in 3D modeling software. Starting from the top view, you will learn to draw the tub, utilize offset tools, and manipulate lines for accurate shaping. The guide includes tips for tracing side views, creating components, and adjusting dimensions. You'll finish by adding essential details such as wheels, tires, headlights, and other features. Perfect for both beginners and experienced modelers looking to enhance their skills in vehicle modeling.

E N D
Time for the body.1. Go back to the top view, and draw tub (start from the center point of the hood)
2. Use the offset tool to quickly make a new set of lines to push/pull the tub with.
3. Draw two short lines, and delete the side of the offset that isn’t required. 4. Copy/move the new section away from the image.
6. Trace side view, starting in line with front edge of door. Get arcs as accurate as possible, but don’t stress if it’s not perfect.
7. Copy/move away from image, push/pull, and make components of side view and top view of tub.8. Make components. Move together, and scale side view of tub to fit top view.9. Explode, and guess what’s coming…Intersect tool again.10. Draw some lines around wheel-well, push/pull.
11. Keep filling in the back section… Give your wheel well some depth, and clean everything up.
12. Finish the floor, and give it some depth or thickness if you feel like it.
13. Create a second tub, scale to mirror, and bring together. Make a component, and bring to fit front of Jeep.14. Explode both components, intersect faces, clean-up where the two halves meet, and group.
15. Now, it’s time to add the details…wheels and tire, headlights, windshield, grill, bumpers, etc.