SFI Tutorial
SFI Tutorial. Tony Mack. What is SFI. SFI: the the command line client for SFA interfaces. SFA: minimal set of interfaces and data types that permit the federation of slice-based network components. Registry Interface Slice Interface Component Aggregate Slice Manager. SFA Interfaces.


SFI Tutorial
E N D
Presentation Transcript
SFI Tutorial Tony Mack
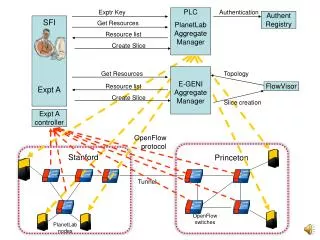
What is SFI SFI: the the command line client for SFA interfaces. SFA: minimal set of interfaces and data types that permit the federation of slice-based network components. • Registry Interface • Slice Interface • Component • Aggregate • Slice Manager
SFA Interfaces Registry Interface - Manage Records • Add • Update • Remove • Show • List Slice Interface - Manage Slices • Resources • Create • Delete • Start • Stop
Current Aggregates PlanetLab (PLC) PlanetLab Europe (PLE) PlanetLab Japan (PLJ) VINI GpENI
Installing SFI [myplc] name= MyPLC baseurl=http://build.planet-lab.org/planetlab/f8/pl-f8-i386-4.3-k22-latest/RPMS/ enabled=1 gpgcheck=0 Fedora RPM Installation • Add yum repository • Install sfa-client $ yum install sfa-client Install from source $ svn export http://svn.planet-lab.org/svn/sfa/trunk sfa $ cd sfa/trunk/sfa && python setup.py install
Configuring SFI $ mkdir ~/.sfi • Create sfi directory • Install private key # username is email without domain $ cp ~/.ssh/id_rsa ~/.sfi/<username>.pkey # remove passphrase from key $ ssh-keygen -p -f ~/.sfi/<username>.pkey • create config file ~/.sfi/sfi_config SFI_AUTH='plc.princeton' SFI_USER='plc.princeton.tmack' SFI_REGISTRY='http://www.planet-lab.org:12345/' SFI_SM='http://www.planet-lab.org:12347/'
Add Record <record description="Test description" hrn="plc.princeton.tmacktestslice" type="slice" url="http://planet-lab.org/" <researcher>plc.princeton.tmack</researcher> <researcher>plc.princeton.llp</researcher> </record> • Slice record template • Add the record to the Registry $ sfi.py add slice-record.xml
Update Record $ sfi.py update slice-record.xml
Display Record $ sfi.py show plc.princeton.tmacktestslice • Show detailed record information peer_authority: None hrn: plc.princeton.tmacktestslice last_updated: 20100625T18:42:41 authority: plc.princeton gid: hrn: plc.princeton.tmacktestslice urn: urn:publicid:IDN+plc:princeton+None+tmacktestslice uuid: 98680966165612911378858199233917520628 date_created: 20100625T18:42:41 type: slice researcher: ['plc.princeton.tmack']
Listing Records $ sfi.py list plc • List all records at a specific level in the hierarchy plc.iss (authority) plc.cesnet (authority) plc.princeton (authority) $ sfi.py list plc.princeton plc.princeton.planetlab-01 (node) plc.princeton.tmack (slice) plc.princeton.tmacktestslice (slice)
Get Available Resources $ sfi.py resources -o nodes.rspec <?xml version='1.0' encoding='ASCII'?> <RSpec type="SFA"> <network name="plc"> <site id="s13"> <name>Princeton</name> <node id="n10025"> <hostname>alice.cs.princeton.edu</hostname> <bw_limit units="kbps">10000</bw_limit> </node> <node id="n10328"> <hostname>planetlab-9.cs.princeton.edu</hostname> <bw_limit units="kbps">10000</bw_limit> </node> ...
Get Allocated Resources $ sfi.py resources plc.princeton.testslice -o slice-nodes <?xml version='1.0' encoding='ASCII'?> <RSpec type="SFA"> <network name="plc"> <site id="s13"> <name>Princeton</name> <node id="n10025"> <hostname>alice.cs.princeton.edu</hostname> <bw_limit units="kbps">10000</bw_limit> </sliver> </node> <node id="n10328"> <hostname>planetlab-9.cs.princeton.edu</hostname> <bw_limit units="kbps">10000</bw_limit> </node> ...
Allocate Resources Pt. 1 • Modify RSpec by hand (adding the <sliver/> tag) • Use client tools Using Client Tools • Get available resources $ sfi.py resources -o nodes.rspec • Create a text file of hostnames $ sfiListNodes.py -i nodes.rspec -o nodes.txt • Remove/Add nodes to/from text file • Create an RSpec with requested resource allocations $ sfiAddSliver.py -i nodes.rspec -n nodes.txt -o mynodes.rspec
Allocate Resources Pt.2 $ sfi.py create plc.princeton.slice mynodes.rspec • Create the slice on the specified resources • Check it $ sfi.py resources plc.princeton.slice • You can use 'sfi.py create' to deallocate resources as well. Just create an RSpec with only the resources you want and execute create again.
Deallocate All Resources $ sfi.py delete plc.princeton.slice
Other Calls • Stop a slice $ sfi.py stop plc.princeton.tmacktestslice • Start a slice $ sfi.py start plc.princeton.tmacktestslice