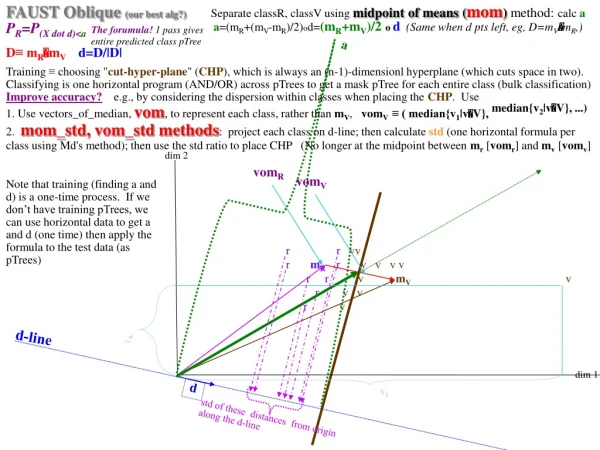
Download

1 / 54
550 likes | 724 Vues
Group 12 Jason M ersch V ictor M orales V ictor R obles D anielle A nderson. ParkBot. Project Overview. Autonomous valet parking vehicle with search, park, and return functionality Provides a low cost solution to automatic valet parking with potential use in real world vehicles

E N D
Group 12Jason MerschVictor MoralesVictor RoblesDanielle Anderson ParkBot
Project Overview • Autonomous valet parking vehicle with search, park, and return functionality • Provides a low cost solution to automatic valet parking with potential use in real world vehicles • Cars with this functionality would have their own designated row of spaces
Requirements • Front-end parking • Cardboard surface with no incline • Avoid objects in path • Park in space without colliding with neighboring cars • All parking spaces uniform and designated • Return to drop-off position • Low cost to implement • Simulate potential real world environment • Battery powered
Specifications • Minimum RC car dimensions: 15”L x 13”W • Max Speed: 6 mph • Max search and park time: 5 minutes • Max pull out and return time: 5 minutes • Parked front end clearance: 3 in • Safe distance from obstacle during park search mode: 3 in (formerly 10 in) • Max cost: $400.00
Components Overview • RC car platform • DC motor for forward and reverse propulsion • Motor speed and motor direction control • Steering servo for left and right maneuvers • LCD Display • Power Supplies • Transmitter/Receiver pair • Obstacle avoidance sensors • Microcontroller
RC Car • Requirements: • Needed an electronic speed control module (ESC) w/attached motor to control the motor speed and direction . • ESC needed to be easy to interface with an Arduino microcontroller. • Needed 3-wire steering servo motor for easy interfacing with an Arduino microcontroller. (some, believe it or not, came with 5-6 wires) • Needed to have a large enough chassis to support multiple battery packs, obstacle avoidance sensors, and PCB. (minimum: 15” L x 10” W)
RC Car Comparison • Option 1: Ready-to-run (RTR) car • Left/Right /Center steering (not proportional) • Large and fit budget, but did not have desired ESC for controlling motor speed and direction • Option 2: Hobby grade RTR car • Fully proportional steering • ESC for motor control • Large enough to fit all essential components on chassis, full function, fit budget • Purchased: Duratrax Evader EXT • Dimensions: • Length: 16.1” • Width: 12.9” • Height: 6.6”
Motor • Utilize existing motor in R/C car • Model: Duratrax Photon Speed 20 • Operating voltage: 7.2 v – 8.4v • Max speed: Up to 30 mph
Motor Control • Requirements: • Needed to control the motor’s forward and reverse direction • Needed to control the motor’s forward and reverse speed • Speed to be kept under 3 mph for accurate movement • Needed to support current draw of motor • Motor start-up could potentially meet or exceed 20 A.
Motor Control Options • Option 1: Implement H-bridge IC • Easy interfacing with Arduino microcontroller. • H-bridge IC’s that supported up to 20 A per channel cost up to $50 • Option 2: Use existing ESC on RC car • Model: Duratrax Sprint ESC with reverse • Maximum constant current for forward 128 A & for reverse 64 A • Easy interfacing with Arduino microcontroller. • Chose to utilize existing ESC
Dynamite Tazer 15T • Specifications: • Operating Voltage: 4.8– 8.4 V • Controls forward and reverse movement • Peak current 700 A • Continuous current 110 A • Designed for 20 – 27 turns motors • Dimensions: • Length: 1.7” • Width: 1.5” • Height: 1.1”
Steering Servo • Use RC car’s existing servo • Operating Voltage: 6V • 3-wire servo motor • Speed 0.20 sec/60 degrees • 128 oz-in torque
LCD Display • Requirement: • Display currently running function for viewing • Description: • Character Display • White text on blue background • Backlight • Standard Hitachi HD44780 controller • 16 characters wide x 2 columns • Utilize six data lines (D4 – D7 )
Transmitter & Receiver • Motivation: • Basic functionality • Send signal to begin parking spot search • Send signal to pull out of parking spot and return to point of origin • Allows for expansion if different wireless features want to be added
Transmitter & Receiver Methods Considered • Bluetooth • Too expensive to implement • Infrared • Poor range, line of sight • Wi-Fi • Components needed to implement system are too large • Chose: RF • Good range • Easy to implement on microcontroller chosen • Inexpensive
RF Transmitter • MO-SAWR-A • Transmits at a frequency of 315Mhz • Range up to 500 ft. • No line of sight needed for transmission • Common in car alarm remotes, beepers, and many similar devices • Operating voltage: 2 to 12v
RF Receiver • MO-RX3400-A • Receives signal at 315Mhz from RF transmitter • Range of up to 500 ft. • Common in car alarm remotes, beepers, and many similar devices • Operating voltage: 5V • Current draw: 2.3 to 3 mA • Digital signal to to microcontroller for easy data processing
Sensors Considered • Infrared Sensors • Sharp IR GP2D12 Sensor • 450 –750 nanometer range of visible light • Covers a range of 10 to 80cm with a optimized distance of 24cm • Operating Voltage: 0.3 to 7 volts • Max current draw: 10mA • Imaging Sensors • TSL 1401 Linescan Imaging Sensor Daughterboard • 128-pixel sensor chip • 7.9mm focal length imaging lens • Operating voltage: 3.3 to 5 volts. • Max current draw: 5mA
Sensors Considered cont’d • Ultrasonic Sensors • Chose: Ping Ultrasonic Range Finder • Emit a short 40 kHz signal • Range 0.8 in to 118.8 in (3.3 yd) • Operating Voltage: 5 volts • Max current draw: 35mA
SensorsAdvantages and Disadvantages • Ultrasonic sensor • Fastest response time at 115 us up to 18.5 ms • Smallest at 0.84 in W x 1.8 in L • Best range at 0.8 in to 118.8 in • Infrared sensor • Poor range • Imaging sensor • Poor range • Slow response time • Expensive
Ultrasonic Sensor Considerations • The sensor must be mounted perpendicular to the floor for accurate performance • Echo-free environment for the most accurate readings • The object that the sensor will detect has to be large enough for the ultrasonic waves to deflect off of it
Ultrasonic Sensor Mounting • The small size of the sensors make it easy for mounting onto the frame of the car • There will be three sensors mounted on ParkBot one in the front and one on each side of the car • These sensors will be connected in series to keep the current draw low • Sensors will be mounted at different heights to determine optimal height
Power Supply • Decided to divide the power system of ParkBot into two separate power supplies: • One will power the drive motor and servo. • The other will power the remaining components. • Transmitter has its own power supply.
Voltage Regulation • Voltage regulation to 5VDC required for the following components • Microcontroller • Ultrasonic sensors (x3) • RF receiver unit • Rf transmitter unit • Decided to use a simple linear regulator for the power supply in order to power the components listed above. A LM7805 5VDC voltage regulator will be used. • Voltage Regulation to 6VDC required for the: • Servo system drive
Main Power Supply • Chose: Duratrax 7.2V Ni-MH 4200mAh rechargeable battery pack. • Will be directly connected to ESC module (no voltage regulation needed). • Will be connected to a LM7806 6VDC fixed voltage regulator to power the steering servo motor. • Was chosen based on the amp/hours and voltage needed to properly operate the other components for the minimum time specification. Electronic Speed Controller 7.2v Ni-MH LM7806 Voltage Regulator Steering Servo Motor
Secondary Power Supply • Chose: Chose: Digital Energy 9.6V Ni-MH 1600mAh rechargeable battery pack. • Will be connected to a LM7805 5VDC fixed voltage regulator to power Ultrasonic Sensors (x3), RF Receiver unit, and microcontroller unit. • Was chosen based on the amp/hours and voltage needed to properly operate the steering servo and rear motor for the minimum time specification. • About 1600mAh/152mA = 11 hours and 31 minutes • Good amount of battery life for testing and running LM7805 5VDC LCD 7.2v Ni-MH Microcontroller Ultrasonic Sensors (x3) RF Receiver unit
MCU Requirements • I/O pins needed: • 4 digital (for obstacle avoidance sensors and RF receiver) • 3 digital PWM (for DC motor control and servo control) • Open source • Well documented with online examples • Uses a familiar programming language • Sufficient memory and processing power • Operating voltage of 5V • Chose: Atmel ATMega328
MCU Specifications • Atmel ATMega328 • With ArduinoBootloader for use with the Arduino language • Arduino language based on C/C++ • Max frequency: 20MHz • 32KB of program space • 23 I/O Pins • Operating Voltage: 5V
Programming the MCU • Use a SFE FTDI USB to Serial Basic Breakout Board that interfaces with the MCU • Optimized to work with 5V Arduino boards and cloned 5V Arduino boards • Easy loading of code onto MCU through USB port on PC • Cheaper than buying USB to serial converter cable ($33 vs. $14)
PCB • We decided to purchase a punchboard and utilize the Aruduino layout for the Atmega328 microcontroller. • We soldered the PCB after successful testing of the implemented parts on the board • Optimized Arduino configuration will be used for maximum performance for our system • Size: 4.5" x 3.3
Testing Area Specifications • Our RC car is 1:10 Scale (scaled down to 1/10th the size of real world car) • Real World Measurements • Typical parking space • 240 in L x 120 in W • Dimensions of average mid-sized car • 185 in L x 70 in W • (120 – 70) / 2 = 25 inches in between parked car and left and right ends of parking spot. Multiply this number by 2 to get 50 inches in between the parked car and each of the neighboring parked cars. • Also there is an approximately 60 inch rear clearance assuming the car parks 5 inches away from the front barrier. • Scaled Down Testing Area Measurements • Dimensions of our RC car • 16.1 in L x 12.9 in W • In order to achieve 5 inch (50 / 10) clearance in between parked cars and a 6 inch rear clearance (60 / 10), parking spaces in the testing area will have the following dimensions (left and right ends of the parking spot will denote the side of the neighboring parked car, not the ends of the actual parking space): • 22 in L x 22.9 in W
Software Class Diagram ParkBot • intoccupiedSpotCount • Keeps track of the number of occupied left and right spots. Increments after each occupied pair of spots is detected • intopenSpotLocation • Set to 1 if a left spot is available, 2 if right spot is available, and 0 if spot is detected as occupied • Servo steerServo • Servo object that will represent the steering servo • Servo esc • Servo object that will represent the electronic speed controller • intoccupiedSpotCount • intopenSpotLocation • Servo steerServo • Servo esc + void moveForward(int milliseconds, int dir, int multiplier) + void moveForward(int milliseconds, int dir, int multiplier) + void straightenWheels() + void turnLeft() + void turnRight() + double timeToDistance(long sensorReading) + double getDistance(intsensorPin) + void searchForSpot(boolean search) + void park(intwhichSide) + void pullOutOfSpot(intwhichSide)
Motor and Steering Servo Functions • void moveForward(int milliseconds, int dir, int multiplier) • Moves ParkBot forward for a designated amount of time and in the given direction (0 = forward, 1=left, 2=right) • void moveBackward(int milliseconds, int dir, int multiplier) • Moves ParkBot forward for a designated amount of time and in the given direction (0 = forward, 1=left, 2=right) • void straightenWheels(), void turnLeft(), void turnRight() • These functions straighten out the wheels of ParkBot, turn the wheels of ParkBot to the left, and turn the wheels of ParkBot to the right, respectively
Obstacle Sensor Functions • double getFrontDistance(intwhichSensor) • This function will return the distance value read from whichever sensor is passed in the parameters. The parameter is the pin that the sensor is connected to on the Arduino • long timeToDistance(long sensorReading) • Sensor-read helper function. Takes in a time in microseconds (i.e. reading from an Ultrasonic sensor) and converts the time into a distance in inches (i.e. distance from nearest object to sensor). • According to Parallax's datasheet for the PING))) Ultrasonic sensor, there are 73.746 microseconds per inch. Also the sensor reading in microseconds is the total time, outbound and return, so we must divide by 2 to get the distance to the obstacle. This gives us the following conversion: distanceInInches = sensorReading / 73.746 / 2
Algorithm Functions • void park(intwhichSide) • Does the process of pulling ParkBot into a parking spot. If the whichSide parameter is 1, ParkBot will pull into the parking spot on the left side. If the whichSide parameter is 2, ParkBot will pull into the parking spot on the right side • void searchForSpot(boolean search) • Does the process of searching for an open parking spot if the search parameter is true. If the search parameter is false, this functions is used to return to the point of origin • void pullOutOfSpot(intwhichSide) • Does the process of pulling ParkBot out of a parking spot. If the whichSide parameter is 1, ParkBot will pull out of a parking spot that it pulled into on the left side. If the whichSide parameter is 2, ParkBot will pull out of aparking spot that it pulled into on the right side
Testing Scenarios • The following scenarios were mastered: • Spot available on left • Spot available on right • Future endeavors: • No spots available • Spot too small on the left • Spot too small on the right • Detect traffic when pulling out of spot