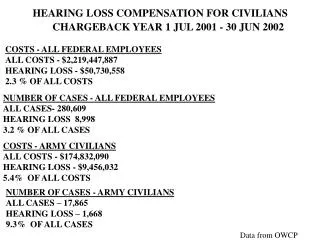
CRM: Creating Cases
100 likes | 195 Vues
CRM: Creating Cases. TKX U- Sales Training- Phase I. Step 1. Open a new Case. Select “New”, Select “Case”. Step 2. Select Customer and Customer Contact from lookup table (magnifying glass). In Title, use following naming format:

CRM: Creating Cases
E N D
Presentation Transcript
CRM: Creating Cases TKX U- Sales Training- Phase I
Step 1 • Open a new Case. • Select “New”, Select “Case”.
Step 2 • Select Customer and Customer Contact from lookup table (magnifying glass). • In Title, use following naming format: Branch Office (Select “SF”,”IS”, “SJ”, “Sac”, “OC”, “LA”): Type of Solution (Select same as “Revenue Type” within Opportunity OR “Tech Question): Name of Account: Due Date (Please refer to SA Matrix- Internal SLA) Example- SF: H-VoIP: Joria Inc: 7/15/08 • In Subject field, select “2: ICB Pricing” or “3: Other SA Request” from lookup table, Click “OK”
Step 3 • Select “Notes and Articles” tab, and click on “Click here to enter a new note…” • Enter description of request. • For loop pricing, enter address (incl. zip code) and NPA-NXX • For Hosted PBX loop pricing, include number of locations, number of total users, internet?, mpls? • Select “Save” icon on top tool bar, or Select “File” and then “Save” *Note: Every Case has a number (identified on the top with CAS-11111-11AAAA)
Step 4 • Select “Actions” from top toolbar within Case • Select “Assign” • Select the magnifying glass
Step 5 • Select “Queue” from “Look for” dropdown • Select “Solution Architect” from list • Click “OK” • Click “OK” again • Select “Save and Close” from toolbar
Step 5 (Continued…) • Quicktip: You can check to ensure it’s done correctly by selecting “Queues” from “My Work” on the left side toolbar. • Then select “Solution Architect” queue from middle toolbar • You will see your case in this queue as shown below
For Analysis Requests • Follow same process (Steps 1-6), except: • In title of Case, use following naming format: Branch Office (Select “SF”,”IS”, “SJ”, “Sac”, “OC”, “LA”): Name of Account: Due Date (Please refer to SA Matrix- Internal SLA) Example- SF: Joria Inc: 8/24/08 • In Subject field, Select “1: Analysis” from lookup table • Assign case to “Analysis” queue, rather than “SA” queue • All your documents should be in the “Connectivity Drive” on the shared drive • Open the “Proposals” folder • Open folder in the name of your Customer Account • Select invoices, which should be in pdf format (from fax or scanner) • Reminder: Remember that all information, worksheet, faxes regarding accounts should go in the Connectivity Drive => Proposals => Name of Account.