Introduction to ACEweb Online Registration Module for ACEware Webinar
450 likes | 545 Vues
Learn how ACEweb, the companion module for Student Manager package, enables online course registration. Customize site design, behavior, mailing list sign-ups, and more. Discover ACEweb requirements, templates, preferences, data sources, and display options. ACEweb offers features like e-commerce integration, instructor access, and email confirmations. Enhance user experience with customizable templates and seamless site transitions. Control group and course listings, display options, and group visuals. Create course listings, customize fields, and manage styles with ACEweb. Explore how to hide courses and groups from the web interface.

Introduction to ACEweb Online Registration Module for ACEware Webinar
E N D
Presentation Transcript
IntroductiontoACEwebOnline Registration Module An ACEware Webinar March 6th, 2008
…. GotoWebinar Orientation 1/3 To minimize the webinar panel click the Close Control Panel right arrow
…. GotoWebinar Orientation 2/3 To Restore the webinar panel click the Open Control Panel Left arrow
…. GotoWebinar Orientation 3/3 Have a question? Get an answer quickly by typing your question in the “Submit Question” section of the control pane. Send Click the send button and wait for an answer.
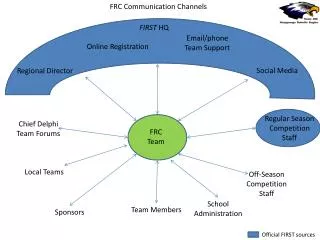
What is ACEweb? ACEweb is the companion module for the Student Manager package that lets you publish your course offerings on the Web, and allow your participants to view/register in them 24/7.
ACEweb Student Manager ACEweb reads data from Student Manager and displays it online for your participants to view. They can see what courses you offer and enroll online. Of course, you must have Student Manager installed and operational. The GREAT thing is that you DO NOT have to double enter info on your Web Site
ACEweb Features • You determine the “look and feel” of your ACEweb site (e.g. apply your site design, decide what is displayed, what special instructions you want, etc.). • You customize ACEweb behavior to meet your needs (set your course display options, user logon options, etc.). • Course Information reads directly from your Student Manager data, and any updates (in Manager ) will immediately display in ACEweb. • Users can sign up for your mailing list and register for your courses anytime! • Confirmations can be emailed to users--and notifications to staff--when they add themselves to your mailing list, request catalog information, and register in courses. • ACEweb offers many additional options that can be enabled such as course prerequisites, coupon discounts, and proxy registrations.
ACEweb Requirements • Student Manager Multi-User system and the Catalog Builder module (minimum configuration). ( List Price: $ 7,090 ) • Windows Web server running IIS. • The ACEweb server must have a network connection to the Student Manager server. • To do e-Commerce, you must have the Credit Card module and a payment gateway (e.g. PC-Charge, Touchnet, etc.). ( List Price (Std Module) - $1,295 ) • To allow instructors online access, you must have the Faculty Manager module. ( List Price: $ 595 ) • To email registration confirmations, etc., you must have an SMTP mail server that allows relaying from the ACEweb machine.
ACEweb Templates ACEweb comes with a set of HTML templates and style sheets that control the look and feel of the site. You will (of course) Put in YOUR logo and name
Customize Templates to Fit Your Needs • Use the default templates with your own logo. • Use the default templates with your own logo and color scheme. • Apply your design to the templates so users experience a “seamless” transition into the ACEweb site.
ACEweb Preferences Preferences are set in an INI file accessed via your web browser. Here is where you’ll set behavior options such as determining the grouping option to use, information shown in course listings, and sort order of listings. You’ll also enable behavior options such as allow waitlisting, firm billing, and alternate fee display.
ACEweb Data Data displayed on ACEweb comes from your Student Manager course screen.
ACEweb Info Tab Control Publish Properties and more on the ACEweb Info tab.
Group/Course Display Options ACEweb offers several course display options: • Display all courses in a list (best if you only offer a few courses at a time). • Categorize courses in a 1-level grouping format. When a user clicks a group link, the list of courses in that group is displayed. • Categorize courses in a 2-level grouping format. You have options … on how this will look
Group/Course Display Options • View courses by location and/or instructor. • Use static pages created by your web designer with some kind of “Register for this course” call that starts the registration process in ACEweb. ***IMPORTANT***ACEweb does not generate/update the static pages—your web designer must do this, so please note that this is a VERY labor-intensive option for him/her!!! This is NOT the recommended method
Controlling Group Display Control the display of group listings: • Standard option displays groups in a table format. You control the table colors using style sheets (included with ACEweb). • Graphical option displays an image and description for each group. You CAN have a class listed under MULTIPLE groups ( Set via Grouping Codes )
Course Listings • Course listings within a group are displayed in table format. You control what information is displayed in the table with an INI setting. Table colors are controlled in the style sheet. Default field listing Custom field listing “Style Sheet” refers to a method (for the end user) to change colors, fonts, etc on web pages.
Hiding Courses and Groups • Hide groups, locations, and courses from the web (e.g. you don’t want a contract course, a private residence, or your employee course group to display in the public listings). • You also have the option to display a course on the web but don’t allow users to enroll online (Publish Only/No Register option).
Course Information Page • You control display on the course information page*: • Pick data to include: • (i.e. course description • instructor link • location link • fees • hours, ceus, etc.). • Use “Tell a Friend. . “ to allow viral marketing.. • Customize the payment instructions (i.e. “A valid credit card …” message). *Other options such as “Enroll Someone Else “ and “Prerequisites” are discussed later in this presentation.
Student, Prospective Student, Customers… User Options Standard tasks users can perform via ACEweb: • View courses. • *Create an account (i.e. name record). • Add/remove themselves from your mailing/emailing lists. • Edit their personal information (i.e. address, phone numbers, interest codes, etc.). • Enroll in courses and make payment, change workshop enrollment (if course hasn’t started yet). • View their registration history (i.e. what courses they are enrolled in, grades/ceus/hours for completed courses). *You can disable online account creation, i.e. users must contact your office to set up an account (staff creates name record via Student Manager) before a student can enroll in courses online.
Controlling User Options You You You You • You control what fields are on the Person Info pages and what data is required. Note: some options may require editing the HTML template. • You determine how users pay. You can allow billings or require credit card payment. (This can be set on a course by course basis) • You determine whether credit card validation is done Real-time or if is done after the registration is submitted. • You determine what is displayed in the registration history pages, and if they are allowed to change their workshop enrollment after they enroll in the course.
Web Registration Process • The user brings up a course page. They have several options to do this: • Navigate through the course/group listing pages. • Search for courses. • Get a link (from another web page or in an email) to a specific course which takes them directly to the course information page. • The user clicks the Enroll Yourself button to start the registration process. AWESOME…. Lets you link to your registration system from ANY external Web page
Logging In • The Log In page opens for the user to log into the ACEweb site. If the user is already in your system, they enter the requested information and log into the system. If they are new, they click the Create Account button (i.e. create a new name record). After creating a new account, they continue the registration process. In case the student is forgetful
Enrollment Card Ask them for Marketing info • The user selects fee options on the Enrollment Card page (i.e. tuition fee, any optional fees, enter coupon code, select workshops). • The user clicks the Finish Registration button to continue the registration process.
Payment Details • The user enters the payment information then clicks the Submit button. If they are paying by credit card (and you are validating cards online), the validation process starts. IF you permit billing, that option would also display
Registration Confirmation • If the credit card validates, the Registration Confirmation page opens. Note: if the credit card does not validate, the user is notified (on screen), the payment is voided, and the registration is marked for deletion in the system. • If you have enabled the email options, a registration confirmation is also emailed to the user, and a copy is sent to the staff.
Coupon Discounts • Course Prerequisites and Related Courses • Event-type Courses • Waitlisting • Block Individuals from Enrolling Online • Supplemental Data • Proxy Registrations • Custom Pages • Express Registration Pages – One Stop Shop • Calendar Module ( Additional Fee ) ALL are included – No Cost (except calendar module)
Coupon Discounts – users enter a special coupon code (from a flyer, an email, special advertisement, etc.) -and receive a discount on registrations.
Prerequisites – (specify on the Prerequisites tab of Catalog screen). • Users view prerequisites but they are not enforced. • Prerequisites are enforced. Users can add prerequisite course(s) to the enrollment card prior to adding advanced course(s)—IF—prerequisite course(s) end before the advanced course(s) begins. • Prerequisites are enforced but users cannot add them to the enrollment card with the advanced course(s).
Related Courses – display related courses for a course as specified on the Prerequisites tab of the Catalog screen. Related Courses can be a link on the course information page or a list:
Event Type Courses – users can reserve multiple seats in an event (e.g. a reception where you just need numbers-not names).
Waitlisting – allow users to add themselves to the waitlist if a course is full. ( Can be set on a Course by Course basis )
Supplemental Data – collect additional information that is not part of the regular registration routine (i.e. t-shirt size, meal preference, etc.). The supplemental data page opens when the user clicks the Finish Registration button, before the Payment page opens.
Proxy Registrations – Lets you enroll other people… (e.g. mother enrolls her 3 children in a course and makes one payment for all 3 registrations). Cheryl Is enrolling Aaron in a course
Block Online Registration - the block is entered on their name record. • When the users logs into the ACEweb site, they will get the Registration Blocked page.
Calendar View – an additional module* that displays courses in a Calendar view. Click on the course link to view course information and enroll in it. * Optional Module Cost $ 995.
Custom Pages – create custom pages that display information in a different format, include special instructions, etc. For example, create a custom group page that displays additional information about courses you offer to a specific firm. • You can create custom: • Group Pages • Course Information Pages • Registration Confirmation Pages • Registration Confirmation Emails
Express Registration – create a "One Page" registration form with personal data, course fees, workshop selections (if applicable), and payment information. Gives your student a “one Stop Shop!” (great for Events/Conferences)
Instructor Access • You can allow you instructors online access to: • View/print course rosters • Email one or all registrants in a course • Save roster information to an Excel spreadsheet • View/print Attendance Sheets • Save Attendance Sheet information to Excel • Enter/edit registrants’ hours, grades, and credits
Controlling Instructor Access • Instructors use their Faculty Manager ID to log on, so you control which instructors have access. • You can also restrict access to Active Instructors only. • You control what instructors can do online with the ACEweb Access Levels. • Determine if instructors can view/email students with the View Student Email option on the Faculty record. 0 - No Access 1 - View Course Information Only 2 - View Rosters 3 - Edit Hours 4 - Edit Hours, Grade 5 - Edit Hours, Grade, Credits ACEweb Access Levels:
Instructor Access Process • Once logged in, view courses they are teaching. If they have permission, they also see the Gradebook section. • Instructors click a course link to see a roster. Or the Edit button next to the appropriate course to enter grades.
Instructor Access Process • Course Roster Options: • Organization determines what information is displayed in an INI setting. • Instructor can print the roster, or save it to an Excel spreadsheet. • Instructor can also view/print an Attendance Sheet, or save it to Excel.
Instructor Access Process • Gradebook Options: • By default, an instructor can enter/edit grades, etc. up to 30 days after the course ends. Organizations can edit that time limit if desired. • YOU determine which fields instructors can access (i.e. hours, hours and grade, or all 3)
Introduction to ACEweb • More information: • Visit the ACEweb Demo Website: http://www.aceware.com/wconnect/ace/home.htm The website has examples of most ACEweb options. Create students (add yourself), enroll in a course, receive sample confirmation notices. • Consult the SM_HELP guide • Contact your ACEware technician.
Questions? Upcoming Webinars…. Codes: Locus, Hocus, Pocus March 18th 2 PM CST Using ACEware Help – Using SM Help Tools March 20th 2 PM CST