TABLE OF CONTENTS
440 likes | 857 Vues
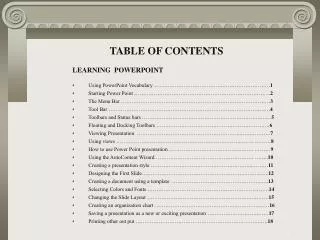
TABLE OF CONTENTS. LEARNING POWERPOINT Using PowerPoint Vocabulary ……..………………………….……………………… 1 Starting Power Point ………………………………………………………………….. 2 The Menu Bar ………………………………………………………………………… 3 Tool Bar ………………………………………………………………………………. 4 Toolbars and Status bars ……………………………………………………….……… 5

TABLE OF CONTENTS
E N D
Presentation Transcript
TABLE OF CONTENTS • LEARNING POWERPOINT • Using PowerPoint Vocabulary ……..………………………….………………………1 • Starting Power Point …………………………………………………………………..2 • The Menu Bar …………………………………………………………………………3 • Tool Bar ……………………………………………………………………………….4 • Toolbars and Status bars ……………………………………………………….………5 • Floating and Docking Toolbars ……………………………………………………….6 • Viewing Presentation …………………………………………………..…….……….7 • Using views ……………………………………………………………..……. ………8 • How to use Power Point presentation …………………………………..……. ………9 • Using the AutoContent Wizard ………………………………………………. ……..10 • Creating a presentation style ………………………………………….……...………11 • Designing the First Slide…………………………………………………..……...…..12 • Creating a document using a template …………………………………………..…..13 • Selecting Colors and Fonts ……………………………………………………..…….14 • Changing the Slide Layout ……………………………………………….…….…….15 • Creating an organization chart ……………………………………….………….……16 • Saving a presentation as a new or exciting presentation ……………….……….……17 • Printing other out put …………………………………………………….……….….18
Using PowerPoint Vocabulary Here are some terms in PowerPoint that are useful to know. Slide: An individual screen in a slide show. Presentation File: The file you save to disk that contains all the slides, speaker's notes, handouts, etc. that make up your presentation. Object: Any element that appears on a PowerPoint slide, such as clip art, text, drawings, charts, sounds, and video clips. You can refer to a clip art object, a text object, a title object, a drawing object, etc. Slide Show: A series of slides displayed in sequence. A slide show can be controlled manually or automatically. Transition: A special effect used to introduce a slide during a slide show. For example, you can fade in from black, or dissolve from one slide to another.
Starting PowerPoint • After clicking in start go up to PROGRAMS. • Then highlight Microsoft POWERPOINT.
The Menu Bar • This Menu Bar is to help out the user on the presentation. • For Example: How to save, open new presentation, add colors, and add charts and much, much more.
Toolbox • (X) the x stands for closing the presentation. • ( ) the box stands for restoring the presentation. • (--) the stands for minimizing the presentation.
The Toolbars and Status Bar • Each button in the toolbar and status bar contains pictures indicating their function.
Viewing Presentations There are five different ways to view your presentations in PowerPoint. As you become familiar with the PowerPoint views, you can customize the menus and add buttons to the toolbar to make it even easier and quicker to create presentations. The views are accessed by buttons (shown below) , which are located in the lower-left corner of your screen.
Selecting Colors and Fonts Changing the color scheme is more dramatic than changing the background color. Completing your color selection is the next step in customizing your presentation. There are two ways to change colors: use a preset color scheme, or customize your own. You can make changes to almost all parts of a presentation including notes and handouts. Customizing the Color Scheme 1. On the Format menu, click Slide Color Scheme. 2. Click the Custom tab, and then click the Background color scheme box. 3. Click Change Color, click a blue spot at the top of the hexagon, and then click OK. 4. Click Preview to see how the color will look. 5. Change the rest of the options under scheme colors as desired. 6. Click Apply to All to make the color changes to the entire document.
Using Views • Slide view is the easiest to use when you are designing your presentation slide by slide. • Outline view helps you organize your presentation in outline format. • Slide Sorter view shows your entire set of slides on-screen, so that you can check the order and completeness of your presentation. • Notes Page view presents the slides in miniature so you can add notes to each one for your presentation. • Slide Show view puts your presentation together so you can view it complete with sound and animation.
Using Views • The second one is the Outline View button.
Using Views • The second View button let user see the text for the slides. For example, on this occasion the user can see the first slide of this presentation. • User can now pre-view their slide when they are working in the text outline mont. • This let the user see how the slide will actually look. • This eliminated the continuously movement of back and fort will the work is being done.
12 • How to use the PowerPoint Presentation • When you first open the program, the PowerPoint dialog box presents four ways to • create a presentation: • AutoContent Wizard - This takes you steps by steps on a presentation building process. This presentation is done and one can take this presentation and edit the information of your tastes. However, the color, picture, and style are already select for the user. This is really helpful because it gives you an idea on how to start your presentation. This is the easier way to start your presentation. • Design Template- This starts you of with an existing design presentation. This presentation is not done, but it helps the user on the design a user can use. • Blank Presentation– You start from the beginning. • Open an existing-presentation allows you to modify a presentation that you or someone else has already created.
Using the AutoContent Wizard to create a presentation • On the File menu, click New. • On the Presentations tab, click AutoContent Wizard and click OK. • Click the Next button to move to Presentation type on the flowchart. • In the Select the type of presentation you're going to give list, click Generic. • Click Next to move to Output options on the flowchart. • How will this presentation be used? question, click Presentations, informal meetings, handouts, and then click Next to move to Presentation style on the flowchart. • What type of output will you use? question, click On-screen presentation. • Will you print handouts? question, click No, and then click Next to move to Presentation • options on the flowchart.
Creating a Document Using a Template 1. On the File menu, click New. 2. Click each tab to view presentation design templates and presentation wizards. 3. On the Presentation Designs tab, click high voltage.pot, and view the presentation template in the Preview window. 4. Click OK.
Blank Presentation 1. On the File menu, click New. 2. On the General tab, click Blank presentation, and click OK. 3. In the New Slide dialog box, click the upper-left page layout that shows two lines of text in the box, and click OK. 4. Close the presentation.
Creating a Presentation style 1. On the Format menu, click Apply Design. 2. Under Presentation Designs, click and preview several designs. 3. Click Notebook.pot, and click Apply.
Clip Art layout Note If you are in Slide View and would like to have access to a wider variety of clip art, insert the program's CD-ROM prior to double-clicking on the Clip Art area. 1. In Outline view, double-click Slide 2, The Congress. 2. On the Format menu, click Slide Layout. 3. Click Text & Clip Art (first column, third row), and click Apply. 4. Double-click Double click to add clip art.
Creating an organization chart Using the organization chart template you can quickly and easily create one. Creating a new slide for an organization chart 1. On the Insert menu, click New Slide. 2. Double-click the Organization Chart AutoLayout. 3. Click Click to add title. 4. Type House Organization Chart.
Creating an Organization Chart 1. Double-click Double click to add org chart. 2. In the Microsoft Organization Chart window, click the Manager button. 3. Type Speaker, press enter, and type Office of the Speaker. 4. Click the Select button.
Saving for the first time When you save the file for the first time, you should name the file as descriptively, but as briefly, as possible. Sometimes, you will want to name it as a particular version or as a type of presentation (i.e., Fall Open House or Technology Grant). Note Be sure to save to a location that makes sense and is easy to find. Saving a new document 1. On the File menu, click Save. 2. In the File name box, enter a relevant and specific name, to make it easy to identify the memo again. 3. Click Save. or . Press enter to save the file.
Printing Other Output You can print other types of presentation output using the Print what list. Handouts print two, three, or six slides per page. You may use Handouts to provide an outline of your presentation to your class. Notes pages print one slide per page and have room for your presentation notes. Outline view allows you to print the outline you used to develop your presentation.