Log into System
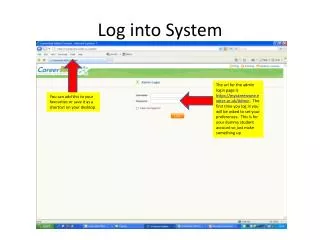
Log into System. The url for the admin login page is https://mycareerzone.exeter.ac.uk/Admin . The first time you log in you will be asked to set your preferences. This is for your dummy student account so just make something up. You can add this to your favourites or save it as a

Log into System
E N D
Presentation Transcript
Log into System The url for the admin login page is https://mycareerzone.exeter.ac.uk/Admin. The first time you log in you will be asked to set your preferences. This is for your dummy student account so just make something up You can add this to your favourites or save it as a shortcut on your desktop
My Career Zone Today Page This will take you to a view of the student site. Once in the student site select “admin” from the top right hand menu to go back The today page will show you all the main things that are happening in the system
The box will be selected active as default. If you do not want the event to show to students as you are still working on it, untick this box This will generally be set at today’s date but if you don’t want to publish this event to students till a later date then you can select the date you want to publish This will be the event start and end date and time. If you want your event to expire at a different date to the end date (eg. you want it taken off a few days before the end date) you can change the expiry date Provide a summary of your event here this will show to students when they are searching for events before they select the event and see the full details
Tick use booking. Select the number of participants able to attend the event. If there is no limit select unlimited. If you don’t want this event to be bookable online by students tick disable self-managed bookings. If you want your bookings to open after the publish date or close before the end date you can change this here. If you have an employer running an event you can add them here. If you want to show who is administering the event internally you can add them here. This will show to students. This will also pull the event into your CareerHub calendar Only really required if students are unable to book online or they need to contact someone re the event You can upload an attachment if reqd
Select an event type relevant to the event. It’s really important to select the best match for the event as these categories all map to the Exeter Award and Leaders Award. They will also be used for management information If applicable These are really set up for jobs so select all by selecting the first in the list, hold down shift, select the last in the list Student Preferences: When students first log into My Career Zone they are asked to set their preferences based on the service area they are interested in, the career they would like to pursue and the discipline they are studying. This does not restrict them viewing information in any of these categories but will pull relevant information onto their home page. If relevant to a certain career option select relevant one (of how ever many), if not, select all
If relevant to a certain discipline select relevant one (or how ever many), if not, select all Click to save – if the active box remains ticked then this will be advertised Straight on the student console and if Managed bookings is selected then Students will be able to book on from now!
Select the work group that is relevant Check this box