Mastering ISO and Shutter Speed in Photography
Understanding ISO and shutter speed is essential for capturing stunning photographs. ISO measures your camera's sensitivity to light; lower settings yield finer grain, while higher values allow for quicker shutter speeds in low-light conditions, though with increased noise. Shutter speed controls how long the camera's shutter remains open, affecting motion capture. To prevent shake, ensure shutter speeds are faster than 1/60s unless using a tripod. Learn to balance these settings for the ideal exposure whether shooting indoor events, nature, or fast-moving subjects.

Mastering ISO and Shutter Speed in Photography
E N D
Presentation Transcript
ISO In traditional (film) photography ISO (or ASA) was the indication of how sensitive a film was to light. It was measured in numbers (you’ve probably seen them on film – 100, 200, 400, 800). The lower the number the lower the sensitivity of the film and the finer the grain in the shots you’re taking. In Digital Photography ISO measures the sensitivity of the image sensor. The same principles apply as in film photography – the lower the number the less sensitive your camera is to light and the finer the grain. Higher ISO settings are generally used in darker situations to get faster shutter speeds (for example an indoor sports event when you want to freeze the action in lower light) – however theresultisgrainiershots.
ISO Most people tend to keep their digital cameras in ‘Auto Mode’ where the camera selects the appropriate ISO setting depending upon the conditions you’re shooting in When you do override your camera and choose a specific ISO you’ll notice that it impacts the aperture and shutter speed needed for a well exposed shot. For example – if you bumped your ISO up from 100 to 400 you’ll notice that you can shoot at higher shutter speeds and/or smaller apertures. When choosing the ISO settingask yourself the following four questions: Light– Is the subject well lit? Grain– Do I want a grainy shot or one without noise? Tripod– Am I using a tripod? MovingSubject – Is my subject moving or stationary?
ISO If there is plenty of light/ your subject is stationary andyou want little grain, you can generally use a low ISO rating. If it is dark, you purposely want grain, or don’t have a tripod and/or your subject is moving you might consider increasing the ISO as it will enable you to shoot with a faster shutter speed and still expose the shot well. Situations where you might need to push ISO to higher settings include: Indoor Sports Events – where your subject is moving fast yet you may have limited light available. Concerts – also low in light and often ‘no-flash’ zones Art Galleries, Churches etc- many galleries have rules against using a flash and of course being indoors are not well lit. Birthday Parties – blowing out the candles in a dark room can give you a nice moody shot which would be ruined by a bright flash. Increasing the ISO can help capture the scene. www.digital-photography-school.com
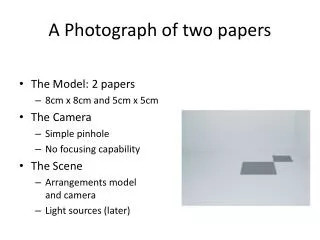
When using Manual Mode, two ways to control light: • Shutter Speed • Aperture
Shutter Speed The amount of time the shutter is open. Shutter speed is measured in seconds – or in most cases fractions of seconds. The bigger the denominator the faster the speed (ie 1/1000 is much faster than 1/30). In most cases you’ll probably be using shutter speeds of 1/60th of a second or faster. This is because anything slower than this is very difficult to use without getting camera shake. Camera shake is when your camera is moving while the shutter is open and results in blur in your photos. If you’re using a slow shutter speed (anything slower than 1/60) you will need to either use a tripod or some some type of image stabilization (more and more cameras are coming with this built in).
Shutter Speed When considering what shutter speed to use in an image you should always ask yourself whether anything in your scene is moving and how you’d like to capture that movement. If there is movement in your scene you have the choice of either freezing the movement (so it looks still) or letting the moving object intentionally blur (giving it a sense of movement). To freeze movement in an image you’ll want to choose a faster shutter speed and to let the movement blur you’ll want to choose a slower shutter speed. The actual speeds you should choose will vary depending upon the speed of the subject in your shot and how much you want it to be blurred.
Shutter Speed Motion is not always bad– For example when you’re taking a photo of a waterfall and want to show how fast the water is flowing, or when you’re taking a shot of a racing car and want to give it a feeling of speed, or when you’re taking a shot of a star scape and want to show how the stars move over a longer period of time. In all of these instances choosing aslowershutter speed will be the way to go. However in all of these cases you need to use a tripod or you’ll run the risk of ruining the shots by adding camera movement (a different type of blur than motion blur). Focal Length and Shutter Speed - another thing to consider when choosing shutter speed is the focal length of the lens you’re using. Longer focal lengths will accentuate the amount of camera shake you have and so you’ll need to choose a faster shutter speed (unless you have image stabilization in your lens or camera). The rule of thumb to use with focal length in non image stabilized situations) is to choose a shutter speed with a denominator that is larger than the focal length of the lens. For example if you have a lens that is 50mm 1/60th is probably ok but if you have a 200mm lens you’ll probably want to shoot at around 1/250.
Aperture The size of the opening in the lens when a picture is taken. Depth of Field: Range of sharpness in a photo (how much of the scene is in focus) DOF is changed by adjusting the aperture: Small aperture = more items in the scene are in focus (example, f 22) Large aperture = “fuzzier” photo (example, f 2.8) Another way to think of it: Small # f/stop (f/2.8) = Small (shallow) DOF = asmaller area in focus, with the main subject as the focal point. Large # f/stop (ie: f/22) = Large (greater) DOF = foreground and background in focus
Light • Light is to the photographer what words are to the writer. Light isolates, blends, emphasizes, de-emphasizes, reveals or reduces shape, enhances or hides texture, creates atmosphere and mood, and can direct or distract the viewer • Become an observer of the characteristics of light while wandering around. Learn how to read the light in photographs so that you can use techniques that you see and like in your own photographs.
Technical Characteristics of light 1. INTENSITY 2.QUALITY Hard light — Point sources: the sun; light bulb; electric flash, candle Creates a sharp line between highlights and shadows Soft light — Comes from broad sources — sky, rainy day, skylight, fluorescent Subtle lines between shadow and highlights. Smooth gradients 3.DIRECTION Emphasizes the shape and texture of the subject or object. Discover the direction of the light by looking at the shadows, which always point away form the light source. Front lighting — flat no shadows Side lighting — lights half the face Back lighting — light coming from behind; “rim” lighting
Technical Characteristics of light Natural light — sun or sky Morning/ Evening light — softer quality, longer shadows, sun at a lower angle, warmer colors Overcast lighting – can be easier to shoot in since there are less shadows to contend with. Less intensity and texture Midday sunlight – worst time of day to shoot if you can help it. Shadows fill eye sockets and face, often hot light on top of head and nose Available light — Light that is not from the sun or under the control of the photographer. Fluorescent light, light bulbs, stadium lights, street lamps, candles Can be hard or soft and it can come from any direction Using this light can be difficult sometimes because there may not be much of it, but using it can help preserve the feel of the environment in which you’re shooting Often have to work with very low amounts of light here....think high ISO, slow shutter speeds and wide open apertures to help Artificial light — Light which photographer controls, studio lights or electronic flash, flashlights, reflector.
Using Light to Make a Statement Mood Separate planes Imply depth Reveal character and texture Complement composition Direct attention Convey time of day or year All of the characteristics of light contribute to creating highlights and shadows in your photograph and these two elements are the major way of communicating shape, texture, and surface information to our reader. Control your light, don’t let it control you!
Composition Composition is the design of the image, how parts work together. It works secondary to the content, but is crucial to making a strong image. There are many fundamentals and guidelines to good composition, but often they can be broken. Sometimes they’re used in tandem or alone.
Compositional Devices Focal point – Every image must have one main attention-drawing place within it. Without a focal point the viewer’s eye will wander around the picture trying to figure out what the picture is all about. Rule of Thirds – Use this to avoid center of the frame syndrome. Foreground Framing – Creates an illusion of depth in a photograph by using objects or lines to frame other objects. Foreground/Background Relationships — Shows scale and depth. Leading Lines – Draws your viewer toward your focal point. Repeated Patterns – Repetition of form is pleasing to the eye and draws attention to your focal point. Try to fill your frame with the pattern then break the pattern with your focal point (usually a human).
Compositional Devices Camera Angle – Look for the unusual angle. Shoot high and shoot low. Go to extremes. The unusual angle will “force” your viewer to look at your picture a little longer. That’s what it’s all about. Choice of Lens and Selective Focus – Use shallow depth of field to control what you want to emphasize or play down in a photograph. (use deep depth of field when layering is working well) Vertical and Horizontal – Shoot both for visual variety and impact. We don’t see vertically, so shooting this way often forces us to see in a different way. Cropping — Do all the cropping you can in the camera – fill the frame! Simplify the picture - Minimum Distraction = Maximum Impact
Common Errors in Composition Bad backgrounds Empty foreground Weak focal points Avoid “back shots” Watch what is happening at the edges of the image Tell the story. Composition should aid the goal but be subordinate to it. Remember that composition is only one tool that we have to make great compelling pictures. The use of light, color and CONTENT will also contribute greatly, with composition to a great photo.