Download
1 / 10
130 likes | 243 Vues
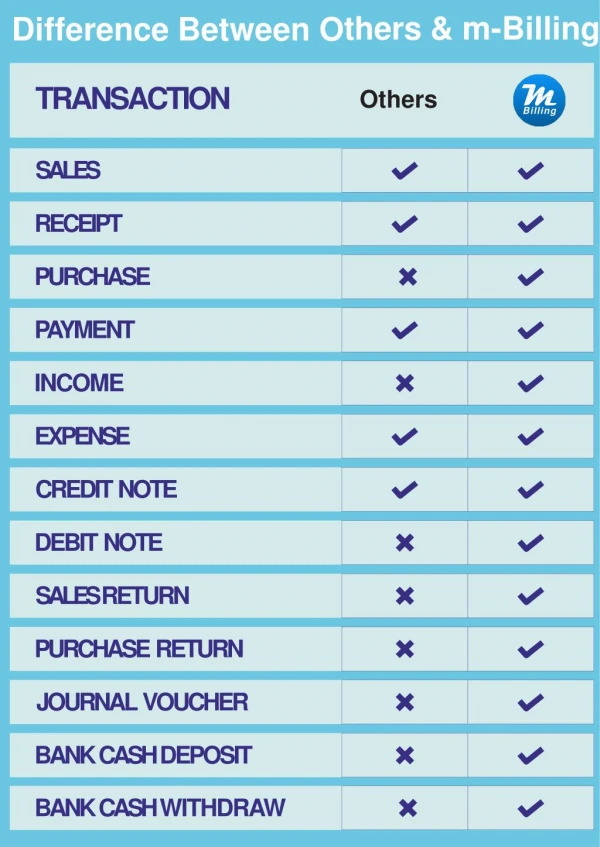
BOKAS is free GST software designed for small business. It is easy to use and install and person with minimum technical knowledge use it with ease

E N D
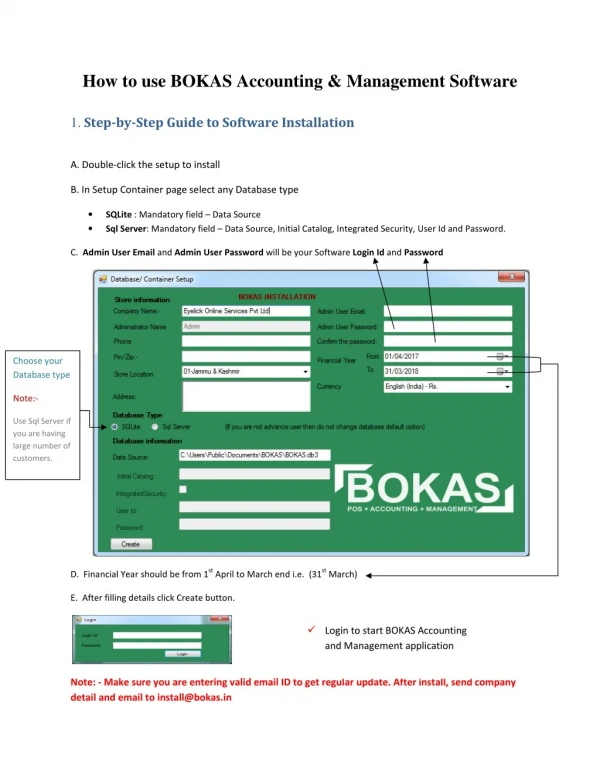
How to use BOKAS Accounting & Management Software 1. Step-by-Step Guide to Software Installation A. Double-click the setup to install B. In Setup Container page select any Database type SQLite : Mandatory field – Data Source Sql Server: Mandatory field – Data Source, Initial Catalog, Integrated Security, User Id and Password. • • C. Admin User Email and Admin User Password will be your Software Login Id and Password Choose your Database type Note:- Use Sql Server if you are having large number of customers. D. Financial Year should be from 1st April to March end i.e. (31st March) E. After filling details click Create button. ?Login to start BOKAS Accounting and Management application Note: - Make sure you are entering valid email ID to get regular update. After install, send company detail and email to install@bokas.in
2. Step-by-Step Guide to Software General Setting Login and start your application then go to Administration Menu and Click Setting. A. Company Details Note:- ?Fill your company details in which you want to display in Invoice page. ?Set Your Logo size. B. Watermark Setting, Printer Setting, Invoice Setting Note:- ?Select any one option from watermark setting. ?Choose any one option from Printer Setting in which you want to generate invoice / Bill. ?If you want to display QRCode or Linear Code on Invoice page than select any one option from Invoice Setting
C. Currency, Cleaner, Backup Note:- ?Select your country currency from combo box ?Cleaner button will clean all product variant stock, MRP, MPP, SP to zero ?Quickest way to back up files any time just browses your location where you want to take backup. D. Set Password and Partner Equity Note:- ?Set Password – Admin have full rights to change password of his own and his staff password. ?Partner Equity – To be done by Sandeep sir E. Store and Opening and Closing a Financial Year Note:- ?Store – You can add multiple store by selecting admin of that store. ?Financial Year – In this feature you are able to open and close your financial year. Financial Year should be start from 1st April to March end i.e. (31st March)
2. Step-by-Step Guide to Software Customer Page A. Customer Details - A template to store client details. ?Mandatory field – Name, Anyone (PAN or AADHAR or Email), Attribute (Customer Type) and Department ?Manage Customer different phase completion more easily with Attribute radio button options. Customize customers job by selecting there types. ?Search Customer – Filter Customer by Name, Email and Aaadhar Number ?Facility to select multiple departments to associate customer. To create new departments, click Administration ? Offerings ? Add Departments ?Two options to add image 1). Upload images browsing local computer. 2). Using Webcam. ?View/edit/delete/add Customers by clicking on the Edit button ?Add customers Bank Details if you want to ?Schedule Transaction – Scheduled transaction can be added for selected customer. Invoice will be send to customer through mail.
3. Step-by-Step Guide to Software Offering Page An item is a goods or service that is traded or rendered for the purpose of business. An item can be raw material, finished goods, by - products, or service. Basically, you have to create Offerings for the items you want to sell or purchase. To create Item, click Administration ? Offerings To Add Product or Services I. STEP 1. Add Offerings ?Select Department ?Select Items types (Product and Services) ?Add Name of Product or Services ? Select Category (Current Asset, Fixed Asset) ?Click Save Button Note:- ?Option to search Offering i.e. Product or services. ?It is helpful to check if Offerings previously added.
II. STEP 2. Search Variant (Product or Services) ?If you search for Product tha (Product or Services) than below part will be enable Note: - Use Barcode scanner to maintain inventory information ?Do not add quantity from here item is purchase from transaction part i.e. Transaction ?You can associate vendor/ Supplier when item is purchase. ?If you search for Services than below part will be available. than below part will be available. Do not add quantity from here to maintain balance sheet as it will automatically up transaction part i.e. Transaction ? Sales/Purchase vendor/ Supplier when item is purchase. as it will automatically update when ?Associate with vendor/ Supplier ?Add Cost of that service / Supplier that service is belongs to. Note:- ? Add HSN code to product and services to Rate. Harmonized Nomenclature GST Rates of goods and Add HSN code to product and services to calculate GST Tax Rate HSN Code - Harmonized Nomenclature GST Rates of goods and services under GST in India r GST in India. ? System System of of
Point-Of-Sale Transaction processing system Document and report Processing Documents Document Sale /Purchase ? ? ? ? ? ? ? ? Database Sale Order Slip Purchase Order Slip Staff Salary Slip Email Invoice Slip Doctor Prescription Slip Balance Sheet Excel Transaction details (Date wise) B2B, B2C Small, B2C Large (Excel file) ? ? ? ? ? ? ? ? ? ? Customer sale Order Purchase Order Employee Salary Customer Payment Vendor Payment Debit/ Credit Note Sales/ Purchase Return Payment Pending Reverse Charge Cancel Transaction Database Update ? ? ? ? Customer Order Inventory Purchase order (stock update) Balance Sheet Update Transaction Process I. STEP 1. Search Customer for transaction ?Customer, Vendor/Supplier and other can be search by entering email or PAN number. ?If customer found then transaction button will be enable. ?You can also search previous transaction by entering transaction invoice number STEP 2. Sales/Purchase ?After clicking transaction button Sale/Purchase form will be enable. ?Select Transaction type from radio button i.e. Sales, Purchase and Employee Salary 1.Purchase : •Select department on with you want purchase. •Search Offering i.e. Product or services. •If offering found than below popup box will display else will ask to create new. II.
Note: - Enter 3 character of product and press enter or use Barcode •Add quantity on purchase details form and press Ok button •Purchase details can be view on left side list box. •Press Save Button to confirm transaction. 2.Sales : •Select department on with you want purchase. •Search Offering i.e. Product or services. •In order to maintain GST balance sheet Excel, Select correct ?POS – Point of Sales ?Invoice type ?Busyness Type – (B2C Small, B2B Large and B2B Supplies) ?Sale Type – E/OE (Ecommerce/Other than Ecommerce). ?If Sale type is E i.e. Ecommerce than search ecommerce operator name Note:- Set this field before adding offering in transaction.
•If transaction is pending then click Payment Pending Check box so that transaction can be visible on Receivable part on (Balance sheet) and can be pay on later through Partial Payment textbox. (Functionality Swift payment collection available). 5. Export to GSTR-1 & Balance Sheet ? Select transaction period & Business type then click Search ?Click on Export to GSTR to download relevant GSTR in XLS which you can upload on Government GSTN Portal ?On balance sheet group box, fixed asset can be revaluated by decreasing or increasing value. Balance sheet can be modified in case of discrepancies which is unlikely as every transaction update these information automatically 4. Transaction Summary & Shortcuts ?Adding customer is important before starting any transaction
?Type email/PAN/Aaadhar of person to whom you are doing transaction. If customer is not interested to share his detail then just clear email field and press Ctrl + N shortcut for new transaction. It will initiate transaction with Operator ID. ?Point cursor to offering field and scan item using bar code using scanner or manually type item name or bar code. Quantity can be added next to that else default one quantity will get added. ?Ctrl +F, will search and display all transaction of related customer ?Click on Save to Save transaction OR Click Ctrl +S ?Transaction pending status can be changed any time. However, if transaction is cancelled, its status can’t be changed further. ?Previous pending, late fee and settlement can be added in to new invoice. Settlement should be entered with prefix +/- i.e. +10 gain, or -10 as loss. ?Save transaction and GSTR-1 will be updated if payment is not pending else GSTR will be updated when payment status is changed to confirm from pending. ?You can print invoice by clicking “Print Slip” OR can send mail to customer. ?To edit transaction click on Edit In Case of Query write to support@bokas.in