Download

1 / 38
390 likes | 846 Vues
Biomechanics of the High Jump. Presented by: Ryan Q. Mahoney Head Track & Field Coach Lincoln Southwest High School Lincoln, Nebraska. So why do we care about biomechanics?.

E N D
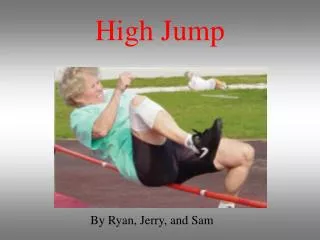
Biomechanics of the High Jump Presented by: Ryan Q. Mahoney Head Track & Field Coach Lincoln Southwest High School Lincoln, Nebraska
So why do we care about biomechanics? • In order to properly coach an event, a coach must have a good grasp of how the body moves and why certain movements are required for success. • It helps us find and correct flaws in our athletes. • The more knowledge we demonstrate the more likely our athletes will buy into our coaching. • It helps our athletes get over the bar.
Introduction to the High Jump • The high jump is a technical event. • As with all jumping events the approach is the most important factor. • The flop technique employs a curved approach to the bar and takeoff on the foot to the inside of the curve. • The athlete will clear the bar with their back facing the bar.
The Fosbury Flop • Composed of three main elements: • The approach • The take-off • The flight
The Approach • In the flop, the approach is approximately 60-70% of the total jump. • The goal of the approach is to develop a great deal of horizontal velocity in the direction of the pit.
Unique Elements of the Approach • The approach run shares many characteristics with the approach runs of the other jumping events. • It is developed by consistent practice. Ideally, the athlete is at his fastest at the end of the run. • High jumpers generally use an approach that begins as a straight run, yet finishes as a curve. The reason for the final part of the run being curved is to develop centrifugal force in order to propel the body over the bar as the vertical takeoff is executed.
Horizontal velocity provides for two things: • Translation of increased horizontal velocity into vertical velocity results in greater jump heights. • The greater the horizontal velocity, the farther away an individual can take off, allowing for a more gradual takeoff angle. This is also advantageous because it provides the athlete with more time to reach peak height.
The Curve • Most jumpers employ 8-10 strides, with the last 5 strides on the curve. The approach's length depends upon the ability and maturity of the athlete.
Approach path for the high jump. • First 5 steps are in a path perpendicular to the direction of the bar. • Last 5 steps are in a curved path.
Setting up the Curve • Most jumpers use two check marks. One is located from 10-16 feet out on a line from the near standard. This mark establishes the straight portion of the approach. The faster the jumper, the further out this mark will be. The second check mark is located on a line running perpendicular to the bar from the other check mark, and locates the start of the run.
Check mark #1 Check mark #2
Beginning the Approach • The athlete should begin the run by running in a straight line perpendicular to the bar, towards the check mark. The curve is initiated by turning the outside foot inward slightly on the fifth step (of a ten stride approach).
Running the Curve • In the curve, the athlete should establish a pronounced inward lean, and apply foot pressure outward against the curve. The quality of this lean and outward pressure greatly determines the effectiveness of takeoff. • Horizontal velocity can increase only if a pronounced inward lean is maintained by the athlete. • The greater the horizontal velocity generated by the athlete, the greater the inward lean must be.
The Takeoff: General Concepts • The jumper's primary focus should be to maintain an inward lean and outward pressure as long as possible through takeoff. • The high jumper should attempt to takeoff vertically and allow the centrifugal force developed to propel the jumper over the bar. Jumping into the bar or leaning into the bar at takeoff is a common error. • Throughout the final strides, proper posture should be maintained. Backward lean, forward lean, and butt-out postures in the last few strides are common errors in this event.
Takeoff Specifics: The Penultimate Step • Should exhibit a dorsiflexed ankle prior to contact. • Should exhibit a rolling contact of the foot. • Should not occur too far in front of the body, so that braking is minimized. • Should include slight lowering of the body, without postural deviation and deceleration.
Takeoff Specifics: The Takeoff (last) Step • Should exhibit a dorsiflexed ankle prior to contact. • Should exhibit a rolling contact of the foot. • Should touchdown in front of the body, with the foot pointed somewhat toward the pit to avoid ankle injuries. • Should not be rushed, as in pecking or slapping at the ground.
Takeoff Specifics: The Push-off From the Ground • Should be in a vertical direction. The jumper should move over the takeoff foot as the takeoff occurs. • Should feature a powerful, upward swing of the free leg and arm(s). The hip should be involved in this movement. • Should be complete and unhurried. • Proper blocking involves stopping the swinging of the arms and free leg at the instant the jumper leaves the ground.
Factors to look for on take off: • take off point is approx 1.5 to 2.5 feet from the near upright along the bar and out from the bar • take off foot is slightly ahead of the athlete's body • take off foot plant is heel first to provide the maximum lever • take off foot is pointing towards a position halfway between the middle of the bar and the far upright (10° to 20°) • take off foot is in alignment with the take off leg • the trunk is upright and leaning slightly back - not leaning towards the bar
Factors to look for on take off: (continued) • hips are at 45° to the bar and the shoulders at 90° • there is quick and vigorous movement of free limbs • the inside shoulder does not drop in towards the bar • rotation comes from the non jumping side i.e. the free leg and shoulder pulling across the body • the leg nearest the bar is driven up bent and high at the opposite upright • both arms are swung forwards and upwards with the free leg
The Flight • KEY POINT: • Once the athletes leaves the ground his or her center of mass is on a predetermined path that CAN NOT be changed. • The athlete can manipulate his or her body around their center of mass however.
The Flight • The jumpers, upon leaving the ground, should immediately begin to lay back, dropping the shoulders and lifting the hips, and hold this position. • The takeoff locations should be so that the peak of the flight is located over the bar and clearance moves can occur unhurried. • In the final stages of flight, the jumper should lift the head and feet to clear the bar. • Overarching should be avoided. Overarching or achieving maximal height in front of the bar are usually caused by poor mechanics.
Factors to look for on the Flight • right knee stays up at bar level • heels are pulled back towards the head (arching the back) • knees bent and wide apart • arms in a crucifix position or held by the side • once the hips are over the bar the piking of the thighs to the chest can be assisted by movement of the head onto the chest so that the eyes are looking forward • finally the knees are straightened and landing on the shoulders
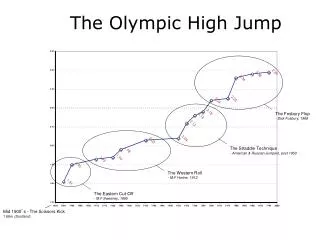
Chart from: Steve Patrick, Track & Field Coach, SUNY Cobleskill
Questions • Name one reason why it is important for a coach to understand the biomechanics of the high jump. • To properly coach the event. • To recognize and correct flaws. • So our athletes have confidence in us. • To help our athletes achieve greater performances.
Questions • How does increased horizontal velocity effect inward lean on the curve during the approach phase? • The greater the horizontal velocity, the greater the inward lean.
Questions • What happens to the center of mass during the penultimate step? • The center of mass is lowered during the penultimate step.
Questions • How can an athlete alter the flight path of his or her center of mass after leaving the ground at takeoff? • Trick question. An athlete CAN NOT alter the flight path of his or her body after leaving the ground. They can only alter their body around their center of mass.
Questions • You have an athlete who constantly catches the bar with their heels during jumps. What errors should you look for? • See if the athlete is bringing their knees to their chest after the hips clear the bar. • Watch for the head/chin to move towards the chest.
Teaching Progression • Step #1 • Stand and jump (build confidence in athlete) • Step #2 • 3 steps, touch the net or rim. • RHYTHM, RHYTHM, RHYTHM! • Watch for a big last step • Coaches should explain why foot needs to be directly under the center of mass to achieve vertical lift.
Teaching Progression • Step #3 • 3 steps and sit on a raised cushion on the mat. • Athlete should make a “plop” sound. *At this point don’t worry about knee drive or rotation. Athletes will do this automatically. Just make sure they are facing perpendicular to wear the bar would be when they land.
Teaching Progression • Step #4 • 5 steps and sit on a raised cushion on the mat. • Have the appropriate curve drawn with chalk or cones. • Remind the athlete of the idea of leaning in order to stay on the curve. *Coaches need to tell the athlete that the upper body is used to catapult the body into the air, not into the pit. Make sure they are landing on target not drifting. *Work on a progressively faster rhythm. This should help take care of a big last step. *Watch for cutting the curve, take off foot placement, and lunging into the pit.
Teaching Progression • Step #5 • 5 steps and land on your back with your knees and feet in the air. • Keep curve markings and raised cushions. • Remind jumper to jump up first, now rotate your back. *Athletes will want to dive into pit. *Have athletes focus eyes on top of far standard.
Teaching Progression • Step #6 • Place a bungee bar on the standards and start removing cushions. • Keep everything else the same. *Don’t let the jumper get away from the target landing area. *Continue to remove cushions. *move the athlete back as they are able to maintain rhythm.