Download
1 / 25
250 likes | 276 Vues
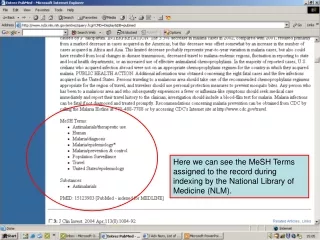
Citation format – MeSH information. Here we can see the MeSH Terms assigned to the record during indexing by the National Library of Medicine (NLM). MEDLINE format 1. The MEDLINE Display option is selected here. MEDLINE field identifiers.

E N D
Citation format – MeSH information Here we can see the MeSH Terms assigned to the record during indexing by the National Library of Medicine (NLM).
MEDLINE format 1 The MEDLINE Display option is selected here.
MEDLINE field identifiers The MEDLINE Display option shows all the fields in the MEDLINE record with field identifiers at the beginning of each line. This format is best used for downloading records into reference managing software.
Number of records displayed There are a number of different options for displaying the number of references per page. These range from 5 to 500. It is advisable to download as many references per page as possible as this will save time when viewing results by eliminating the need to scroll through numerous pages. From the Show dropdown menu, 200 has been selected to re-display. To change the Show number, click on one of the options in the dropdown menu.
Results pages The results page is now displaying 1-200 of 1854. There are now only 10 pages of results to view.
Sorting options Results can be ordered alphabetically by Author or Journal title, or by publication date. In this example, Journal has been selected from the dropdown menu. To change the alphabetical order, click on one of the options in the dropdown menu.
Sorting by journal title The results 1-200 are now displayed alphabetically by journal title.
Selecting references To select references from the results list, we need to check the box on the left-hand side near the top of each record.
Selecting references 2 From the results page, records 1-4 now have been selected.
Send to Text option 1 The results selected can now be formatted for print by selecting Send to Text from the dropdown menu.
Send to Text option 2 This option presents a printer friendly format for output to a printer.
Send to File 1 To download selected results to a disk drive, select Send to File from the dropdown menu.
Send to File 2 Choose a name for your file and give the file a .txt file extension. Click on Save.
Send to Email 1 To email selected results choose Send to E-mail from the dropdown menu.
Send to Email 2 From this screen, we can choose a format and sorting order, and add text notes.
Send to Email 3 Type in an email address in the box provided.
Send to Email 4 Then click on the Mail button.
Send to Email 5 When you return to the main results screen, a message bar appears to inform that an email has been sent from the PubMed server to the client address.
Send to Clipboard 1 Selected results can also be sent to a clipboard area. Select Send to Clipboard from the dropdown menu.
Send to Clipboard 2 An information bar will appear telling you how many results have been sent to Clipboard, the time limit after which they will be lost, and the maximum number of items allowed on the clipboard. Since we used the HINARI tab and checked five items, these have been transferred to the Clipboard.
Send to Clipboard 3 To retrieve items from Clipboard, click on the link below the query box.
Send to Clipboard 4 From within Clipboard, you can re-format and display results in the same way as you can from the main results page. Here, we have the Abstract display.
Send to Clipboard 5 To remove an item from Clipboard, choose Send toClip Remove from the dropdown menu.
Send to Clipboard 6 An information bar will appear saying how many items were removed from the Clipboard. Note that this page uses the Summary display format.
This is the end of Module 4 Part 1 This is the end of Module 4 Part 1. There is a workbook to accompany this part of the module. The workbook will take you through a live session covering the topics included in this demonstration with working examples. Updated 07 2007