NCSX Field Period Assembly
This document outlines the progress and updates from the NCSX Project Review held from April 8-10, 2008, managed by Mike Viola. Key highlights include the completion status of the four assembly stations, changes to shimming and welding techniques, strengthening of metrology teams, and additional process steps to enhance efficiency. Notable improvements in trials for Station 2 are discussed, as well as risks, mitigation plans, and assembly sequences for coil components. The review indicates strong performance compared to the proposed baseline.

NCSX Field Period Assembly
E N D
Presentation Transcript
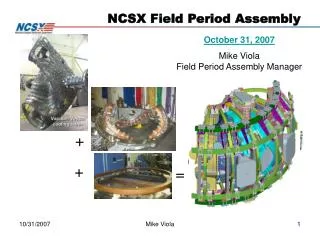
NCSX Project Review April 8-10, 2008 NCSX Field Period Assembly Mike Viola NCSX Field Period Assembly Manager SC Project Review of NCSX, April 8-10, 2008
Changes since August 2007 • Still four stations • Station 1 - complete • Station 2 • Redesigned bolted shims - from Alumina to G-10 • redesigned nose welding scheme - now using shear plates which requires additional steps for assembling coils to fit and install shear plates then disassemble to weld interior side of shear plates and reassemble to weld outside of shear plates. • We strengthened the metrology teams and equipment but additional time is required to perform and analyze metrology and check with photogrammetry • An additional FTE has been added to perform routine calibration checks of metrology systems and a second metrology team has been added to support parallel operations. • Station 3 - same plan - with additional measurements of Vessel ends in the vertical position to analyze “sagging” • Added steps to allow for flat position welding • Station 5 - trim coils have been added, coil support design complete and increased I&C components SC Project Review of NCSX, April 8-10, 2008 Mike Viola - page 2
Station 2 FPA trials were enhanced and are well in progress: Gross fit individual mating coils found and resolved a few minor interferences CAPTIONS Joint design trials for Station 2 (useful for Station 3 also): Install and torque bolts – assess accessibility SUCCESSFUL Develop shim technique SUCCESSFUL Pillow shims SUCCESSFUL New welded design for inboard interface (nose) SUCCESSFUL Install Alumina coated metal shims qualified vendor could not produce shims in quantity flat enough to meet tolerance - required redesign Station 2 Trials Were Successful SC Project Review of NCSX, April 8-10, 2008 Mike Viola - page 3
Preparation Steps/ Major Activities MC Fit-up Check Verify will come together (Gross Fit-ups) Pre-Measurement of MHCP Type A/B/C Coil Flanges & Interfacing Type A Coil Flange Individual coils have been racked into proper shape. (within +/- .005”) Shim Sizing & Preparation Measure shim thicknesses to arrive at a satisfactory shim set for MCHP assembly. RisksandMitigation Plans Tooling not rigid enough – RETIRED wedges determined to be adequate Coils still too flexible –RETIRED physically racked (twisted) coils to re-establish their coordinate system Alignment not within tolerances bars- RETIRED Able to achieve +/- .005” lock-in Weld distortion excessive Install wing chairs to offset distortions If required, coil welds can be ground out & coil separated Expand - review risk registry Station 2 Risks Retired SC Project Review of NCSX, April 8-10, 2008 Mike Viola - page 4
Station 2 Assembly Sequence A-B Modular Coil Assembly Steps/Major Activities • Rack A coil & measure fiducials. • lower B coil into place onto precalculated shims • Measure shear plate puck height • Install nose shear plates & lightly tack weld • Lift B coil and invert. • Establish A & B coil fiducials – weld shear plates to plasma side both coils, recheck fiducials. Back Office assess part for compliance. • Place B coil back on A coil precalculated shims and align • Measure and Install bushings • Weld A/B nose region solenoid side & re-measure. REPEAT FOR C TO A-B ASSEMBLY SC Project Review of NCSX, April 8-10, 2008 Mike Viola - page 5
Station 2 Assembly Sequence A-B Modular Coil Assembly Steps/Major Activities • Rack A coil & measure fiducials. • lower B coil into place onto precalculated shims • Measure shear plate puck height • Install nose shear plates & lightly tack weld • Lift B coil and invert. • Establish A & B coil fiducials – weld shear plates to plasma side both coils, recheck fiducials. Back Office assess part for compliance. • Place B coil back on A coil precalculated shims and align • Measure and Install bushings • Weld A/B nose region solenoid side & re-measure. We are doing very well as compared to the proposed baseline but we are only a few weeks along and have not executed the B-C coil assembly. REPEAT FOR C TO A-B ASSEMBLY Baseline Actual 2/1 2/28 3/6 3/11 3/11 3/11 Redo shear plates 3/27 4/1 4/3-5 4/6 SC Project Review of NCSX, April 8-10, 2008 Mike Viola - page 6
RisksandMitigation Plans Tooling not rigid enough Reinforce/redesign tooling if necessary Wedge mount levelers Left or Right MCHP changes shape Back Office review changes & provides new left to right MCHP orientation Will compare actual deflections to FEA as verification of the models. Pre-Assembly Steps/Major Activities Pre-Installation Set-Up Install monuments, floor mounted tracks & Vacuum Vessel base support, measure MCHP CG Anchor tooling (floor mounted tracks, support carts, adjuster bar, temporary scaffolding, etc. Pre-Assembly of Left MCHP Establish global coordinate system and install laser screens. Measure MCHP in vertical orientation, including A-A flange Perform Metrology and align Station 3 Assembly Sequence MCHP support cart assembly MCHP Left side Vacuum Vessel Support SC Project Review of NCSX, April 8-10, 2008 Mike Viola - page 7
Pre-Assembly Steps/Major Activities Install Laser Screens Perform Dry Runs with MCHPs without vessel Has been performed previously with 25,000 lb. concrete block and chain falls.l Inboard screens Floor mounted screen Floor mounted screen Right screen Left screen Station 3 Assembly Sequence SC Project Review of NCSX, April 8-10, 2008 Mike Viola - page 8
Assembly Steps/Major Activities Install VV NBI support stand & install VVSA to base support structure. Using metrology, take tooling ball readings to properly position VVSA to global coordinate system. VV base support MCHP fixed support assembly MCHP support cart assembly VV lateral support NBI Port Station 3 Assembly Sequence SC Project Review of NCSX, April 8-10, 2008 Mike Viola - page 9
RisksandMitigation Plans Components damaged during assembly (highly unlikely due to very slow motion). remove MCHP from vessel & repair damaged component with existing spare component e.g. cooling tube or clamp. Weld distortion excessive Install wing chairs to offset distortions If required, coil welds can be ground out & coil separated EXPAND A-A vertical weld Assembly Steps/Major Activities **** Getting advanced information from CAD **** Install Left then Right MCHP over VVSA Weld Inboard shear plates and re-measure alignment Station 3 Assembly Sequence SC Project Review of NCSX, April 8-10, 2008 Mike Viola - page 10
RisksandMitigation Plans Difficulty of welders working inside VV in contorted positions may pose ergonomic & confined space hazards Ergonomic / confined space hazards – prior Job Hazard Analysis (JHA) will consider all hazards Leak check fails on one or more ports Identify leak point (s), repair weld and re-test Assembly Steps/Major Activities VV Port Installation Install circular ports. Install domes, inserting the long port through the MC hole opening & weld dome shell to VV. Leak check all port welds. Trim Coil Installation Install trim coils - mounted to the MC shells using local field fit support brackets Station 5 Assembly Sequence 1” – 2” clearance around all ports SC Project Review of NCSX, April 8-10, 2008 Mike Viola - page 11
Right & Left TF Coil Assembly Steps/Major Activities Attach temporary supports, disengage base of MC, & install TF support brackets Slide TF assemblies against TF support brackets one at a time Install machine support plates & re-engage base of MC Station 5 Assembly Sequence Temporary end support simplified with two TF coils) Right side leveler pad with intermediate support removed SC Project Review of NCSX, April 8-10, 2008 Mike Viola - page 12
Assembly Steps/Major Activities Advanced TF Fit-Up Checks Opportunity for advance check of alignment and clamp adjustments Station 5 Assembly Sequence Install TF support brackets on the sides of the coils, both on the top of the MC and on the bottom. SC Project Review of NCSX, April 8-10, 2008 Mike Viola - page 13
Station 5 Assembly Sequence Final Assembly Steps/Major Activities • Tack Weld Ports 4’s • Install PF Structural Members • Route MC leads and coolant lines • Install MC Coolant Manifold • Install Rogowski Coils on end of VV MC coolant manifold Port 4 SC Project Review of NCSX, April 8-10, 2008 Mike Viola - page 14
RisksandMitigation Plans Final measurements not within tolerances Many measurement opportunities during Station 3 to allow time to address potential problems during Station 5 and 6. Final Assembly Steps/Major Activities Final Measurements of vessel Obtain set of Period 1 alignment fiducials for locating VV within the MC Using monuments on VV for alignment, perform trial VV alignment, adjusting VV supports as necessary. Make final measurement of all fiducials, VV end flanges, & Type C end flanges REPEAT FOR PERIODS 2 & 3 Station 5 Assembly Sequence SC Project Review of NCSX, April 8-10, 2008 Mike Viola - page 15
Summary • Station 1 vacuum vessel segments are complete. • Station 2 modular coil assembly has begun, risks are being retired, and proof of principal is in hand. • Station 3 installing the modular coil half period assembly over the vacuum vessel and Station 5 final field period assembly sequence plans have been developed in detail and include the necessary metrology and trial elements. • We have a credible plan to assemble the field periods to the accuracy required. SC Project Review of NCSX, April 8-10, 2008 Mike Viola - page 16