Performance Results
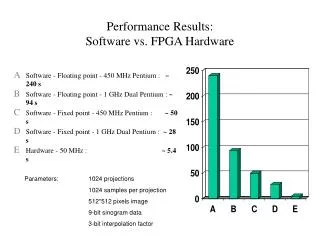
Performance Results. The following are some graphical performance results out of the literature for different ATM switch designs and configurations For more information, see [Tobagi 1990]. Input Buffering.

Performance Results
E N D
Presentation Transcript
Performance Results • The following are some graphical performance results out of the literature for different ATM switch designs and configurations • For more information, see [Tobagi 1990]
Input Buffering • The first set of performance results is for input buffering (alone) with First Come First Serve (FCFS) service discipline (also known as First In First Out (FIFO)) • Suffers from the Head of the Line blocking problem
Maximum Throughput for Input Buffering N Maximum Throughput 1 1 2 0.75 3 0.6825 4 0.6553 5 0.6399 6 0.6302 7 0.6234 8 0.6184 0.5858
Maximum Throughput for Input Buffering 0.8 0.7 MAXIMUM ACHIEVABLE THROUGHPUT 0.6 0.5 0 20 40 60 80 100 NUMBER OF PORTS (N)
Performance of Banyans • The next set of performance results is for banyan multistage interconnection networks (NOTE: these are NOT Batcher-banyans) • FACT: in a bufferless banyan, throughput T degrades significantly with an increase in N, the number of input ports, due to the blocking problems (path contention and output port contention) • T = 40% for N = 32, T = 26% for N = 1024
Buffered Banyans • Performance of banyans can be improved by adding internal buffers to the switch fabric at places where contention may occur (i.e., at outputs of each 2x2 module) • This approach can increase the effective throughput of banyans
Throughput for Uniform Traffic (Single Buffered Banyan) 1.0 N=2 0.8 0.6 THROUGHPUT 0.4 0.2 0.0 0.0 0.2 0.4 0.6 0.8 1.0 OFFERED LOAD p
Throughput for Uniform Traffic (Single Buffered Banyan) 1.0 N=2 0.8 N=4 0.6 THROUGHPUT 0.4 0.2 0.0 0.0 0.2 0.4 0.6 0.8 1.0 OFFERED LOAD p
Throughput for Uniform Traffic (Single Buffered Banyan) 1.0 N=2 0.8 N=4 0.6 N=16 THROUGHPUT 0.4 0.2 0.0 0.0 0.2 0.4 0.6 0.8 1.0 OFFERED LOAD p
Throughput for Uniform Traffic (Single Buffered Banyan) 1.0 N=2 0.8 N=4 0.6 N=16 N=64 THROUGHPUT 0.4 0.2 0.0 0.0 0.2 0.4 0.6 0.8 1.0 OFFERED LOAD p
Throughput for Uniform Traffic (Single Buffered Banyan) 1.0 N=2 0.8 N=4 0.6 N=16 N=64 THROUGHPUT N=1024 0.4 0.2 0.0 0.0 0.2 0.4 0.6 0.8 1.0 OFFERED LOAD p
Effect of Buffer Size (N = 64) 0.8 0.7 B=4 0.6 B=2 THROUGHPUT 0.5 B=1 0.4 0.3 0.3 0.4 0.5 0.6 0.9 1.0 0.7 0.8 OFFERED LOAD p
Effect of HOL Bypass (N = 64) 0.8 0.7 HOL BYPASS 0.6 FIFO TROUGHPUT (WITH HOL BLOCKING) 0.5 0.4 0.3 0.3 0.4 0.5 0.6 0.9 1.0 0.7 0.8 OFFERED LOAD p
Buffered Banyans: Summary • Performance depends on load • The more buffers, the better the throughput • HOL bypass helps • Performance still degrades as N increases, due to blocking effects
Shared Memory Switches • The next set of performance results looks at buffer managment strategies for shared memory switches • In particular, looks at cell loss performance for partitioned versus shared buffering
Partitioned Buffers SHARED MEMORY
Cell Loss with Partitioned Buffers (=0.9) 1.0 -2 10 -4 10 -6 CELL LOSS PROBABILITY 10 -8 10 -10 10 N=2 -12 10 0 20 40 60 80 BUFFER SIZE, b (per port)
Cell Loss with Partitioned Buffers (=0.9) 1.0 -2 10 -4 10 -6 CELL LOSS PROBABILITY 10 -8 10 N=4 -10 10 N=2 -12 10 0 20 40 60 80 BUFFER SIZE, b (per port)
Cell Loss with Partitioned Buffers (=0.9) 1.0 -2 10 -4 10 -6 CELL LOSS PROBABILITY 10 N=8 -8 10 N=4 -10 10 N=2 -12 10 0 20 40 60 80 BUFFER SIZE, b (per port)
Cell Loss with Partitioned Buffers (=0.9) 1.0 -2 10 -4 10 N= -6 CELL LOSS PROBABILITY 10 N=8 -8 10 N=4 -10 10 N=2 -12 10 0 20 40 60 80 BUFFER SIZE, b (per port)
Cell Loss with Partitioned Buffers (N=) 1.0 -2 10 -4 10 -6 CELL LOSS PROBABILITY 10 -8 10 -10 10 p=0.70 -12 10 0 10 20 30 40 50 BUFFER SIZE, b (per port)
Cell Loss with Partitioned Buffers (N=) 1.0 -2 10 -4 10 -6 CELL LOSS PROBABILITY 10 -8 10 -10 10 0.75 p=0.70 -12 10 0 10 20 30 40 50 BUFFER SIZE, b (per port)
Cell Loss with Partitioned Buffers (N=) 1.0 -2 10 -4 10 -6 CELL LOSS PROBABILITY 10 -8 10 0.80 -10 10 0.75 p=0.70 -12 10 0 10 20 30 40 50 BUFFER SIZE, b (per port)
Cell Loss with Partitioned Buffers (N=) 1.0 -2 10 -4 10 -6 CELL LOSS PROBABILITY 10 0.85 -8 10 0.80 -10 10 0.75 p=0.70 -12 10 0 10 20 30 40 50 BUFFER SIZE, b (per port)
Cell Loss with Partitioned Buffers (N=) 1.0 -2 10 -4 10 0.90 -6 CELL LOSS PROBABILITY 10 0.85 -8 10 0.80 -10 10 0.75 p=0.70 -12 10 0 10 20 30 40 50 BUFFER SIZE, b (per port)
Cell Loss with Partitioned Buffers (N=) 1.0 -2 10 p=0.95 -4 10 0.90 -6 CELL LOSS PROBABILITY 10 0.85 -8 10 0.80 -10 10 0.75 p=0.70 -12 10 0 10 20 30 40 50 BUFFER SIZE, b (per port)
Shared Buffers SHARED MEMORY
Cell Loss with Shared Buffers (=0.9) 1.0 -2 10 -4 10 -6 CELL LOSS PROBABILITY 10 -8 10 -10 10 N=16 -12 10 0 10 20 30 40 50 BUFFER SIZE, b (per port)
Cell Loss with Shared Buffers (=0.9) 1.0 -2 10 -4 10 -6 CELL LOSS PROBABILITY 10 -8 10 -10 10 N=16 N=32 -12 10 0 10 20 30 40 50 BUFFER SIZE, b (per port)
Shared Memory: Summary • Shared buffers provide much lower cell loss than partitioned buffers, for uniform input traffic (Note: the opposite may be true for non-uniform traffic!) • For partitioned, cell loss gets worse with larger N, while for partitioned it gets better
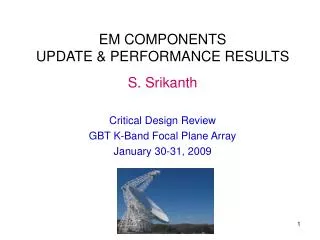
Sunshine Switch • The final set of graphs looks at the performance of the Sunshine switch • Sunshine switch is based on a Batcher banyan design, but with recirculation lines and with the use of multiple banyans in parallel to accommodate multiple cells destined to the same output port
M Batcher-Banyan Switching Fabric RECIRCULATING QUEUE M BANYAN ROUTINGNETWORK ... ... IN 1 ... BATCHER SORTER TRAP NETWORK CONCENTRATOR M+N M+N ... N ... ... ... IN N
... ... ... IN 1 M+N M+N M+N ... ... ... ... IN N SUNSHINE SWITCH ARCHITECTURE DELAY M M OUT 1 BANYAN 1 BATCHER SORTER TRAP NETWORK SELECTOR CONCENTRATOR ... ... BANYAN K OUT N
0 10 -2 10 -4 10 -6 10 -8 10 -10 10 Cell Loss in Sunshine Switch (K=1) p=0.4 CELL LOSS RATIO Uniform Traffic N = 128 Single Banyan (K=1) 0.0 0.2 0.4 0.6 0.8 M/N
0 10 -2 10 -4 10 -6 10 -8 10 -10 10 Cell Loss in Sunshine Switch (K=1) p=0.6 p=0.4 CELL LOSS RATIO Uniform Traffic N = 128 Single Banyan (K=1) 0.0 0.2 0.4 0.6 0.8 M/N
0 10 -2 10 -4 10 -6 10 -8 10 -10 10 Cell Loss in Sunshine Switch (K=1) p=0.8 p=0.6 p=0.4 CELL LOSS RATIO Uniform Traffic N = 128 Single Banyan (K=1) 0.0 0.2 0.4 0.6 0.8 M/N
0 10 -2 10 -4 10 -6 10 -8 10 -10 10 Cell Loss in Sunshine Switch (K=1) p=1.0 p=0.8 p=0.6 p=0.4 CELL LOSS RATIO Uniform Traffic N = 128 Single Banyan (K=1) 0.0 0.2 0.4 0.6 0.8 M/N
0 10 -2 10 -4 10 -6 10 -8 10 -10 10 Cell Loss in Sunshine Switch (K>1) K=1 CELL LOSS RATIO Uniform Traffic N = 128 p = 1.0 0.0 0.1 0.2 0.3 0.4 0.5 M/N
0 10 -2 10 -4 10 -6 10 -8 10 -10 10 Cell Loss in Sunshine Switch (K>1) K=1 CELL LOSS RATIO K=2 Uniform Traffic N = 128 p = 1.0 0.0 0.1 0.2 0.3 0.4 0.5 M/N
0 10 -2 10 -4 10 -6 10 -8 10 -10 10 Cell Loss in Sunshine Switch (K>1) K=1 K=3 CELL LOSS RATIO K=2 Uniform Traffic N = 128 p = 1.0 0.0 0.1 0.2 0.3 0.4 0.5 M/N
0 10 -2 10 -4 10 -6 10 -8 10 -10 10 Cell Loss in Sunshine Switch (K>1) K=1 K=3 CELL LOSS RATIO K=4 K=2 Uniform Traffic N = 128 p = 1.0 0.0 0.1 0.2 0.3 0.4 0.5 M/N
Sunshine Switch: Summary • Sunshine switch was designed and prototyped at Bellcore • Multiple banyans provide parallel routing paths to accommodate multiple cells destined for the same output port • Recirculation handles the “overflows” • Very promising switch design