Download
1 / 4
40 likes | 57 Vues
Learn how to efficiently disassemble distinct task chair sub-assemblies and components, including casters, base, cylinder, seat, control mechanism, arms, and more. Follow step-by-step instructions for disassembly, removal, and recycling of various parts.

E N D
Natick, Bolton, Upton, Granite, Element and Shiloh task chair disassembly instructions
Distinct task chair sub-assemblies and components 5 casters – sub-assemblies (polymer PA6 and steel) 1 base (polymer PA6) 1 cylinder – sub-assembly (steel) 1 seat – sub-assembly (plywood, urethane foam, polypropylene, upholstery cover) 1 control mechanism (steel and polymer) 2 arms (1 right & 1 left) – sub-assemblies (polymer PA6, urethane) 6 arm attachment bolts (steel) 3 or 4 back -, 4 mechanism attachment bolts (steel) 1 chair back – sub-assembly (polymer PA6, nylon, steel, upholstery cover) 1 #5 Allen wrench (steel)
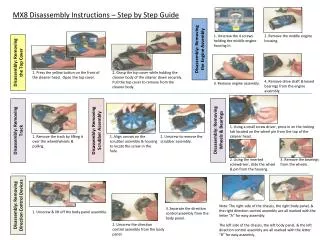
Task chairs: base / casters / glides / cylinder removal and disassembly - Turn chair upside down- Remove the aluminum or polymer base with casters/glides and cylinder from the mechanism. The cylinder is secured to the mechanism and base by a press fit. To remove the cylinder, use a rubber mallet to separate the cylinder from each the base and mechanism. (2 minutes) - Pull the caster/glide with stem out of the base socket at the end of each base leg (1 minute)- Remove the steel stems from the PA6 polymer casters (2 minutes)- Remove steel pneumatic cylinder from the base. Recycle or dispose the steel cylinder as per regulations applicable to your business region. (1 minute) Task chairs: arm rest removal and disassembly • If the chair is equipped with arms, remove the left and right arm (identified with an “L” and “R”) on bottom of seat by removing the three bolts each using provided #5 Alan wrench (or appropriate power tool). (2 minutes) • Remove the urethane arm caps from the polymer arm rests (1 minute)
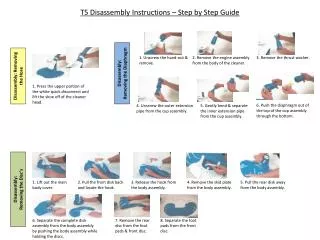
Task chairs: backrest removal • Using provided Alan wrench (or appropriate power tool), remove 3 or 4 bolts to remove the chair back from the seat assembly. (1 minute) Task chairs: mechanism removal and dis-assembly • Remove 4 bolts to remove the steel mechanism from the seat assembly. (1 minute) • Remove polymer handles and fasteners • Task chair; disassembly of upholstered seat and backs • Remove the cover on the bottom of the seat by removing the fasteners. • Remove the staples that hold the upholstery material to the inner seat shell/back upholstery carrier, subsequently separate the fabric or mesh material and the foam. Appropriate disposal is required for the foam. Fabric, mesh and foam in all cases can be removed easily removed for recycling purposes. AIS does not use any adhesives for these assemblies.