Custom Enclosure Template for Artwork: Print, Cut, and Assemble Instructions
This template provides detailed instructions for preparing your enclosure. Print the template on ordinary copy paper, cut it to size, and paste it to the enclosure using glue. After making holes, wash the template with water to ensure it adheres properly. You can customize the artwork by replacing the serial number and call sign with your personal favorites. For best results, print on glossy, water-resistant adhesive labels using an inkjet printer. Achieve a professional look for your custom enclosure!

Custom Enclosure Template for Artwork: Print, Cut, and Assemble Instructions
E N D
Presentation Transcript
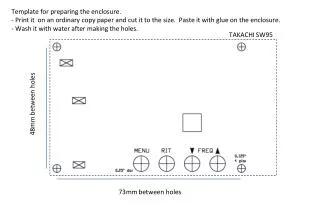
Template for preparing the enclosure. • Print it on an ordinary copy paper and cut it to the size. Paste it with glue on the enclosure. • Wash it with water after making the holes. TAKACHI SW95 48mm between holes 73mm between holes
Template for Artwork - Replace the artwork, serial number and call sign with your favorite one. - Print it on the glossy adhesive label (preferably water resistant) of post card size with inkjet printer. THE MOUNTAIN TOPPER (MTR) ANT 40 30 Designed by KD1JV, S/N: 063 Assembled by JA7QIL TAKACHI SW95 DC IN 40 30 PD PH MENU RIT DOWN UP 40 30 VOL.