studio tools
studio tools . We’re gonna get technical, technical. I wanna get technical. Lets get into technics now. the control room. Video Capture. Sound Board. Light Board. Switcher. Graphics. Teleprompter. Switcher. Used by the TECHNICAL DIRECTOR to choose which video source goes to air.

studio tools
E N D
Presentation Transcript
studio tools • We’re gonna get technical, technical. I wanna get technical. Lets get into technics now...
the control room Video Capture Sound Board Light Board Switcher Graphics Teleprompter
Switcher • Used by the TECHNICAL DIRECTOR to choose which video source goes to air.
switcher • The switcher allows you to preview shots before you take them, use transitions, apply effects (such as chroma key) and work with a wide variety of audio and video inputs.
Switcher inputs • Camera 1 • Camera 2 • Camera 3 • Playback Rec. • Video Server • Cable Stream • Frame Buffer
Switcher • Your Program/Preview switches are your most important. • Preview allows the director to see a shot before he/she decides to Take it. • Program is what goes to air.
Switcher • Notice that the switches line up underneath the description. You will always be able to tell what switch controls what input. Switch Description Program Preview
Important! • ATTN: ALL DIRECTORS! • You will ALWAYS call a Preview before a Take
Switcher Allows you to use a pre-programed transition, OR manually transition with the trans-lever, OR simply cut.
Switcher • Allows you to adjust the video signal, which affects the image. • We use this a lot to adjust while using the green screen.
Video Signal Guide • Hue: Color Saturation • Gain: Brightness relative to the color channels (RGB) • RGB video signal is chrominance • May cause noise • Y Suppressor: Brightness relative to the amount of white • Referred to as luminance
Video Capture/server • Meet Lucy and Desi Desi Lucy
Video Capture/server • Can preview show using playback monitor • We record to Lucy • We run video from Desi • All PKG’s will be housed on Desi
Video Capture/server • All video recording on lucy is run through Final Cut Pro • Instead of Log and Transfer we use: • Log and Capture --> Capture Now • Make sure you are saving your projects prior to working just like we always have
Video Capture/server • All video on Desi should be finalized before playback • Work in FCP in classroom • Export locally and bounce to server • On Desi, pull down from xserve and import into FCP • Make sure to render before playing back live!
Soundboard • Looks way more complicated than it really is • We will only work with a fraction of the knobs, dials, buttons, and sliders.
soundboard • Knobs adjust EQ (Equalizer) which has influence over how each input is interpreted. • Sliders allow us control the Db levels on the fly to accommodate for fluctuations in talent’s performance.
soundboard • Uses same Db meter as Final Cut Pro • Avoid Peaks on talent • Make sure there is no feedback from monitor playback.
Remember • Pay attention to your meters. Just because it is an acceptable level in the control room does not mean it is an acceptable level on tape (or your recording)
Microphones • Anchors use lavaliere microphones • Referred to as a Lav or Lapel mic • Type of dynamic microphone • Worn at the neck
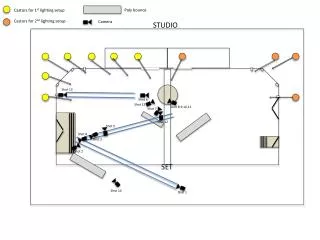
Studio Lights • Lights are a one stop shop. On at the start of the show, off at the end. The only time you’ll need to adjust them is for using the green screen.
Mobile Lights / Light kit • The mobile lights are used for transport when lighting a scene outside of the studio. • Flood lights are for a wide spread of light • Light Kits are used for a more specific style of lighting.
Lighting • Lighting equipment can one of the most dangerous pieces of equipment on a set. • Tend to get very hot • Need to be handled correctly or they will explode!
Lighting • Always yell “striking” when turning on a non studio light. • Never move the light stands while the lights are on. • Always use gloves when adjusting barn doors, changing scrims, or replacing bulbs. • When you are done, allow the lights to cool off before you pack up.
Lighting • The switch • Most lighting switches do not have an “On” or “Off” on them. They have a “|” or “O”. • Refers to the circuit being opened (|) or closed (O). • “|” is on “O” is off
Lighting • Make sure you plug them in, in the correct order. • Make sure the switch is turned off (“O”) • Plug cord into the light • Plug the cord into the wall outlet • Yell ________! • Turn light on via switch
Teleprompter • Teleprompter uses a mirrored system similar to a periscope to reflect an image off of a monitor so that it can be read by the on air talent.
Teleprompter • Uses a specific type of treated glass creating abeam-splitter to ensure that the image of the text is not detected by the lens, but can still be read while looking head on..
Teleprompter • Uses software similar to Microsoft Word • Allows for title headings, camera notification, story breaks, even duration. • Allows you to shift stories around easily, and on the fly.
Teleprompter • Lets the operator control the speed of the text as it appears on the prompter. • Can jump up and down stories instantly. • Needs a steady hand!
Camera Op • It’s not that hard.
Camera On/Off • To turn the camera on slide it to camera. NOT media.
Camera • Zoom toggle • W: Wideangle • T: Telephoto • (rec button does nothing)
Camera Tilt Lock Pan Lock
Wheel Lock Unlocked Locked
Camera Usage • When moving the camera make sure: • There are no cables/wires in the way • Your wheels aren’t locked • Always unlock tilt/zoom when using, and lock when done • Always unlock wheels when using, and lock when done • Always keep your headset on and listen to your director • Make sure your camera is locked down when done