Download

1 / 77
770 likes | 995 Vues
The Requisition Process. A Guide to Generating Banner’s Requisition for a Purchase Order. Welcome to the Requisition Process Virtual Seminar!. This training presentation is a step by step guide through the requisition form (FPAREQN).

E N D
The Requisition Process A Guide to Generating Banner’s Requisition for a Purchase Order
Welcome to the Requisition Process Virtual Seminar! This training presentation is a step by step guide through the requisition form (FPAREQN). The lesson is self-paced. So sit back, relax, and enjoy the show with every click of the mouse! For starters, here’s an overview of the purchasing process…
The Purchasing Process 9 Requisition Purchase Order Accounts Payable Check Generates to Issues a P.O. 3 Bid Invoice When approved 2 PurchasingDepartment 4 10 Sends the invoice 8 Pays vendor Sends P.O. to 1 Files a request Receiving Report 6 Files Receiving Department 5 7 Ships goods Vendor Delivers goods End User/Dept
Now that you understand what position the requisition plays in the purchasing process, let’s begin …
Once you sign-on, this is the main screen that you will see …
Type the name of the form, FPAREQN, in the direct access field. Then “enter” from the keyboard.
DO NOT CLICK ON THE “SEARCH” BUTTON ON THE RIGHT. Note: Technically, this button is called the “LOV” button. It stands for “list of values.” When you click on it, a new window will open, and you can choose from a list of items that are available. You can also perform a search, which we will show you later in the presentation.
Type in the word “NEXT” (with no quotes or spaces before or after) to command Banner to assign a requisition number.
Order date and transaction date will have defaulted in with the current date, as well as your contact information. The latest version has replaced the options menu on the left side with tabs Enter a future date for the delivery date.
Type in the name of the person to whom this order is going. Include building and room #, or an ext. #.
Use this area to put messages for the vendor, state a quote #, specify special requests, etc. There are 99 lines available. When text is entered on a line and is full, use the down arrow to advance to the next line.
Exit. Note: This message bar is Banner’s line of communication to the user. (Here it says that the text entered has been saved)
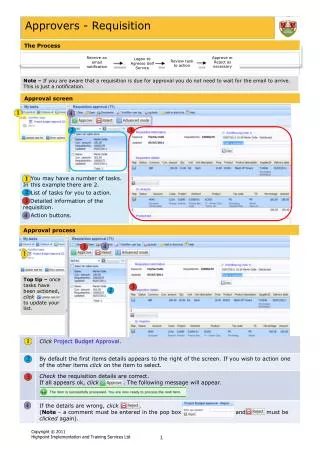
2. Click “Next block” to continue. 1. Banner takes you back to the requisition form. Notice a requisition number is assigned.
Enter the vendor ID number if you know it. If not, click on the LOV button to search for the vendor.
To do a search: 1) Press F7 from the keyboard (or the “enter query” button) 2) Tab over to “Last Name” 3) Type “%” (The % sign is a wildcard) 4) Choose one main word in the vendor’s name and type it in 5) Put another “%” after the name 6) Press F8 from the keyboard (or the “execute query” button)
Banner’s search engine is case sensitive, so try all caps first.
Scroll down to see if the vendor you’re looking for is listed here.
If not, do another search. This time, try upper and lower case.
Or click on the vendor name once to hi-light, then click on the “select” button. Double click on the vendor name to bring it back to the requisition.
Click on “next block.” This will move page selection to the “Commodity/Accounting tab Check the vendor’s address to make sure that’s the right address to send a purchase order to. If it is not, click on the LOV button next to Seq# to pick another address.
Tab over to Desc to describe the item you want to purchase. Be as precise as possible. Bear in mind that this description has to be clear to the people who are approving this purchase request as well as the vendor. Therefore, it is important to include item # where appropriate.
When the description is too long, keep typing till you run out of space. Then click on “item text” in the Options menu, to continue the description. The description field has limited space.
Click on “next block.” Notice the description from the previous page resurfaced here.
Save when finished. Continue with the description in this area.
Click the Exit button. Notice the confirmation message.
Fill in the quantity. Tab to U/M (Unit of Measure). Type in the measurement, or click on the LOV button to select from a list. Notice “Item Text” is checked. It’s an indication that the description for this item is continued in Item Text.
Tab through the ext cost, and Banner will do the calculations for you.
1. If only one item is being ordered, click on “next block.” 3. The description of the second item can be entered here. 2. Otherwise, keep tabbing until the cursor returns to the commodity description. Press the “down arrow” key from your keyboard to insert the next commodity.
Notice the description to the second item is short. It does not need to continue in item text. Therefore, the item text box is not checked. There’s no restriction to the amount of commodity you want to order. Just continue using each row for each item.
For training purposes, we’ll order three items. This third item requires a continuation. So click on “item text” tab of the “Options” menu item.
When you finish and forget to save, Banner will prompt you to either save or erase.
Choose either “yes” to save, or “no” to erase what you’d just put in. Then exit.
Click on “next block” to enter the accounting codes to be charged.
Unchangeable default: C (chart of accounts), Yr (fiscal year) Should be current year (July 1, - June 30). Changeable defaults: Orgn (organization code), Prog (program code) Make changes to Orgn code only if needed. Otherwise, tab to Acct and enter in the Acct code. Skip Index code. Enter the fund code.
Consider the amount to be charged to this acct. You can choose to charge by % or by $. To charge by %: Click on the box right below the % sign.
Notice the check mark is no longer there after Banner did the calculations. Tab through the USD section, and Banner will fill in the $ amount based on your percentage.
Tab through this section so that Banner can calculate your line total.
To share the cost between two grants or cost centers (or between a grant and a cost center), you can specify by percentage like this…