Download
1 / 10
110 likes | 271 Vues
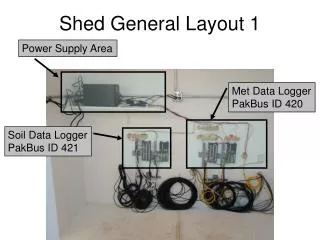
Shed General Layout 1. Power Supply Area. Met Data Logger PakBus ID 420. Soil Data Logger PakBus ID 421. Ground Terminal. Shed General Layout 2. Wind Heater 12V. Sensor Power Terminal Strips. CNR4 Heaters. PTB110. CS616 CTRL Strip. Soil AM16/32B Multiplexer. Met CR1000.

E N D
Shed General Layout 1 Power Supply Area Met Data Logger PakBus ID 420 Soil Data Logger PakBus ID 421
Ground Terminal Shed General Layout 2 Wind Heater 12V Sensor Power Terminal Strips CNR4 Heaters PTB110 CS616 CTRL Strip Soil AM16/32B Multiplexer Met CR1000 Soil CR1000 Met AM16/32B Multiplexer Excess Soil Logger Cables Excess Met Logger Cables Excess cable (still deployable) for shed tripod SI-111 & SR50A
Met Logger Layout 1 16.0 m AT/RH (Brown Tape) AT/RH Wiring: AT Signal (White Wire) -- AM 16/32B Odd Hi Sensor AG (Green Wire) -- AM 15/32B Lo RH Signal (Yellow Wire) -- AM 16/32B Even Hi Sensor AG (Green Wire) -- AM 15/32B Even Lo Blue Wire -- +12V Red Wire -- G Black Wire -- G 13.0 m AT/RH (Orange Tape) 11.0m AT/RH (Blue Tape) 4.5m AT/RH (Yellow Tape) 3.0m AT/RH (Green Tape) 1.5m AT/RH (Red Tape)
Met Logger Layout 2 CNR4 Radiation: Tower Top (Forest Floor) 13 Hi (17 Hi) – SW Up + Red Wire 13 Lo (17 Lo) – SW Up - Blue Wire 14 Hi (18 Hi) – SW Dn + White Wire 14 Lo (18 Hi) – SW Dn - Black Wire 15 Hi (19 Hi) – LW Up + Gray Wire 15 Lo (19 Lo) – LW Up - Yellow Wire 16 Hi (20 Hi) – LW Dn + Brown Wire 16 Lo (20 Lo) – LW Dn - Green Wire Forest Floor CNR4 Radiation (Blue-White Tape) Tower Top CNR4 Radiation (Red-White Tape) Forest Floor PAR (Blue Tape = Up) (Orange Tape = Down) PAR: Tower Top (Forest Floor) 21 Hi (23 Hi) – PAR Up + Red Wire 21 Lo (23 Lo) – PAR Up - Black Wire 22 Hi (24 Hi) – PAR Dn + Red Wire 22 Lo (24 Hi) – PAR Dn - Black Wire Tower Top PAR (Red Tape = Up) (Yellow Tape = Down)
Met Logger Layout 3 Forest Floor CNR4 Temperature (Blue-Black Tape) VX2 –Resistor to SE16 SE16 – White Wire AG – Black Wire MetOne 02C Wind Direction (Black-White Tape) SE9 – Yellow Wire AG – Green Wire Tower Top CNR4 Temperature (Red-Black Tape) VX1 – Resistor to SE8 SE8 – White Wire AG – Black Wire PTB110 Pressure (Blue-Blue Tape) SE13 – White Wire 12V – Red Wire G – Black Wire To AM16/32B SE1 – COM HI -- Yellow Wire SE2 – COM LO -- White Wire
Met Logger Layout 4 To AM 16/32B C7 = CLK (White) C8 = RES (Green) MetOne 01C Wind Speed P1 = WS #1 Yellow Wire (Black) P2 = WS #2 Yellow Wire (Red) MetOne 01C Wind Speed C1 = WS #3 Yellow Wire (Blue) C2 = WS #4 Yellow Wire (White) C3 = WS #5 Yellow Wire (Yellow) C4 = WS #6 Yellow Wire (Brown) C5 = WS #7 Yellow Wire (Orange) C6 = WS #8 Yellow Wire(Green) MetOne 01C Wind Speed AG = WS Green Wires
Soil Logger Layout 1 107 Temps Set 3 Odd Hi – 40cmbgs (Yellow Tape) Odd Lo – 100cmbgs (Green Tape) 107 Temps Set 2 Odd Hi – 20cmbgs (Blue Tape) Odd Lo – 30cmbgs (Red Tape) CS616 Wiring Green Wire – Odd Hi or Odd Lo Orange Wire – SM CTRL Terminal strip Red Wire – 12V Terminal strip Black Wire – Ground Terminal strip 107 Temps Set 1 Odd Hi – 5cmbgs (Orange Tape) Odd Lo – 10cmbgs (Brown Tape) CS616 Set 2 Odd Hi – 30cmbgs (Red Tape) Odd Lo – 40cmbgs (Yellow Tape) 107 Temps Wiring Red Wire – Odd Hi or Odd Lo Black Wire – Even Hi Purple Wire – Even Lo Clear Wire -- Ground CS616 Set 2 Odd Hi – 10cmbgs (Brown Tape) Odd Lo – 20cmbgs (Blue Tape) CS616 Set 1 Odd Hi – HFP SM (Red-Yellow Tape) Odd Lo – 5cmbgs (Orange Tape)
Soil Logger Layout 2 ST01 Temp (White Cable) Odd Hi –Red Wire, Res to Even Hi Odd Lo – Red Wire Even Hi – Resistor to Odd Hi Even Lo -- White Wire 107 Temps Set 5 Odd Hi – HFP#2 2cmbgs (Red-Blue Tape) Odd Lo – HFP#2 6cmbgs (Red-Orange Tape) 107 Temps Wiring Red Wire – Odd Hi or Odd Lo Black Wire – Even Hi Purple Wire – Even Lo Clear Wire -- Ground 107 Temps Set 4 Odd Hi – HFP#1 2cmbgs (Yellow-Blue Tape) Odd Lo – HFP#1 6cmbgs (Yellow-Orange Tape)
Soil Logger Layout 3 To AM16/32B SE7 – COM ODD HI -- Red Wire SE8 – COM ODD LO -- Yellow Wire VX1 – COM EVEN HI – Green Wire AG – COM EVEN LO – Black Wire HFPSC#2 (Red Tape) SE5 – White Wire SE6 – Green Wire SE9 – Yellow Wire SE10 – Purple Wire Precip Bucket (Green-Green Tape) P1 – White Wire AG – Black Wire HFPSC#1 (Yellow Tape) SE1 – White Wire SE2 – Green Wire SE3 – Yellow Wire SE4 – Purple Wire HFPSC #1 & #2 Heaters (Red Tape) (Yellow Tape) SW12V – Red Wire G – Black Wire
Soil Logger Layout 4 SI-111 #2 (Yellow Tape) SE14 – Green Wire SE15 – Red Wire SE16 – Black Wire VX3 – White Wire AG – Blue Wire CS616 Control C5 – White Wire for: -- CS616 HFP -- CS616 5 cmbgs -- CS616 30 cmbgs C6 – Yellow Wire for: -- CS616 10 cmbgs -- CS616 40 cmbgs C8 – Green Wire for: -- CS616 20 cmbgs SR50A #1 (Blue Tape) #2 (Red-White Tape) #3 (Yellow Tape) C3 – Green Wire 12V – Red Wire G – White Wire G -- Black Wire G – Clear Wire SI-111 #1 (Orange Tape) SE11 – Red Wire SE12 – Black Wire SE13 – Green Wire VX2 – White Wire AG – Blue Wire To AM16/32B C1 – CLK – White Wire C2 – RES – Green Wire 12V – Red Wire G – Black Wire