AVR Tools STK500 usage
AVR Tools STK500 usage. Contents. Writing assembly code in the AVR Studio Compiling and Debugging STK500 Overview (low voltage) In System Programming Running the code in the AVR LED‘s, Switches, voltage and frequency control Parallel Programming High Voltage Serial Programming


AVR Tools STK500 usage
E N D
Presentation Transcript
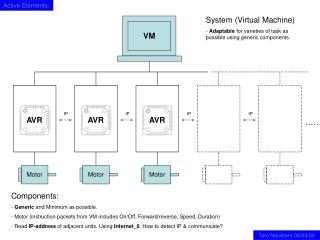
Contents • Writing assembly code in the AVR Studio • Compiling and Debugging • STK500 Overview • (low voltage) In System Programming • Running the code in the AVR • LED‘s, Switches, voltage and frequency control • Parallel Programming • High Voltage Serial Programming • Additional STK500 features • RS232 Spare, Dataflash, using a Crystal • STK500 firmware upgrade • Batch programming using the command line version
Creating a new project in AVR Studio • Launch AVR Studio 3.55 (or 4.0x) • Ceate a new project • Specify a location (e.g. c:\Atmel\AVR) • Name the project (e.g LED_STK500) • Select AVR Assembler as Project Type • Go to „File“ and „New Text File“ • Specify the name of the file and make sure to have „ .asm “ as ending
Writing the program • Double click on the assembly file in the Project window and the code editor will appear • The software is ready – Assembly code can be written! Shortcut: • Go to Help->Help Topics – the help window will appear • Find the Example Application code in the help of the STK500 (No code needs to be written) • Mark all the code using the mouse and copy it in the clipboard (using CTRL+C) • Paste the code in the source code editor window in AVR Studio • Specify the whole include path of part file (e.g. .include "c:\Program Files\Atmel\AVR Studio\AppNotes\8515def.inc"
Compiling the code • Go to Project->Project Settings...the AVR Assembler Options will appear • Select the output file format to generate – use: • Object Format for AVR Studio for debugging • Intel Hex for programming the AVR • Go to Project->Assemble to assembly the code
Debugging the code • Start debugging session by performing a single step • AVR Studio checks if emulator is connected and launches the simulator if no emulator was found • The Simulator Options window will appear - select the correct AVR device • Note: the frequency settings are only relevant for time calculations not for the simulation speed
Debugging Controls: (Trace Into, Step Over, Step Out,..., Toggle Breakpoint, Clear Breakpoint, Reset) STK500/AVRISO/JTAGICE programming tool Debugging windows control: (Watch Window, Register Window, Memory Window, Processor Window, Message Window, IO Window) The AVR Studio development environment
The IO window • Perform several single steps by using Trace Into or Step Over buttons • Set a break point on beginning of loop and hit run • Open the IO window and monitor the PortB settings (LED‘s) • Manipulate the PortD settings (PORTD register) in the IO window. This will stimulate the Switches. Note: the Switches of the STK500 are low active. • Remove the delay for faster debugging • Configure the Input Pins of Port D the way it looks if none of the switchs is pressed • Simulate switch zero (bit 0) to be pressed and interprete the output pattern on PortB • Put delay back in and generate intel hex file as output file
Other debgging features • Open the Memory window and select IO memory from the pull down selection • Find the relevant registers of the IO window at their IO memory locations • Open the Register window and see the 32 general purpose registers • Gain more information by opening the Processor window • Use this window to determine cycle counts of routines
(low voltage) In System Programming • Plug the part in the corresponding socket on the STK500 (remove all other parts) • Determine the „Target ISP header“ (SPROG1..3) and connect it to the ISP6PIN header to the • Do additional connections if necessary – see comumn Target ISP header for details • Make sure all jumpers are in default setting and nothing is connected to port pins • Connect the PC to the RS232 CTRL and power the STK500 • Start the programming software in the AVR Studio Setting up the hardware:
(low voltage) In System Programming • Select the correct device and hex file to program • Make sure ISP programming mode is selected • Go to the Advanced tab sheet and read the Signature Bytes to verify proper communication with the part • Signature matches the selected device must be reported by the software • Go back to the Program tab sheet • Erase the device, program the code and verify the successful programming
Running the code in the AVR • Use two of the 10 pin ribbon cables and connect: • PORTB with the LED‘s • PORTD with the Switches • Press the different switches to see the different output pattern • Connection of the Switches on the STK500 • Exteral pull up will give logical high if switch is not pressed • Series resistor for current limitation • Connection of the LED‘s on the STK500 • Design guarantees same amount of light independent of the target voltage level
Voltage and Frequency control on STK500 • The software clock of the STK500 can be controlled from the programming interface • Change the frequency in the pull down menue and verify the changes on the board • If the delay was never put back in the code a speed reduction to very low frequencies can be used (e.g. 14Hz) • The target voltage and reference voltage generated by the STK500 can also be controlled from the software
Parallel Programming • Plug the part in the corresponding socket on the STK500 (remove all other parts) • Connect the headers PROGDATA and PORTB and the headers PROGCTRL and PORTD with the two 10-wire cables • Do additional connections if necessary – see Parallel Programming table for details • Make sure all other jumpers are in default setting and nothing is connected to port pins • Connect the PC to the RS232 CTRL and power the STK500 • Start the programming software in the AVR Studio Setting up the hardware:
High Voltage Serial Programming Setting up the hardware: • Plug the part in the corresponding socket on the STK500 (remove all other parts) • Use on 2-wire cable to connect the PB3 pin (pin 4) on the PORTB header to the XT1 pin (pin 7) on the PORTE / AUX header. This will connect the clock system to the AVR device. • Use another 2-wire cable to connect the PB5 pin (pin 6) on the PORTB header to the RST pin (pin 4) on the PORTE / AUX header. This will connect the reset system to the AVR device. • Use a third 2-wire cable to connect the PB0 and PB2 pins (pins 4 and 3) on the SPROG1 header to the DATA0 and DATA2 pins (pins 1 and 3) on the PROG DATA header. • Use the last 2-wire cable to connect the PB1 pin (pin 1) on the SPROG1 header to the DATA1 pin (pin 2) on the PROG DATA header. • Do additional connections if necessary – see Parallel Programming table for details • Make sure all other jumpers are in default setting and nothing is connected to port pins • Connect the PC to the RS232 CTRL and power the STK500 • Start the programming software in the AVR Studio
Parallel/High Voltage Serial Programming • Select the correct device and hex file to program • Make sure Parallel/High Voltage serial programming mode is selected • Go to the Advanced tab sheet and read the Signature Bytes to verify proper communication with the part • Signature matches the selected device must be reported by the software • Go back to the Program tab sheet • Erase the device, program the code and verify the successful programming
Additional STK500 features User RS232 interface: • Can be used to interface between target AVR and PC • Operates over complete voltage range Serial Dataflash connection: • On board 2M bit dataflash on STK500 • Interfaces to SPI of AVR • Operates over complete voltage range
Jumpers • Possibility to disconnect all external signals from the AVR • Reconfiguration of clock and programming signals • Description and default settings printed on back of board
Voltage generation • Both target voltage and reference voltage are configurable in software • Jumpers to disconnect voltages if required • External target voltage sensed if internal target voltage is disconnected • Automatical adjust of programming signal voltage
Clock generation • Possibilities to clock AVR exterally: • Software clock generated by Master CPU on STK500 • Usage of crystal together with oscillator circuitry on STK500 • Applying any other external clock to XT1 pin on PORTE (e.g. external RC oscillator) • Other ways to clock the AVR: • Using the internal RC oscillator (available on most parts) • Connection of a crystal between XT1 and XT2 on PORTE with additional capacitances to GND. (On the STK500 the crystal can be connected to the corresponding pins of another dip socket. Capacitors are usually not required because the board itself provides them)
STK500 firmware upgrade • Connect the RS232 CTRL port to the PC • Turn on the STK500 while holding down thePROGRAM button. The STATUS LED will beoff to indicate firmware-programming mode • Do one of the following things: • Manual update using AVRProg: • Start the AVRprog software (go to Tools in AVR Studio) and the window below will appear • Verify correct Device and Hex file • Press the "Program" button • Watch AVRprog successfully program the onboardAT90S8535 • Shut down AVRprog • Toggle the power of the STK500 • Automatic update • Execute the Software Upgrade.exe in the sub-folder STK500 in the AVR Studio intallation direcotry. • Cycle the power of the STK500
Batch programming • Command line version of STK500 programming software is part of AVR Studio installation (STK500.exe) • Widely used for small production programmings • Essential for documentation and QA. Programming excercise: • Copy STK500.exe to c:\Atmel\AVR • Use an Editor and write the following line: STK500.exe –dAT90S8515 –s –e –ifLED_ST~1.hex –pf –vf (see STK500 help in AVRStudio for details) • Save file as BatchProg.bat in c:\Atmel\AVR • Prepare STK500 for ISP of AT90S8515 • Execute batch file