Download
1 / 23
230 likes | 428 Vues
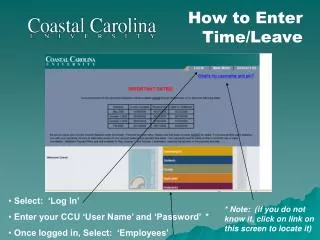
How to Enter Time/Leave. Select: ‘Log In’ Enter your CCU ‘User Name’ and ‘Password’ * Once logged in, Select: ‘Employees’. * Note: (if you do not know it, click on link on this screen to locate it). How to Enter Time. Select: ‘Time entry’. How to Enter Time/Leave. Supervisor.

E N D
How to Enter Time/Leave • Select: ‘Log In’ • Enter your CCU ‘User Name’ and ‘Password’ * • Once logged in, Select: ‘Employees’ * Note: (if you do not know it, click on link on this screen to locate it)
How to Enter Time • Select: ‘Time entry’
How to Enter Time/Leave Supervisor If applicable, dual position will appear on a row below primary • Select: Pay Period (Choose Only One) • Select: ‘Submit’ • Notes: Entry must be finished by ‘Cut-Off Date’ If you have a “dual position, it will appear here.
Terminology • EXAMPLE • Pay Day: • Friday - May 13, 2011 • Employee Cut Off: • Monday - May 16 • Supervisor • Cut Off: • Tuesday – May 17 • Cut-Off Date – the last day an employee can enter time and leave for a specific pay period. The Cut-Off date is the next workday after payday at 11:59 PM. • Authorized Processor – An employee who has been selected as a back-up person to the supervisor of record to process time and/or leave on behalf of the supervisor or designated employees.
Time Entry Summary Form - Enter # of leave hours taken in the appropriate column based on leave type. Note: ‘Salaried Non-Exempt’ employee schedules have been pre-populated based on information provided by department/division. Changes will need to be made if you work more hours than shown on the screen for a particular work day OR leave is taken. - Delete or adjust default hours shown in column labeled ‘Hours Worked’.
About Overtime… (Entry Area) • You will record ‘actual hours worked’ in the designated column. • The system will automatically convert hours worked over 40 in a specified work week to overtime after you submit your time/leave.
Time Entry Summary Form - bottom • If Time Entry is complete, ‘Approve’ by clicking in the electronic signature box. • Select: ‘Submit’ * Note - you cannot make changes once you have electronically signed the form.
Important Notes (Slide 1 of 2) • You must review your time entry form WEEKLY. • Do not enter ‘Sick Leave – Immediate Family’ in the column labeled ‘Employee Sick’ leave. • Instead, enter Sick Leave – Immediate Family hours in the ‘Other Time Hours’ column. • Then under ‘Other Leave Types’ select ‘Sick Leave – Immediate Family’ from the drop down list. • The ‘Other Leave Types’ drop down list includes only leave types you are eligible to use. • If you have any additional time/leave during the current payroll period, you must make any entries before the ‘cut-off date’.
Important Notes (Slide 2 of 2) • If you have no changes to report, you must still mark the electronic signature box and then select ‘Submit’. • If you must make leave changes to a prior period, you must submit changes through the leave amendment process. • Once you ‘Approve’ your leave record and submit it, you cannot make changes to it. This is because the leave information has already been submitted to your supervisor to approve or reject. • You will be able to view a ‘confirmation’ screen once you click on the ‘Submit’ box. Refer to next slide. • You will receive an e-mail from your supervisor if time/leave is rejected along with instructions on how to proceed.
Time Entry Confirmation Form • If you do NOT mark the electronic signature box, the confirmation will specify that the time entry status is ‘not complete’. It will verify any entries during the session. • If you mark the electronic signature box, the confirmation will specify that the time entry status is ‘completed’. You cannot re-enter the form for this period.
How to View Employees Time History (slide 1 of 4) After Logging on, Select: ‘Time history’
How to View Employees Time History (slide 2 of 4) Note: The history function will only work for transactions processed through Web Time Entry on/or about July 1, 2011. • Select the applicable year • Select: ‘Submit’
How to View Employees Time History (slide 3 of 4) Select: ‘Pay Period/Position’ Select: ‘Submit’
How to Report Leave for a Prior Period
Leave Amendment • Select: ‘Leave Amendment Form’
How to Report Leave for a Prior Period • You will be prompted to re-enter your CCU ‘User Name’ and ‘Password’ in order to access the form. Employee List M Mouse D Duck M Goofy M Mouse Remove Remove Remove Remove Remove
To ADD Leave: Enter Start Day, End Day, Leave Type, Time (# leave hours) and Comments. Enter each absence separately. How to Report Leave for a Prior Period Employee List M Mouse D Duck M Goofy M Mouse Remove Remove Remove Remove Remove
To REMOVE Leave: Go to ‘Reported Leave Time’ located in the bottom/shaded section of the screen. Click on ‘Remove’ link next to the date(s) you want to remove. How to Report Leave for a Prior Period Employee List M Mouse D Duck M Goofy M Mouse Remove Remove Remove Remove Remove
To ADJUST Leave: You must remove the leave entry already submitted and then enter the correct amount of leave. How to Report Leave for a Prior Period Employee List M Mouse D Duck M Goofy M Mouse Remove Remove Remove Remove Remove
TIP: You can use calendar function instead of entering ‘Start Day’ and ‘End Day’, if you prefer. How to Report Leave for a Prior Period Employee List M Mouse D Duck M Goofy M Mouse Remove Remove Remove Remove Remove