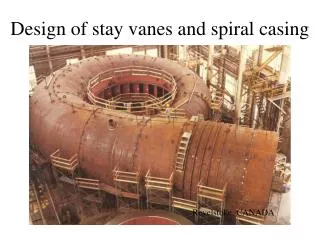
Casing Discussion
Casing Discussion. BY John Williams The Tapecoat / Royston Company. CHASE Construction Products TAPECOAT / ROYSTON. Casing Discussion Format. Casing Background & History ECDA Filling a Casing Conclusions. Casing Background.


Casing Discussion
E N D
Presentation Transcript
Casing Discussion BY John Williams The Tapecoat / RoystonCompany CHASE Construction Products TAPECOAT / ROYSTON
Casing Discussion Format Casing Background & History ECDA Filling a Casing Conclusions
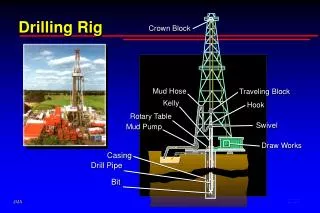
Casing Background • Casing installation began for the following: • Potential for stress damage to the pipeline caused from heavy loads, trains and trucks. • Unstable soils • Corrosion caused by oxygen concentration cells because of road building processes • Ease of removal and replacement of pipelines • Venting of dangerous gasses away from road side
SP0 – 200 DEFINITIONS Carrier Pipe:The pipe or piping that is pushed through the casing or sleeve. Casing:A metallic pipe (normally steel) installed to contain a pipe or piping. Metallic Short:Direct or indirect metallic contact between two metallic structures. Electrolytic Contact:Ionic contact between two metallic structures via an electrolyte (water).
NACE SP0 – 200 - 2008 1.1 Steel casings are used to install and maintain pipeline crossings such as those at road and railroad rights of way. This standard details acceptable practices for the design, fabrication, installation, and maintenance of steel-cased pipelines. 1.2 Use of cased crossings should be avoided unless required by load considerations, unstable soil conditions, or when their use is dictated by sound engineering practices. 1.3 This standard does not imply that utilization of casings is mandatory or necessary.
NACE SP0 – 200 - 2008 • 3.2.3 Uncoated casing pipe is normally used. The use of coated or nonmetallic casing pipe is not recommended, due to potential shielding problems. • 3.2.4 Vent pipes should be installed on both ends of a casing. • 3.2.5 The casing vent hole should be at least one-half the diameter of the vent pipe (25 mm [1.0 in] minimum). The casing vent pipe should be a minimum of 50 mm (2 in) in diameter. • 3.2.6 The casing and carrier pipe shall be properly supported for the entire length of the pipe, especially near the ends, to prevent sagging, metallic contact, and to avoid carrier pipe stress. Refer to Paragraphs 4.3 and 4.4. • 3.2.7 Properly designed casing end seals shall be installed to prevent ingress of water and debris. • Of course this rarely happens!
Historic Casing Practices • Common Practice started w/ RR Crossings • Highway requirements came later • End Seal Types • Concrete or Enamel w/ Rope • Today: Wraps, Shrink Sleeves and Link Seal types • Spacer Types • Metallic • Concrete coated pipe • Wooden • Today: Plastics
End Seal- Boot Style Note the metal banding
End Seal – Link Seal Note the metal bolts
Small Casing Spacer Note the metal bolts and the black coated metal
Large Casing Spacer Note the metal
How does a casing short to a pipeline? End seals crush or deteriorate allowing water to enter Pipe spacers crush or wrong type used such as metal or metal components Test leads make contact in the test station Vent pipes connected to the pipeline or supported on the pipeline Other possible problems such as metal tools left inside the pipe.
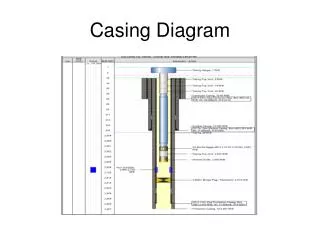
Shorted Casing A high percentage of shorted casings occur at the ends allowing the pipe to contact the casing causing an electrical (metallic) short. Vent Pipe Casing Isolating Spacers
PROBLEMS WITH CASED PIPELINES • Once water enters a casing: • Corrosion can develop • Even if the casing is not shorted, the current may not be enough to adequately protect the pipe. • Any current passing through the casing will only provide some protection to that part of the pipe immersed in the water. • No way to properly monitor the potential inside the casing.
PROBLEMS WITH CASED PIPELINES • Corrosion occurs on the external surfaces of pipelines inside casings whether the casing is shorted to the pipe or not! • US Department of Transportation agrees that there are almost as many leaks in un-shorted casings as in shorted casings.
Direct Assessment: The four steps for assessing casings Pre-Assessment, Indirect Inspection, Direct Examination, Post Assessment • Pre-Assessment • Use Historical data to develop a scenario • Coating Type • Quality of Pipe • Water Table • Filled or not
Direct Assessment • Indirect Inspection • Survey the casing • PCM / A-Frame • Results categorized into four areas • Severe • Moderate • Minor • Clear
Direct Assessment • Combine Pre-Assessment and Indirect Inspection data into action list for direct examination • Immediate Work • Scheduled • Suitable for monitoring
Direct Assessment • Direct Examination • Dig up casing for further inspection • There are three ways to verify condition of pipe • Guided Wave • In Line inspection • Hydro-test
Methods for locating Corrosion on Pipe Inside a Casing Verification Tests Guided Wave This method use torsional data as well as compressional wave modes to detect cracks, metal loss and other defects on a carrier pipe inside a casing. In Line Inspection or Tethered Pigs ILI is used to determine the presence or absence of pitting-corrosion damage on carrier pipe inside a casing. Hydrostatic Test (Go-no-Go Type Test)
WHAT TO DO WHEN THE CASING CAN NOT BE REMOVED • Correct shorted casing when possible • Most casings are shorted at the end(s) where the end seals or supports have collapsed. • Inspect the test lead wires. They may be shorted to the vent pipes or to each other. • Make sure vent pipes are not welded to the pipe. • Reposition the pipe and replace the end seals.
WHAT TO DO WHEN THE CASING CAN NOT BE REMOVED • Add more CP to the pipeline to meet criteria. 3. Monitor with vapor leak test at vent pipes at required intervals to determine if a leaks exists. • Use cameras to determine where short is located and if corrosion exists. • ILI can determine if corrosion on pipe is present.
WHAT TO DO WHEN THE CASING CAN NOT BE REMOVED OR • Clean and fill the casing with a wax type filler • Make sure vent pipes have sufficient (2”) openings to the inside of the casing in the proper configuration for best fill. • Clean out casing using air, power washer, or suction truck. • Remove old End Seals to assist the cleaning, then replace with new seals. • Pressure Test Seals with minimum 5psi. In one vent and out the other to ensure quality fill.
“Except for unprotected copper inserted in ferrous pipe, each pipeline must be electrically isolated from metallic casings that are a part of the underground system. However, if isolation is not achieved because it is impractical, other measures must be taken to minimize corrosion of the pipeline inside the casing.” PHMSA §192.467 20
Types of Casing Fillers • Hot applied Wax based materials with corrosion inhibitors • Cold Applied Wax based materials with corrosion inhibitors • Gels with corrosion inhibitors • Inert gas (casing must be sealed to provide positive pressure). Practical? • Inject vapor and or water based type inhibitor in annulus. Practical?
Requirements for filling a casing • Diameter and length of casing and carrier • Location of casing(s) • Access to reach vents • Preparation of casing including: • Evaluation of vents to be set up in best configuration for successful fill • New End Seals with 170F temperature rating if using a Hot Wax Casing Filler (Most Shrink Sleeves do not meet the temp requirement) • Air pressure test of 5 psi, no spacer blockage, no vent blockage
Casing Fill Preparation The lower side of the casing should have the opening at the bottom to allow cleaning and placement of casing filler material. Vent Pipe Casing Isolating Spacers
The majority of Casing Fillers are a blend of petroleum wax and corrosion inhibitors. These hot materials are pumped into the casings by custom, heated trucks with meter controls and experienced personnel.
Cold Applied Casing fillers come in barrels and use a mastic pump for installation. This system is good for smaller projects utilizing in-house labor.
INSTALLATION OF NEW CASING AND PIPE Do not install casing unless absolutely necessary. If installation is required, be sure to install properly coated pipe with enough supports to keep the pipe separate from the casing. Insure the end seals are properly installed. Attach vent pipes of proper size and location to provide installation of casing filler. Install casing filler as part of the project to help prevent corrosion in the future.
CONCLUSIONS • All casings are a problem shorted or not shorted. • Remove casings when possible, shorted or not. • When you must install a new casing, fill it as part of the construction project cost • Corrosion occurs almost as often in non-shorted casings as in shorted casings. • Water is present in nearly all casings • Filling a casing will remove the electrolyte / water from the equation and stop any further corrosion