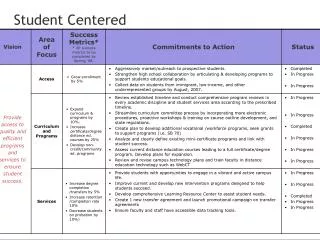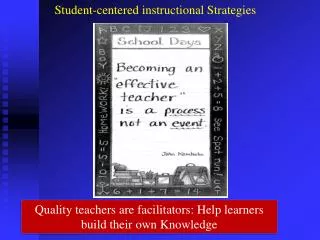
Module 4-C Student-centered Instructional Methods
Module 4-C Student-centered Instructional Methods. TED 367 Methods in Sec. Ed. Reading. Read the following in the Duplass textbook: Unit 5 (topics 21-25) Instructional Approaches Unit 6 (topics 26-36) Methods. Learning Experiences Ladder. Symbolization. Abstract. Verbal Experiences

Module 4-C Student-centered Instructional Methods
E N D
Presentation Transcript
Module 4-CStudent-centeredInstructional Methods TED 367 Methods in Sec. Ed.
Reading • Read the following in the Duplass textbook: • Unit 5 (topics 21-25) Instructional Approaches • Unit 6 (topics 26-36) Methods
Learning Experiences Ladder Symbolization Abstract • Verbal Experiences • Teacher talk, written words. Engages 1 sense. • Visual Experiences • Graphics, images, charts. Engages 1 sense. • Vicarious Experiences • PC or video programs. Engages several senses. Learner indirectly doing. • Simulated Experiences • Role play, experiment, simulations, working model. Engages nearly all senses. • Direct Experiences • Learner actually does what is being learned. Engages all senses. Most effective and long-lasting learning. Engages many senses. Interdisciplinary. Authentic learning. Concrete Hands-onMinds-on
Student-centered Methods • Learning in Pairs (Dyads) • Learning in Small Groups • Inquiry teaching anddiscovery learning • Project-centered learning • Case studies • Educational games • Field trips (real and virtual) • Guest speakers Remember to vary the methods you use!
Learning in Pairs (Dyads) • Peer-assisted Learning (PAL) • Paired Team Learning • Think-Pair-Share
Peer-assisted Learning (PAL) • One student (more skilled) tutors/mentors another (less skilled). • Also known as peer mentoring or tutoring. • Benefits: • Promotes active learning. • Increases academic achievement for both students.
Paired Team Learning • Students study and learn in teams of two. • Gifted students work and learn especially well in this format. • Specific uses: • Drill partners. • Book report pairs. • Homework partners. • Project assignment pairs.
Think-Pair-Share • In dyads: • Examine a new concept/topic about to be studied. • Discuss what they already know or think about the concept. • Present their perceptions to the class. • Benefit: • Discover misconceptions studentshave about the topic to be studied.
Learning in Small Groups • Create groups of 3-8 students. • Students assume greater control over learning. • Grouping: • Personality type. (Less assertive students.) • Social pattern. (Break up friends.) • Common interest. • Learning style. • Abilities.
Cooperative Learning Groups • CLG’s are heterogeneous groups who work together, with emphasis on support for one another. • Based on the work of Vygotski. Vygotski argued that learning is most effective when learners cooperate in a supportive learning environment, under guidance of a teacher.
Cooperative Learning Groups • Theory: • When a mixed group of learners works together towards a common goal: • Friendship increases. • Respect increases. • Individual self-esteem is enhanced. • Increased higher-order thinking. • Learning occurs.
Cooperative Learning Groups • Assign roles such as: • Group facilitator: Keep group on task. • Materials manager: Obtain, maintain, and return materials. • Recorder: Record all group activities and processes. • Reporter: Report progress to teacher/class. • Thinking monitor: Identify and record sequence and processes of group’s thinking. Be sure to rotate students through positions!
Cooperative Learning Groups • For CLG’s to work: • Each group member has 2 tasks: • Perform his/her assigned task. • Ensure others are performing their tasks. • Foster interpersonal skills. • Ensure all students understand their roles. • Rotate roles.
Cooperative Learning Groups • Uses: • Problem solving. • Investigations. • Opinion surveys. • Review. • Project work. • Test making. • Many other purposes.
Cooperative Learning Groups • Benefits: • Improved communication. • More acceptance of individual differences. • Fewer off-task behaviors typically. • Improves thinking strategies (problem-solving, decision-making, critical thinking, creative thinking). • Increases academic achievement.
Cooperative Learning Groups • Grading: • You typically grade based on group achievement. • Options: • You can recognize individual contributions. • You can grade individuals on different standards, based on ability. • Although the group receives a grade, individual learners will be assessed in additional ways later (e.g., tests, etc.).
Activity • Create a cooperative learning group activity. • Determine the topic/task. • Determine the number of students per group. • Identify how you will group students (ability, learning style, personality, etc.). • Identify student roles.
Inquiry Teaching andDiscovery Learning • Both methods are based on the assumption that learners would rather actively seek knowledge than receive it through expository methods. • Both methods are based in problem solving. vs.
Inquiry Teaching andDiscovery Learning • Problem solving involves: • Define a problem. • Determine desired outcome. • Select possible solutions. • Test trial solutions. • Evaluate outcomes. • (Revise as needed.) • Differentiation: Who defines the problem, process, and solution?
Problem Process Solution Teacher or textbook Teacher or textbook Student Inquiry Teaching vs.Discovery Learning These methods differ by who defines problem and process for solving the problem. • Teacher or textbook • Student • Student • Student • Student • Student LowEnd HighEnd
Inquiry Teaching andDiscovery Learning Outcomes • You want students to… • Use their skills to address real-world problems. • Develop confidence in their ability to solve problems. • Understand that there are no right/wrong answers to real-life problems. • Help students realize the tentativeness of “answers” to real-life problems.
E-missions.net • 2-hour videoconference. • Emergency response team: Students form teams to handle different tasks. • Students utilize volcano and hurricane data sent from the (simulated) space shuttle mission. • Emergency bulletins arrive at times. • Incorporates math, science, and practical application.
E-missions.net • Costs $500 per mission. • Requires 5 PC’s and videoconferencing equipment. • Aligned with state standards. • Provide lesson plans. • Provide session available to show benefits to schools, students, and teachers.
E-missions.net e-missions.net
Class Activity/Example • Experience inquiry teaching (discovery learning) as a class. • Topic: Locating a Colony
Activity • Create an inquiry teaching/discovery learning experience. Allow the class to attend the learning activity. • Create a real-life problem to be solved. • Create materials for students: • Background/scenario. • Directions to solve problem. • Provide any additional materials needed (Web sites, maps, graphics, statistics, etc.).
Project-centered Learning • Projects are: • A hands-on way for students to apply what they have learned. • A relatively long-term investigation (experience). • Culminates in a presentation. • Can include an oral report, a written report, and a hands-on item (e.g., multimedia presentation, play, song, poem, diorama, poster, chart, display).
Project-centered Learning • Benefits: • Develops social interaction and cooperation. • Develops skills in writing and verbal communication. • Encourages higher-level thinking. • Encourages learning and thinking independence. • Builds self-esteem (student knows much on one topic/area and makes a contribution). • Allows student to exercise control over learning. • Increases motivation.
Suggestions for Projects • Helps students select a topic. • Provide sample topics. • Show other finished projects. • Suggest readings, Web sites, and other resources. • Let students decide if they want to work in groups. • The project could be a class project divided into sections handled by groups.
Suggestions for Projects • Help students stay on-task with progress. • Set deadlines. • Ask for information on progress. • Provide coaching and guidance, and inquire if students have questions/problems. • Maintain balance. • Provide sufficient guidance and coaching so the projects don’t fail. • Don’t provide too much guidance or the project becomes a teacher-centered project vs. a student-centered experience.
Suggestions for Projects • Require both a written and oral report. • Have students write a paper that describes their experience in developing the project vs. doing a traditional research paper. • Have students present an oral report to the class.
Suggestions for Projects • Make the project a significant part of the student’s grade. • Make the grading clear (clear rubric). • Suggested criteria: • Organization. • Quality and quantity. • Quality of learning shared with the class. • Quality of products (written, oral, and hands-on).
Activity • Create a project-centered learning activity. • Choose a subject. • Provide some sample topics to help guide us in picking a project topic. Picking a topic is one of the most difficult parts of this activity. How will you teach this to your class? • How will you handle deadlines and progress updates? • How will you assess the product(s)? Create a rubric.
Case Studies • Case studies involve presenting a real-world type of problem that students attempt to solve/address. (Remember that in real-world situations, there are no black and white answers.) • Case studies place students in a problem-solving scenario. • A case may present actual data already collected from a real company/situation.
Case Studies • Students analyze (process) the case: • Determine what is known. • Assess the problem. • Create charts, data tables, etc. as needed. • Determine important vs. unimportant details. • Students determine possible course(s) of action to solve/address the problem. • Deliver a final product: • Written report, multimedia presentation, and/or a classroom presentation.
Advantages of Case Studies • Students become active agents in the learning process. • Students analyze information and develop solutions to problems. • Students develop skills that allow them to think clearly about unstructured, ambiguous situations using incomplete information.
Advantages of Case Studies • Students must decipher the underlying motivations of the characters or the causes of events or phenomena. • Students must deduce assumptions and principles because cases do not explicitly denote the underlying problems. • Ensures that students learn to both listen and talk, regardless of their temperaments. • Students develop skills in articulating ideas to influence and persuade others.
Example: Math Case Study • One More Minute Between Classes • The student council has asked the principal to add one more minute between classes, to cut down on the number of students tardy for class. The principal has asked your class to study the matter and make a recommendation.
Example: Math Case Study • Guidelines provided by the principal: • Bus schedules cannot be changed due to after-school activities and bus schedules. • Classes must meet at minimum of 210 minutes a week or 420 minutes every two weeks. • Homeroom time is required. • A multimedia presentation is expected in two weeks. • Be prepared to defend any plan with facts, figures, and charts.
Example: Science Case Study • Humans Affect on the Local Watershed • For humans to survive they need water, however there is only a limited amount of water for everyone to use on the earth. The community is locked in a debate about the appropriate use of existing water supplies and the need to expand business development.
Example: Science Case Study • Last month the local newspaper ran a story about the lack of additional sources of water for the community. The article also stated that unless additional sources of water could be located, the community is at risk of running out of water in 20 years.
Example: Science Case Study • Today the local newspaper has a story about a new industry which wants to move into the community. This industry needs a large amount of water for its manufacturing process. This new industry is expected to add 200 new jobs and provide additional taxes to support the community.
Example: Science Case Study • The local government is going to hold a public hearing on the matter in two weeks. You are to present your view at this hearing.
Activity • Prepare a case study learning activity. • Do an online search for case studies in your field. Select a case study. • Determine the purpose of using the case. What do you want students to gain? • Some case studies provide tasks/questions for learners. Present a task(s) or questions for the learners to address in the case. • How will you assess what the learners have gained from analyzing this case?