Performing a titration
Performing a titration. A bluffers guide!. Preparing a standard solution. Accurately weigh a weighing bottle, recording the mass Add approximately x g of your substance to the bottle. Re-weigh and record the mass Tip the substance into a 100cm 3 beaker.

Performing a titration
E N D
Presentation Transcript
Performing a titration A bluffers guide!
Preparing a standard solution • Accurately weigh a weighing bottle, recording the mass • Add approximately x g of your substance to the bottle. • Re-weigh and record the mass • Tip the substance into a 100cm3 beaker
Rinse out the weighing bottle with distilled water a couple of times. Add the washings to the beaker. (It is important all the solid goes into the beaker) • Pour about 25cm3 of distilled water into the beaker (but do not exceed half-full) • Stir with a glass rod until all the solid has dissolved
Transfer the contents of the beaker into a 250cm3 volumetric flask, carefully, using a funnel. • Rinse the beaker and glass rod a couple of times, adding the washings to the flask, then wash the funnel twice as well. • This technique ensures all the solid is transferred.
Add distilled water to the flask to about 1cm below the graduation mark • Using a clean pipette add distilled water until the bottom of the meniscus is just touching the graduation mark. • DO NOT EXCEED THIS MARK ON PAIN OF DEATH!!
Stopper the flask, with the correct sized stopper, (Hint: Check this point before starting!!) and invert several times • You have now made a standard solution, the molarity of which you know exactly. • Having done all this correctly: stop and look very smug!!
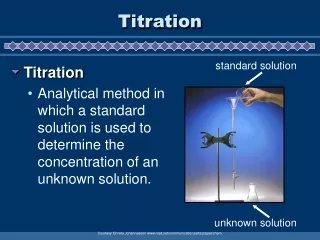
Use a pipette and pipette filler to withdraw 25.0cm3 of standard solution from the volumetric flask and transfer it to a conical flask • Use a clean beaker to fill a burette with the solution that you are titrating with.
Good practice includes • Not looking up at the beaker (This can be dangerous). You should be filling it from above, ie looking down on it!! • Ensure the tap is closed (Please!!) • Use an appropriate clamp!! • Use a funnel to perform this procedure • Run a little solution into the beaker to remove any air bubbles
More ways to get an A* • Take the funnel out before recording the starting volume • It does not have to go to 0.0cm3 • Make sure you are aware you can record these volumes to 2dp, so therefore ensure you do record all volumes to 2dps!!! • Be consistent, always record to the bottom of the meniscus
Couple more things • Use a white tile when doing the titration • Add the solution from the burette in small amounts, swirling all the while
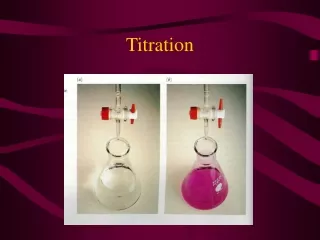
Finally • The end point will be an obvious sudden colour change. • Record the volume used and work out the volume used. This is your rough titration. • Do several more titrations until you achieve concordance (two readings within 0.1cm3). • Add the solution dropwise as the end point approaches, swirling at the same time.