Download
1 / 15
160 likes | 361 Vues
Purchase Order and Invoice Guide. Updated December 14, 2012. Supplier Portal Navigation. Your Account Page. Purchasing Process Steps. Draft and Approve Purchase Order(s): The buyer will create and approve a purchase order for the desired goods or services.

E N D
Purchase Order and Invoice Guide Updated December 14, 2012 Purchase Order and Invoice Guide
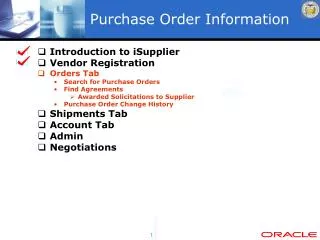
Supplier Portal Navigation Purchase Order and Invoice Guide
Your Account Page Purchase Order and Invoice Guide
Purchasing Process Steps • Draft and Approve Purchase Order(s): The buyer will create and approve a purchase order for the desired goods or services. • Reviewing the Purchase Order: Once the purchase order has been approved by the buyer, the supplier will be able to view the purchase order in the Supplier Portal. • Acknowledging a Purchase Order: The supplier will be able to acknowledge the purchase order in the Supplier Portal. • Creating an Invoice: Once the purchase order has been accepted, the Supplier will be able to create an invoice from the purchase order. • Submitting an Invoice: The supplier will be able to submit the invoice to the buyer for review. • Acknowledging a Purchase Order: Once the invoice has been submitted, the buyer will be able to acknowledge, accept or reject the invoice. Purchase Order and Invoice Guide
Reviewing Purchase Orders After a purchase order has been created and approved by the buyer, the purchase order will become available to view in the Supplier Portal. The supplier should first review the purchase order before approving it. To review the purchase order, do the following: • From the Your Account Screen, select the Not Confirmed link under the Purchase Order column. This internal link will show all of the purchase orders that are awaiting confirmation. • Take a moment to review the purchase orders listed on the Your Purchase Orders Screen. • Click on the name of the Purchase Order to review. • View the purchase order details. Purchase Order and Invoice Guide
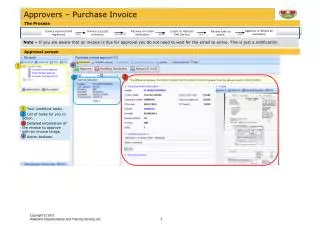
Acknowledging Purchase Orders Once the purchase order has been reviewed, the supplier can acknowledge the purchase order. A supplier will be able to acknowledge the purchase order at the shipment level or order level. To acknowledge a purchase order, do the following: • From the Your Account Screen, select the Not Confirmed link under the Purchase Order column. This internal link will show all of the purchase orders that are awaiting confirmation. • Select the desired purchase order by selecting the radio button at the right of the table. • Next, click the Acknowledge button. Choose to acknowledge the purchase order at the Order Level or the Shipment Level. • To acknowledge at the Order Level, select either the Accept All or Reject All button on the bottom of the window. • To acknowledge the purchase order at the Shipment level, acknowledge the whole purchase order by selecting the Accept All or Reject All buttons or individually accept, reject or change each line item by using the magnifying glass icon to the right of each line item and selecting the desired option. • If desired, write a brief description explaining why an individual line item or set of line items was accepted or rejected . • If desired, add the Supplier Item Number under each line item if it is different than the Item Number specified by the buyer. • Next, click on the Submit button. • Next, select the Submit button on the Confirm Screen, then click the Continue button. Purchase Order and Invoice Guide
Acknowledge PO Example Purchase Order and Invoice Guide
Creating the Invoice Once the supplier has acknowledged the purchase order, the next step is to generate the invoice. To generate an invoice, do the following: • Return to the Your Account page in the Supplier Portal. • Select the Create New link in the Transactions Table under the Invoice Column. • Search for the purchase order by entering the desired search parameters and clicking on the Submit button. • When the list of schedules displays, select the desired purchase order. • Click on the Continue icon. When the My Invoice Screen displays, take a moment to review it. The next section describes how to fill out the Invoice Details on the My Invoice Screen. Purchase Order and Invoice Guide
My Invoice The invoice creation process occurs on the My Invoice page, which is composed of three screens. These screens are as follows: • Input • Tax • Review & Confirm Purchase Order and Invoice Guide
My Invoice Page Purchase Order and Invoice Guide
Input Screen To complete the Input Screen, do the following: • When the Input screen appears, take time to become familiar with the fields. • Next, enter the Invoice Number for the invoice. • Next, enter the Invoice Date by using the Calendar icon below the text field and selecting the desired date. • If desired, enter Comments about the invoice for the buyer. • If desired, change the Quantity of the line item. • If applicable, enter Shipping and Handling costs. • If desired, select the Pencil icon to add the Charge Type and a Description. • Next, click on the Submit button. Purchase Order and Invoice Guide
Entering the Tax The next screen contains the submitted information from the Input screen and a field for entering tax. To complete the information required for this screen, do the following: • If applicable, enter the Tax. • If desired, enter a Description of the tax using the Pencil icon to the left of the Tax field. • Next, select the Continue button. Purchase Order and Invoice Guide
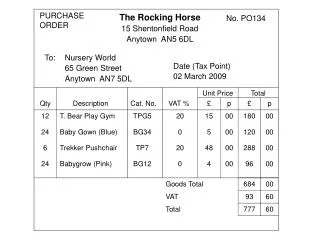
Review & Confirm Screen Once the tax information has been submitted, a preview of the invoice should display. To review and confirm the invoice, do the following: • Take a moment to review the preview of the invoice. If the Invoice is accurate and complete, click on the Submit button. • If the invoice was submitted successfully, a message that reads “Invoice submitted successfully” along with a preview of the invoice will display. • If desired, save the invoice as a PDF by selecting the PDF icon in the top right corner of the preview screen. • Select the Continue link to the right of the submitted invoice message to return to the Supplier Portal Home page. Purchase Order and Invoice Guide
Invoice Submission Purchase Order and Invoice Guide
After Invoice Creation After the invoice has been submitted, it will be available for the buyer to review, acknowledge, and process. Once the buyer has acknowledged the invoice, it will be accessible in the Supplier Portal by clicking on the Acknowledge Link under the Invoice column in the Transactions Tile. Purchase Order and Invoice Guide