EMnet Setup: Notifications
EMnet Setup: Notifications. Notifications. Previous versions of EMnet include multiple means of distributing and disseminating emergency information:. Printing Options (automatically prints incoming messages)

EMnet Setup: Notifications
E N D
Presentation Transcript
EMnet Setup: Notifications
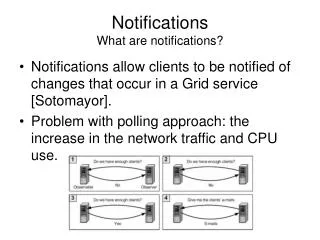
Notifications Previous versions of EMnet include multiple means of distributing and disseminating emergency information: • Printing Options (automatically prints incoming messages) • Public Distribution(decrypts messages and makes them available in text or XML format) • Pager Notifications(forwards incoming messages or error notifications to email addresses) The Notifications feature handles all of these functions and more in a single, highly flexible rules-based system.
Notifications The new Notifications feature permits notifications for: • All incoming EAS messages, or EAS messages that fall into specific parameters • All incoming priority-level text messages, or priority-level text messages that fall into specific parameters • Outgoing EAS and priority-level text messages • Error notifications
Notifications These messages and events may be disseminated in multiple ways: • Messages may be automatically printed from a single printer, or multiple printers • Messages may be forwarded to any email address, including standard email accounts, pagers, cell phones,etc. (This feature requires a local mail server to disseminate email. It also permits importing existing lists of email addresses. You may select different alerts to be sent to different email addresses.) • Messages may be decrypted into text or EDXL format, and stored in a folder on the PC for further use • The system may be configured to launch an executable when a message arrives.
Notifications Notification rules can easily become very complicated! Before you begin creating rules, you may wish to plan how you want to be notified of various events. In this way, you can minimize undesired redundancy, and make sure no crucial messages are missed.
Setting up Notifications To configure your station for notifications, right-click on the E-NAWAS satellite icon, and select Notifications.
Setting up Notifications Logging into Notifications will require a case-sensitive password.
Setting up Notifications This will open the EMnet Notification Rules dialog.
Creating a new rule To create a new rule, click New Each Rule you create in the Notification Rules dialog will direct EMnet to process messages of a particular type. There is no limit to the number of rules you can create!
Defining when a rule is in effect By default, the rule is in effect at all times. You will next be asked when the rule should be in effect.
Defining when a rule is in effect You may also configure specific times when the rule is in effect. Click When to define specific times You will next be asked when the rule should be in effect.
Defining when a rule is in effect This will open a dialog that will allow you to define specific times, by weekday. You will next be asked when the rule should be in effect.
Defining the type of message You may select: Incoming messages (non EAS) Next, you will define which type of message this rule applies to.
Defining the type of message You may select: Incoming messages (non EAS) Incoming EAS messages Next, you will define which type of message this rule applies to.
Defining the type of message You may select: Incoming messages (non EAS) Incoming EAS messages System Errors Next, you will define which type of message this rule applies to.
Defining the type of message You may select: Incoming messages (non EAS) Incoming EAS messages System Errors Notifications can also be processed for EAS or non-EAS messages sent from this EMnet terminal. Notifications can also be processed for EAS or non-EAS messages sent from this EMnet terminal. Next, you will define which type of message this rule applies to.
Defining the type of message For this example, we will select Incoming EAS Messages. (Settings for other message types will work similarly.) Click Next Next, you will define which type of message this rule applies to.
Defining EAS messages All Messages is checked by default. This will process all EAS messages received at this station. This will open a Message Filter dialog, which allows you to define which EAS messages are processed for this rule.
Defining EAS messages If you wish to select messages by destination FIPS code, check Messages to … … and then select the desired destination from the dropdown menu … This will open a Message Filter dialog, which allows you to define which EAS messages are processed for this rule.
Defining EAS messages … or click Customize to select multiple FIPS codes. If you wish to select messages by destination FIPS code, check Messages to … This will open a Message Filter dialog, which allows you to define which EAS messages are processed for this rule.
Defining EAS messages … and then use the dropdown to select a single originator … If you wish to select messages by origin, check Messages from… This will open a Message Filter dialog, which allows you to define which EAS messages are processed for this rule.
Defining EAS messages … or click Customize to select multiple originators. If you wish to select messages by origin, check Messages from… This will open a Message Filter dialog, which allows you to define which EAS messages are processed for this rule.
Defining EAS messages … and then use the dropdown to select a single event code … If you wish to select messages by event code, check Messages with event code… This will open a Message Filter dialog, which allows you to define which EAS messages are processed for this rule.
Defining EAS messages … or click Customize to select multiple event codes. If you wish to select messages by event code, check Messages with event code… This will open a Message Filter dialog, which allows you to define which EAS messages are processed for this rule.
Defining EAS messages If you have checked more than one option above… … then you may use the radio buttons below to select messages that match *all* of the criteria, *any* of the criteria, or *none* of the criteria. This will open a Message Filter dialog, which allows you to define which EAS messages are processed for this rule.
Defining EAS messages When the EAS message filter has been configured to your satisfaction, hit Next to define the rest of the rule. This will open a Message Filter dialog, which allows you to define which EAS messages are processed for this rule.
Defining the actions to be taken After you have defined the type of message you are processing, the next screen that appears will allow you to define the actions to be taken with that message type.
Defining the actions to be taken Click Print Message to automatically send the message to a printer … … and then click the Printer button to select a printer installed on this PC. NOTE: If you want to send a message to multiple printers, you may create a separate rule for each printer. After you have defined the type of message you are processing, the next screen that appears will allow you to define the actions to be taken with that message type.
Defining the actions to be taken If Inhibit on screen alert is selected, no flashing alert will appear to alert you of these messages’ arrival, and no tone will sound. The message will simply be placed in the inbox with no fanfare. Before selecting Inhibit on screen alert, be *sure* you do not want alerts to appear for this type of message! If you click Inhibit on screen alert for the message, then when the message arrives, no alert will appear on the screen. After you have defined the type of message you are processing, the next screen that appears will allow you to define the actions to be taken with that message type.
Defining the actions to be taken If Discard is selected, the message will be deleted upon reception. It will *not* be stored in the Inbox for future reference or alert you on arrival. Before selecting Discard, be *sure* you do not wish to receive messages of this type! DISCARDING MESSAGES IS NOT RECOMMENDED. If you click Discard, then when the message arrives, it will be immediately deleted. A Discarded message may not be printed or redelivered over email. After you have defined the type of message you are processing, the next screen that appears will allow you to define the actions to be taken with that message type.
Defining the actions to be taken Click Browse to select the desired executable. Clicking Run this program will run an executable when a message arrives. After you have defined the type of message you are processing, the next screen that appears will allow you to define the actions to be taken with that message type.
Defining the actions to be taken Click Redeliver message using regular Email to forward incoming messages to email addresses. If desired, you can choose to also forward any incoming attachments. After you have defined the type of message you are processing, the next screen that appears will allow you to define the actions to be taken with that message type.
Defining the actions to be taken Clicking Export the message to file enables you to store the decrypted message on your computer. Use the drop-down to select the desired format After you have defined the type of message you are processing, the next screen that appears will allow you to define the actions to be taken with that message type.
Defining the actions to be taken Clicking Export the message to file enables you to store the decrypted message on your computer. If desired, you can choose to also save any incoming attachments. Click Copy the exported message to the specified folder. After you have defined the type of message you are processing, the next screen that appears will allow you to define the actions to be taken with that message type.
Defining the actions to be taken Clicking Export the message to file enables you to store the decrypted message on your computer. Click Browse to select the desired folder. Click Browse to select the desired folder. After you have defined the type of message you are processing, the next screen that appears will allow you to define the actions to be taken with that message type.
Defining the actions to be taken When you have chosen all desired actions for this specific rule, click Next. After you have defined the type of message you are processing, the next screen that appears will allow you to define the actions to be taken with that message type.
Email Delivery If you click Add … …then you will be able to type in desired email addresses, one at a time. …then you will be able to type in desired email addresses, one at a time. If you selected Redeliver messages using regular email, you will then be taken to an additional screen, where you can specify email addresses for this rule.
Email Delivery Or, click Import from file to import addresses saved in a .txt file. If you selected Redeliver messages using regular email, you will then be taken to an additional screen, where you can specify email addresses for this rule.
Email Delivery Click Export to file to save the current list of addresses in a .txt file, for future use. If you selected Redeliver messages using regular email, you will then be taken to an additional screen, where you can specify email addresses for this rule.
Email Delivery If desired, you can choose to send a daily test message to these addresses. Type in the desired time, and click Customize to specify the message. When you have entered all desired email addresses for this rule, click Next. If you selected Redeliver messages using regular email, you will then be taken to an additional screen, where you can specify email addresses for this rule.
Email Delivery If this is the first time you are setting up your system to deliver email, you will then be taken to an additional screen, where you can define a mail server to deliver email.
Email Delivery Enter the domain name or IP address of the outgoing mail server you wish to use here: Type in the email address to appear in the “from” column here: If this is first time you are setting up your system to deliver email, you will then be taken to an additional screen, where you can define a mail server to deliver email.
Email Delivery If your outgoing mail server requires authentification, select the type here, and enter the appropriate username and password: Make certain that the selected port is one that is open on your network to the specified mail server. Click OK If this is first time you are setting up your system to deliver email, you will then be taken to an additional screen, where you can define a mail server to deliver email.
Email Delivery Enter an email address to receive the test. The first time you set up the outgoing mail server, EMnet will send a message to test the server info you have entered.
Notifications The rule will now appear in your list of notification rules.
Notifications If desired, you can uncheck the Enabled checkbox to temporarily disable a rule. There is no limit to the number of rules you can create.
You have completed the EMnet Notifications Tutorial Thank you for your time!If you have further questions, please contact Comlabs Tech Support: support@comlabs.com 321.409.9898