Ricoh MP6001/7001 Quick Reference
Ricoh MP6001/7001 Quick Reference . Rogue Community College. Quick Reference User Guide. Compliments of: IKON Office Solutions. Table of Contents. COPIER FUNCTIONS How To Copy Documents How To Duplex Documents How To Staple Batch Feed Mode/Auto Duplex

Ricoh MP6001/7001 Quick Reference
E N D
Presentation Transcript
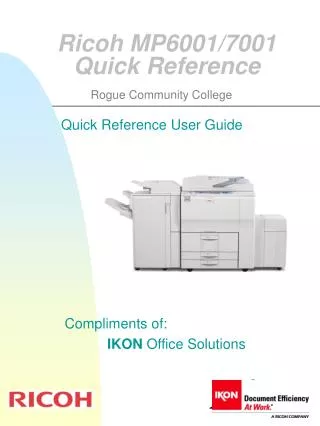
Ricoh MP6001/7001Quick Reference Rogue Community College Quick Reference User Guide Compliments of: IKON Office Solutions
Table of Contents COPIER FUNCTIONS • How To Copy Documents • How To Duplex Documents • How To Staple • Batch Feed Mode/Auto Duplex • Directional Magnification & Enlargement • Image Combination • Book Copying • Magazine Modes • Book Copy Setup & Memory Mode • Tab Copy • Bypass Tray – Copying on OHP • Bypass Tray - Transparencies With Slip Sheets Inserted • Bypass Tray – Heavy Stock • Job Copy Interrupt Ricoh M6000/7000 Quick Reference Guide
Table of Contents DOCUMENT SERVER FUNCTIONS • Scan To Document Server • Print From Document Server • Deleting Documents from Document Server EMAIL AND FAX FUNCTIONS • Email Address Registration • Fax Number Registration • Deleting Email and Fax Entries Ricoh M6000/7000 Quick Reference Guide
COPIER FUNCTIONS Ricoh M6000/7000 Quick Reference Guide
How To Copy Documents Staple • Place originals face up, portrait orientation in Document Feeder (ADF) • Select FINISHER Tab • Select one of the Stapling positions indicated on screen • Enter desired number of copies • Press START • Retrieve documents • Retrieve originals • Press Clear Modes Ricoh M6000/7000 Quick Reference Guide
How To Duplex Documents • Place originals face up, portrait orientation in Document Feeder (ADF) • Select any appropriate enhancement modes • Select Duplex/combine • Press 2 1 • Press OK • Enter desired number of copies • Press START Ricoh M6000/7000 Quick Reference Guide
Staple Documents/Sample Copy Function Saddlestitch Booklet Single Double LGL Double LTR • Place originals face up, portrait orientation in Document Feeder (ADF) • Select Finisher Tab • Select one of the Stapling positions indicated on screen • Press the Sample Copy button • Message displayed *One set was copied. • If you want to print remaining sets), press Resume. • Press Cancel then you can change modes, I.e number of additional sets required, etc. • Screen is displayed • Touch Resume • Press Clear Modes Different stapling positions with optional finisher Ricoh M6000/7000 Quick Reference Guide
R R R Batch Feed Mode/Auto Duplex = • Select the 1:2 Duplex Mode • Touch Sort • Touch Special Original • Touch Batch (SADF) • Touch OKTouch Combine/Duplex • Touch 1 Sided 2 Sided • Touch OK • Select quantity using the numeric pad • Place the first batch of documents in the SADF • Press Start • Add remaining originals, pressing start after after each new batch • Continue adding originals until all originals are complete • Press the # key and the job will automatically begin to print. Ricoh M6000/7000 Quick Reference Guide
Directional Magnification or Enlargement • This exercise will assist you in placing 8.5x11 image on to a 11x17 sheet • Place the letter size original face up, landscape orientation in the ADF • Select a paper tray containing 11x17 paper • Select Auto Reduce/Enlarge • Select Size Mag • Select D Mag (%) • Select Horizontal Ration • Enter 155 using numeric keypad • Select Vertical Ration • Enter 129 using numeric keypad • Touch OK twice • Press Start • Retrieve output = = Ricoh M6000/7000 Quick Reference Guide
R R R R R R R R = Image Combination • This feature allows users to place multiple page documents on to a single page • Place documents in the ADF face up, portrait orientation. • Originals can be grouped in order of 2,4,8 Or 16 to a page • Select Duplex/Combine • Select Combine 1 Side • Select the appropriate grouping (2,4,8,16) • Touch OK twice, Press START • To duplex same application • Place documents in the ADF face up, portrait orientation • Select Duplex/Combine • Select Combine 2 Side • Select the appropriate grouping (2,4,8,16) • Touch OK twice, Press START 4 Pages to 1 Page 2 Pages To 1 Ricoh M6000/7000 Quick Reference Guide
Book Copying • Place Book on glass Platen to desired page • Select Dup./Combine • Select Book • Select Booklet • Select Single Sided or Double Sided Touch OK twice • Select Edit/Stamp • Select Centering • Select OK • Enter desired sets • Press Start • Change book pages and press Start • Press Start after each desired page • Press # after completing last page of document • Sets will automatically print Ricoh M6000/7000 Quick Reference Guide
2 3 4 1 Magazine Modes • Place all originals in ADF face up, portrait orientation • Select Dup./Combine • Select Series/Book • Select Magazine 1 - Sided for Simplex pages or Magazine 2 - Sided for Duplex • Touch OK twice • Select Edit/Stamp • Select Centering • Select OK • Enter desired number of sets • Press Start • Optional • Press Sample Copy to preview job before running multiple sets • Remove the copy and fold in half to create a booklet (if finisher is not added to system) Saddlestitch with optional SR750 Finisher 2 1 3 4 Automatic book layout Ricoh M6000/7000 Quick Reference Guide
Book Copy Setup & Memory Mode • Set UP • Place page of book on Glass Paten • Press Paper Selection 8 1/2x11 • Press Reduce/Enlarge • Select Full Page • Press Duplex/Combine • Select Book • Press Book2 Sided • Press Book 2 Sided • Press OK 3 times • Press Start • Program Mode • Press Program • Select a Storage Box • Press Store - OK • Name Setting - Book Duplex • Press OK • To Use • Place page of book on Glass Paten • Press Program • Select Book Duplex • Press Start Ricoh M6000/7000 Quick Reference Guide
R Tab Copy • Load Tab stock in Tray #2. (90 lb..,Single Reverse Tabs, Tabs facing top left) • Press the User Tools key • Touch Systems Settings • Touch Paper Size Setting • Touch Next • Touch Tray 2 Special Paper Indication • Touch Tab Stock • Touch OK • Touch Exit twice • Place Tab originals in Document Feeder, portrait orientation with Tab verbiage, face up to the right • Touch Tray 2 (Tab Stock) for paper selection • Press Start to begin your job • Retrieve originals • Retrieve output Tabs with optional SR810 Finisher Ricoh M6000/7000 Quick Reference Guide
Bypass Tray - Copying on OHP • Place original in the ARDF or on glass platen • Place Transparencies in bypass tray • Press the # button on key pad • Select OHP • Press OK • Press Start • Transparencies must be of Laser Copier type to withstand the head of the engine, failure to adhere will result in engine jams • Note: If you select OHP transparencies Labels, or thick paper in Special Paper, you cannot have copies delivered face down - -they will JAM Ricoh M6000/7000 Quick Reference Guide
Optional - If slip sheets are stored in a pre-registered tray, you have the election have blank slip sheets inserted in-between transparencies or have the data that is being copied on transparencies copied onto slip sheets as well • Place Transparencies in bypass tray • Press the # button on key pad • Select OHP • Press OK • Press Cover/Slip Sheet • Press Slip Sheet • Select (Copy) or (Blank) • Press OK • Select the tray that contains paper for copying the originals • Place originals in the ARDF or on glass platen • Press Start Transparencies With Slip Sheets Inserted Ricoh M6000/7000 Quick Reference Guide
Bypass Tray - Heavy Stock • Place original in the ARDF or on glass platen • Place Stock Paper in bypass tray • Press the bypass Tray Button • Press the # button on key pad • Select Heavy • Press OK • Enter desired number of sets • Press Start • Note: If you select OHP transparencies Labels, or thick paper in Special Paper, you cannot have copies delivered face down -they will JAM • Media type must be within the Copier paper specifications to avoid damaging the engine Ricoh M6000/7000 Quick Reference Guide
DOCUMENT SERVER FUNCTIONS Ricoh M6000/7000 Quick Reference Guide
Scanning To Document Server • Press Document Server (see arrow) • Place originals in the ADF or glass platen • Press SCAN ORIGINAL (see arrow) • Select any appropriate changes • Press Change File Name • Name Document • Optional Password may be added • Press Start • New File will show in Document Server list • To continue Scanning Additional Documents, repeat steps 1 - 5 • Press SCANNING COMPLETE • (when you are finished scanning in documents) Ricoh M6000/7000 Quick Reference Guide
Print From Document Server • Press Document Server • Select the document (s) you wish to print (press each desired boxes) • Document may be selected in any order to print • Select Print Settings • Optional settings may be added, e.g., duplex, staple, etc. • Enter desired number of print sets • Press START • Optional • Select SAMPLECopy • Prints one set of documents to proof document prior to running multiple sets Ricoh M6000/7000 Quick Reference Guide
Deleting Documents From Document Server • Press Document Server • Select the document (s) you wish to delete (press each desired box) • Document may be selected in any order to delete • Select Delete File button • Confirm you wish to delete this file • Press START Ricoh M6000/7000 Quick Reference Guide
EMAIL AND FAX FUNCTIONS Ricoh M6000/7000 Quick Reference Guide
Registering E-mail Addresses • Press User Tools/Counter button • Press Systems Settings box • Press Admin Tools tab • Press Address Book Management box • Press New Program box • Press Change below the Name bo • With supplied keyboard, enter the user’s name • Press OK • Press the E-mail tab • Press Change box to the left of the E-mailAddress box • With supplied keyboard, enter the user’s email address • Press OK • Press the Protection tab • Press the Sender box to the right of Use Name As • Press OK • Exit Ricoh M6000/7000 Quick Reference Guide
Registering Fax Numbers • Press User Tools/Counter button • Press Systems Settings box • Press Admin Tools tab • Press Address Book Management box • Press New Program box • Press Change below the Name box • With supplied keyboard, enter the user’s name • Press OK • Press the Fax Dest tab • Press Change box to the left of the Fax Destination box • Press Tone box • With the copier’s numeric keys, enter the user’s fax number • If a prefix such as a 9 or 8 required, enter it before the user’s number • Press OK • Exit Ricoh M6000/7000 Quick Reference Guide
Emailing from the Unit • Place documents face up in the document feeder or face down on the glass • Press SCANNING button • Press the User button you wish to send the document to • Press START OR • Manual Entry • Press the Manual Input button • Enter the email address with the supplied keyboard • Press Start Ricoh M6000/7000 Quick Reference Guide
Faxing from the Unit • Place documents face up in the document feeder or face down on the glass • Press Facimile button • Press the User button you wish to send the document to • Press START OR • Manual Entry • Press the Manual Input button • Enter the fax number with the numeric keys If your system demands a prefix number: 9 or another, enter it • Press Start Ricoh M6000/7000 Quick Reference Guide
Deleting E-mail And Fax Users • Press User Tools/Counter button • Press Systems Settings box • Press Admin Tools tab • Press Address Book Management box • Press Delete button • Press the address box you wish to delete • Answer Yes to the confirming delete message • Exit Ricoh M6000/7000 Quick Reference Guide
USER CODES Ricoh M6000/7000 Quick Reference Guide
Turning ON/OFF User Code Function • Select USER TOOLS/COUNTER • Select SYSTEM SETTINGS • Select ADMINISTRATOR TOOLS • Scroll to Screen 2 • Select USER AUTHENTIFICATION MANAGEMENT • Press USER CODE AUTH button • Select Copier Options codes will apply to • Scroll to Screen 2 • Select Printer options codes will apply to • Select Other Functions codes will apply to • Press OK Scroll to Screen 1 See next page to enter individual codes and the functions those codes will engage. Ricoh M6000/7000 Quick Reference Guide
User Code Set Up And Activation Entering Individual User Codes You now are at Screen 1 of 5 under ADMINISTRATOR TOOLS • Scroll to page 2/5 using the down arrows • Select Address Book Management • Select New Program • Select Change next to Name • Enter Name using the keyboard • Select OK • Select Auth Info • Type in the User Code (8 nbrs max) • Press # Key after entering • Press NEXT button • Confirm from the list of Available Functions • Copy: FULL COLOR, ETC • Print: COLOR • Other: Document Server or Scanner • Select OK To enter more individual codes, start at the top of this page Press EXIT three times to return to main copier screen Ricoh M6000/7000 Quick Reference Guide
Using User Codes When you walk up to the Copier and the panel requests your user code • At system Prompt _ _ _ _ _ _ • Enter your User Code • Press the # sign • System is now ready for use • After completing your task • Press the Yellow & Orangebuttons together • This will Reset the pass code • The next user will need to input their own user code to access system Ricoh M6000/7000 Quick Reference Guide
Printing User Codes/Counters • Select USER TOOLS/COUNTER • Select SYSTEM SETTINGS • Select ADMINISTRATOR TOOLS • Select DISPLAY/CLEAR/PRINT COUNTER • Select PRINT COUNTER • Press START button • Press Exit 3 times Ricoh M6000/7000 Quick Reference Guide
Deleting Individual Users • Select USER TOOLS/COUNTER • Select SYSTEM SETTINGS • Select ADMINISTRATOR TOOLS • Scroll to Screen 2 • Select ADDRESS BOOK MANAGEMENT • Press the DELETE button • Press the individual you wish to delete • Confirm you wish to delete: • Yes or NO • Press Exit 3 times Ricoh M6000/7000 Quick Reference Guide