Download
1 / 4
0 likes | 9 Vues
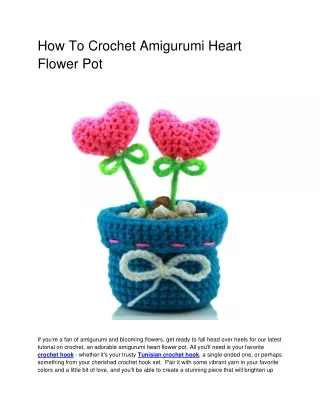
How To Crochet Amigurumi Heart Flower Pot<br>Crochet an adorable amigurumi heart flower pot to add a touch of blooming love to your home decor. An endearing project for plant lovers and amigurumi enthusiasts alike.<br>Visit:https://knitterspride.blogspot.com/2024/03/how-to-crochet-amigurumi-heart-flower.html<br>

E N D
How To Crochet Amigurumi Heart Flower Pot If you're a fan of amigurumi and blooming flowers, get ready to fall head over heels for our latest tutorial on crochet, an adorable amigurumi heart flower pot. All you'll need is your favorite crochet hook - whether it's your trusty Tunisian crochet hook, a single-ended one, or perhaps something from your cherished crochet hook set. Pair it with some vibrant yarn in your favorite colors and a little bit of love, and you'll be able to create a stunning piece that will brighten up
any corner of your home. So grab your hooks, and let's begin this step-by-step journey to crochet blooming love! Amigurumi Heart Flower Pot Materials: ● Any yarn in pot color, dark brown, green, and heart color ● Crochet hook (See the yarn label to choose the preferred size) ● Polyester fiberfill ● Cardboard (such as from a tissue box or cereal box) ● 18 gauge floral wire ● Pliers ● Fabric glue ●Stitch marker, yarn needle, scissors Finished Size: The finished heart in a pot measures approximately 4 inches (10cm) tall, but it may vary as per the tension and used materials. Pattern Instructions: Pot Round 1: Make 6 single crochet using a magic ring. Round 2: Increase in each stitch (12 stitches). Round 3: Single crochet in next stitch, increase; repeat around (18 stitches) Round 4: Single crochet, increase, single crochet in next 2 stitches, increase; repeat around, single crochet in the last stitch (24 stitches) Round 5: Single crochet in next 3 stitches, increase; repeat around (30 stitches) Round 6: Work in the back loops only, single crochet in each stitch around (30 stitches) Rounds 7-12: Single crochet in each stitch around (30 stitches for 6 rounds) Round 13: Slip stitch and chain 1; repeat around. Slip the stitch into the same stitch as the starting slip stitch. Fasten off and weave in ends. Measure the pot's base and use cardboard to make a circle.
Leaves (make 2) Chain 7, slip stitch in second chain from hook and next chain, single crochet in next 2 chains, half double crochet in last 2 chains (6 stitches). Leave a long tail for stitching with a wool needle and bind off. Heart Round 1: Make 6 single crochet using a magic ring. Round 2: Now increase in each stitch. Total 12 stitches. Round 3: Single crochet in each stitch. Bind off, leaving a tail of approximately 10cm for sewing. Continuation of Heart: Repeat Rounds 1-3 without binding off. Round 2: In the next round, join the two pieces to form the heart's top. Round 3: Make 6 single crochet on the second piece, then 12 single crochet on the first piece (starting in the first stitch of the last round), make 6 single crochet on the second piece (24 stitches total). Hem up the opening between the two parts using the yarn tail that's left over from the first piece. Tie a knot to secure it. Round 4: Single crochet in each stitch around (24 stitches). Stuff the heart as you go. Rounds 5-6: Single crochet in each stitch around (12 stitches for 2 rounds). Round 7: Decrease in each stitch around (6 stitches). Cut the yarn, leaving a tail, and pull through the last stitch. Thread the yarn tail through only the front loops of the last round without tightening. Set aside. Soil Round 1: Form a magic ring and work 6 single crochet stitches into it. Round 2: Increase in each stitch around. Round 3: Single crochet in next stitch, increase; repeat around (18 stitches) Round 4: Single crochet, increase, single crochet in next 2 stitches, increase; repeat around, single crochet in the last stitch (24 stitches) Round 5: Single crochet in next 7 stitches, increase; repeat 3 times (27 stitches) Rounds 6-9: Single crochet in each stitch around (27 stitches for 4 rounds) Round 10: Single crochet in next 7 stitches, decrease; repeat 3 times (24 stitches) Round 11: Single crochet in next stitch, decrease; repeat 8 times (16 stitches). Leave the yarn attached and set aside while you prepare the stem.
Stem: ● Use pliers to shape one end of the wire into a 1/2 inch (1.5cm) wide circle. Insert it into the soil with the long end coming out from the center. ● Trim the wire to your desired length plus 2cm (e.g., for a 4cm stem, make it 6cm long), and fold the end over by 1cm. ● Continue crocheting at Round 12 of the soil, decreasing in each stitch around. ● Cut the yarn, leaving a tail. Bring up a long green yarn (about 40cm) through the soil's center. ● Wrap the yarn around the wire tightly, ensuring no wire shows. Add fabric glue to secure. ● Place the heart over the wire and wrap excess yarn around the bottom, securing it inside the heart. ● Sew leaves to the soil on each stem side and weave in all green yarn ends. ● Close the bottom of the soil by weaving the ending yarn tail through the front loops only of the final round, pulling it closed and hiding the end inside. ● Place the soil inside the pot. Fantastic job on crafting the adorable pot! Let's find the perfect spot to showcase it, where it can brighten up the room and fill it with warmth and joy. Additionally, we've published a blog post discussing selecting the ideal crochet hooks sets for amigurumi projects. Take a moment to read it, and use the insights gained to make a well-informed decision for your next creative endeavor. Source: https://knitterspride.blogspot.com/2024/03/how-to-crochet-amigurumi-heart-flower.html