5 Month Review using Hyperion Planning
5 Month Review using Hyperion Planning. Training Session. Road to 5 Month Review 2015. AGENDA. O VERVIEW. 5 Month Review Form. POSSIBILITIES. REPORTS. Process overview 5 month Review form in Hyperion planning. Functionality. Workflow. OVERVIEW. PEOPLESOFT / HYPERION INTERFACE.


5 Month Review using Hyperion Planning
E N D
Presentation Transcript
5 Month Review using Hyperion Planning Training Session
Road to 5 Month Review 2015 AGENDA OVERVIEW 5 Month Review Form POSSIBILITIES REPORTS • Process overview • 5 month Review form in Hyperion planning. • Functionality. • Workflow.
PEOPLESOFT / HYPERION INTERFACE Process Overview BUDGETING SERVICES BUDGET COMMITTEE OPERATING / ANCILLARY UNITS
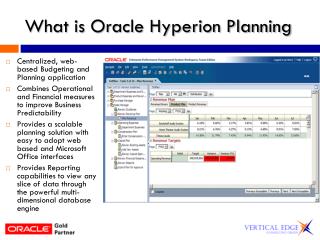
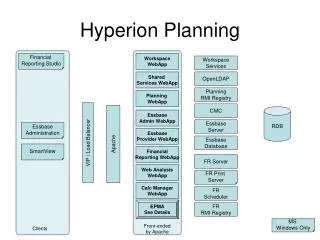
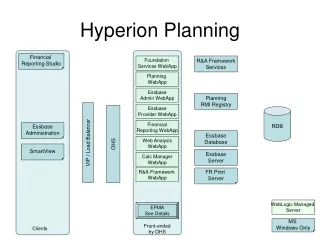
What is Hyperion? FISCAL YEAR INTERFACE BUDGET & FORECAST ACTUALS BUDGET & FORECASTS GL- Chartfields It’s a budgeting tool that allows entering budget and forecast by multiple time periods (fiscal year or Monthly), and by different General Ledger Chartfields: Department, Program, Fund and Account. Hyperion interfaces directly with PeopleSoft . The Actuals are taken from PeopleSoft Financial General Ledger and populated into Hyperion for closed months. Budget, 5 Month Review and 8 Month Review are taken from Hyperion and populated into PeopleSoft Financial General Ledger
PeopleSoft & Hyperion Chartfield Trees • PeopleSoft Finance General Ledger is the Chartfield source of record. • The hierarchy structure of the Chartfields is called a “tree”. • Budgeting Services has created specific Department and Account trees that align with current budget envelopes. • An example of Department tree: • ACADEMIC SUPPORT • VP ACADEMIC • Provost Office • IRA • Human Rights & Equity • AVP Academic Faculty • REGISTRAR’s OFFICE • MOSAIC trees are loaded into HYPERION on a monthly basis. • Any new department, program or account is then available in Hyperion for forecasting or budgeting. • The tree structure will allow organizing the data in the Hyperion forms and reports. • In Hyperion, security is provisioned by department. • Values in Hyperion can ONLY be edited at the lowest level of the tree. • In the example, if the form is open for the ACADEMIC SUPPORT department, all cells in the form will be read only.
5 Month Review Form Point of View • POINT OF VIEW: Shows the Criteria of the Data shown on the form. • The different dropdowns are: • Department: Lists the departments you are entitled to. The codes are the same as in MOSAIC, prefixed by the letter D • Program: Lists all the available Programs. The codes are the same as in MOSAIC, prefixed by the letter P • Type of Expenditure: One-Time or On-Going. This dropdown also lists an FTE option. The use of which will be explained later in the training. • Version: Lists what version you are working on: Working, or any of the What-If versions. • Fund: READ ONLY indicates the fund. • Please note that there are different forms for each fund. Hyperion only has the data associated to Operating fund (20), Ancillaries Fund (30) an Externally Specifically Funded (45).
Find a Department on the Form Note: Any time the point of view is changed, we MUST refresh so the system brings the data from the database into the form Using the Point of View find a Chartfield combination that you want to review. After you have entered a value into every drop box, Click on the REFRESH button.
5 Month Review Form Detail Sections • 5 Month Review Section: • This is the section in which the 5 Month Review data is stored. • It is pre-populated with the year to date actuals and Original Budget. • Users can update the data values at the lowest levels of the trees only. Any value at an higher level of the account, department or program trees are read only. • Users can expand to view monthly drilldown by clicking on the plus sign (+) next to the Year Total Label. • Budget Section: • This is READ ONLY. • Displays the original Budget. • Users can expand to view monthly drilldown by clicking on the plus sign (+) next to the Year Total Label. • Actuals Section: • This is READ ONLY. • Displays the Year To date Actuals loaded from the GL. • Users can expand to view monthly drilldown by clicking on the plus sign (+) next to the Year Total Label.
5 Month Review Form Summary Section • Total revenue, expenses and appropriations for all types (on-going and one-time) are summarized in the last lines of the form. • Total Revenue – All Types: The total of all on-going and one-time revenue. • Total Expenses – All Types: The total of all on-going and one-time expenses. • Deficit or (Surplus) – All Types: The net of all on-going and one-time revenue and expenses. • Opening Appropriations - All Types: • Actual and 5 Month Review: Ending appropriations in FY14 • Budget: Ending appropriations forecast in the FY14 8 Month Review • PS Adjustments – All Types: Actual year-to-date journal entries to appropriation accounts in PeopleSoft GL • Closing Appropriations – All Types: Total of Deficit/(Surplus), Opening Appropriations, and PS Adjustments
5 Month Review Form FTE Budgeting To Forecast FTE’s, the FTE option needs to be selected in the Expenditure Type dropdown needs • 5 Month Review Section: • Displays FTE values. • Users can expand to view monthly drilldown by clicking on the plus sign (+) next to the Year Total Label.
Starting Point
5 Month Pre-Populated DATA Actuals for Closed Periods Total Annual Original Budget Difference between Actual and Budget Year total spread in monthly buckets
Basic Editing 5 Month Review DATA • Light Yellow cells are EDITABLE. • To edit a cell, simply type the new number inside the cell. Once a cell has been edited, it will change color to a darker shade of yellow. • Planners can use EXCEL copy/paste functions for editing cells. • Editing a cell at a YEAR total level will update the values of the cells of ALL OPEN months • Grey cells are LOCKED. Cells are locked due to: • Closed Months • Aggregate Level Forecasts can ONLY by updated at the lowest Account level. THIS APPLIES TO POINT OF VIEW AS WELL • After you have entered a value into editable cells, Click on the SUBMIT button.
What-if versions • Allows planners to create different versions of the forecast for analytical purposes only. • The system offers What-if High, What-If Medium and What-if low versions. • Planners can pre-populate the what-if versions with the 5 month review as a starting point. • Changes performed in a what-if version are NOT moved to MOSAIC. • Only changes to Working version are moved to MOSAIC. • Planners can copy a What-If version into the Working version.
What does Hyperion allow you to do? EDIT Spread monthly values equally or proportionally ADJUST Adjust at Year or Month Levels What-If Versions COPY Save copy to Excel File BUDGET TO A NEW ACCOUNT COMPARE Compare with Actuals Add Supporting Details
Un-Suppress Account • When to use? • The 5 Month review form suppresses (hides) Accounts that have NO data. • If the pre-populated form doesn’t show a specific account, that means that there was no Original Budget and no actuals for that account. • If we need to add a forecast to an account that does NOT show in the pre-populated form, we can UN-SUPPRESS a specific account using this function.
Un-Suppress Account • How? • Right-click on any cell in the smart view form, and select the Smart View option to Open the SmartView Menu. • Select the Un-Suppress Accounts option from the SmartView menu. • The pop-up opens. • Click the Find Box
Un-Suppress Account • Click Binoculars to open the Find box • CheckShow Aliases to search by account name (optional) • Entersearch value and click binoculars • Checkaccount(s) to unsuppress • Clickto move to selected members • ClickOK
REPORTS Summary reports are available to preview the total forecast at a roll-up level. Drilldown reports may be used to isolate any variances or anomalies. These reports are intended for analysis and are not formatted for the final submission document. Positive values are debits, negative values are credits. Submission reports will be available to envelope managers only.
LOGIN • Enter the following URL: https://dmacapps65.mcmaster.ca/Citrix/ • Note: This URL is for Training environment ONLY. The Production URL is indicated in your handouts. • Enter your MACID and password • Click on EXCEL Icon entitled SmartView • Click on the Open button on the banner in the bottom part of the screen. • A pop-up shows status. • Excel opens
Connecting to the Hyperion Database using SmartView • Expand Hypsitf01 • Expand McM_Plan • Expand Forms • Expand 1. OPEX • Expand the appropriate FUND (Operating fund 20, Ancillaries fund 30, Specially Funded fund 45) • Double Click on 2. OPEX 5 MONTH REVIEW 2015 Click on SmartView Tab Click on Panel Icon In the Panel, Click on Shared Connections Enter Login & Password In the Shared Connections Panel, Open drop down Select Oracle Hyperion Planning, Fusion Edition
Exercise Open 5 Month Review Form for appropriate fund. Find Department, Program, Expenditure Type to edit. Edit a value at a Year Level Edit a Value at a Month Level Edit FTE Un-Suppress an account (that is not already on the form). Edit recently Un-Suppressed account
Find the right intersection Set the Point of view to the Department, Program Budgeting type. In this Example, Department D_10003, Program P_3000 Type On-Going
Copy Data from one department to another. Copy yearly forecast from in between programs or accounts. Adjust amounts for a range of cells. Add Cell Comments Add Supporting Details to a cell. Locking cells.
Copy Year Total using Function • When to use? • Copy year total from one program to another. • Copy forecasts from one year to another. • Copy the Original Budget into 5 Month Review scenario. • What is copied? • The year total is copied over and then spread amongst the open months keeping the proportion of previous monthly values.
Copy Year Total using Function • How? • Right-click on any cell in the smart view form, and select the Smart View option to Open the SmartView Menu. • Select the Copy Year Total option from the SmartView menu. • The pop-up opens. Then select the source and destination criteria.
Copy Monthly values using Function • When to use? • Copy specific monthly values for one or multiple months from one program to another. • Copy forecast monthly values for one or multiple months from one year to another. • What is copied? • The monthly values are copied over and the Year total is re-calculated to add up to the sum of the monthly values.
Copy Monthly values using Function • How? • Right-click on any cell in the smart view form, and select the Smart View option to Open the SmartView Menu. • Select the Copy Monthly option from the SmartView menu. • The pop-up opens. Then select the source and destination criteria.
Adjust Data by Percentage • Click on any editable cell (yellow in colour) or a range of cells at a month level. • Right click on the cell and pick the “SmartView” option to open the SmartView menu. • Select the Adjust option from the SmartView menu. • Select the Add fixed value to selected cell(s) radio button and enter the value to increase by in the text box: • Click Adjust Data. • Click on SUBMIT.
Adjust data by amount • Right click on the cell and pick the “SmartView” option to open the SmartView menu. • Select the Adjust option from the SmartView menu. • Select the Add fixed value to selected cell(s) radio button and enter the value to increase by in the text box: • Click Adjust Data. • Click on SUBMIT.
Pre-Populate a what-if version • Select the Pre-Populate What-If option from the SmartView menu. • The pop-up opens. Then select the Target What-If version to pre-populate, the Source Version, Source and Target Year, Source Department, Scenario (i.e. Budget) .