Windows Tutorial 3 Personalizing Your Windows Environment
Windows Tutorial 3 Personalizing Your Windows Environment. Objectives. Access desktop icons and gadgets on the desktop Create and use shortcuts on the desktop Use the Control Panel Customize the desktop Activate a screen saver Change display settings. Objectives.

Windows Tutorial 3 Personalizing Your Windows Environment
E N D
Presentation Transcript
Objectives • Access desktop icons and gadgets on the desktop • Create and use shortcuts on the desktop • Use the Control Panel • Customize the desktop • Activate a screen saver • Change display settings New Perspectives on Microsoft Windows 7
Objectives • Manage the desktop with Aero tools • Pin items to and modify the taskbar • Customize taskbar toolbars • Change Start menu settings • Pin items on the Start menu New Perspectives on Microsoft Windows 7
Accessing Common Tools on the Desktop New Perspectives on Microsoft Windows 7
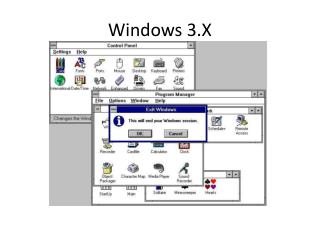
Displaying Standard Desktop Icons • Right-click an empty area of the desktop, then click Personalize on the shortcut menu • In the left pane of the Personalization window, click Change desktop icons • In the Desktop Icon Settings dialog box, click to select a check box for each icon you want to add to the desktop • Click the OK button New Perspectives on Microsoft Windows 7
Displaying Standard Desktop Icons New Perspectives on Microsoft Windows 7
Using Windows Gadgets • Gadgets offer information at a glance and offer similar tools to those you might find on a physical desk: • Calendar • Clock • CPU Meter • Currency • Feed Headlines • Picture Puzzle • Slide Show • Weather • Windows Media Center New Perspectives on Microsoft Windows 7
Using Windows Gadgets • Right-click the desktop, and then click Gadgets to display gadgets currently installed on your computer New Perspectives on Microsoft Windows 7
Using Shortcuts • You can create shortcuts to access drives, documents, files, Web pages, programs, or other computer resources such as a printer New Perspectives on Microsoft Windows 7
Using Shortcuts New Perspectives on Microsoft Windows 7
Personalizing with the Control Panel • To open the Control Panel window, double-click the Control Panel icon on your desktop. If the icon does not appear on your desktop, click the icon on the Start menu New Perspectives on Microsoft Windows 7
Personalizing with the Control Panel New Perspectives on Microsoft Windows 7
Personalizing with the Control Panel New Perspectives on Microsoft Windows 7
Selecting a Theme • Open the Control Panel window and switch to Category view, if necessary. • Click Appearance and Personalization. • Click Personalization. • Click a theme. New Perspectives on Microsoft Windows 7
Changing the Desktop Background • Open the Control Panel • Click Appearance and Personalization • Click the Change desktop background link New Perspectives on Microsoft Windows 7
Changing the Desktop Background New Perspectives on Microsoft Windows 7
Changing Desktop Colors and Fonts • Windows Color and Appearance allows you to change the properties of window elements • Click Window Color in the Personalization window New Perspectives on Microsoft Windows 7
Activating a Screen Saver • A screen saver blanks the screen or displays a moving design whenever you haven’t worked with the computer for a specified period of time New Perspectives on Microsoft Windows 7
Changing Display Settings • Screen resolution refers to the clarity of the text and images on your screen • Items appear sharper and smaller at a higher resolution New Perspectives on Microsoft Windows 7
Managing the Desktop with Aero Tools New Perspectives on Microsoft Windows 7
Modifying the Taskbar • The taskbar contains three sections: • Start button • Middle section • Program buttons • Notification area • Current time and date • Program icons • System status information New Perspectives on Microsoft Windows 7
Pinning Programs to the Taskbar • If the program is already running, right-click the program button, and then click Pin this program to taskbar. Or • If the program is not running, click the Start button, locate the program in the Start menu, right-click the program icon, and then click Pin to Taskbar. New Perspectives on Microsoft Windows 7
Moving and Resizing the Taskbar • Make sure the taskbar is unlocked. To unlock it, right-click any blank spot on the taskbar, and then click Lock the taskbar on the shortcut menu to remove the check mark. • To move the taskbar, click a blank spot on the taskbar, hold down the left mouse button, and drag the taskbar to a new location (the top, bottom, left, or right edge of the desktop). • To resize the taskbar, point to a taskbar border until a resize pointer appears, and then drag the border to a different height or width. New Perspectives on Microsoft Windows 7
Moving and Resizing the Taskbar New Perspectives on Microsoft Windows 7
Setting Taskbar Appearance Properties • Right-click a blank area on the taskbar, and then click Properties New Perspectives on Microsoft Windows 7
Working with Taskbar Toolbars • One way to customize the taskbar is to use it to display toolbars New Perspectives on Microsoft Windows 7
Creating a Custom Taskbar Toolbar • To create a custom toolbar, right-click a blank area of the taskbar, point to Toolbars, and then click New toolbar • In the New Toolbar − choose a folder window, click the folder or object you want to turn into a toolbar, and then click the Select Folder button New Perspectives on Microsoft Windows 7
Customizing the Start Menu • To customize the Start menu, right-click Start button on the taskbar, then click Properties; click the Customize button New Perspectives on Microsoft Windows 7
Pinning an Item to the Start Menu New Perspectives on Microsoft Windows 7
Selecting Start Menu Settings New Perspectives on Microsoft Windows 7