Inverted Colors Photo Effect
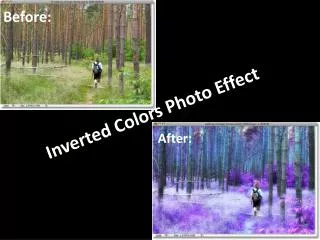
Before:. Inverted Colors Photo Effect. After:. Step 1: Select Any People In The Image And Place Them On A Separate Layer. Use the lasso tool to outline the subject

Inverted Colors Photo Effect
E N D
Presentation Transcript
Before: Inverted Colors Photo Effect After:
Step 1: Select Any People In The Image And Place Them On A Separate Layer • Use the lasso tool to outline the subject • Once you have done that go to Layer menu at the top of the screen, choose New, and then choose Layer via Copy, or I could simply use the keyboard shortcut Ctrl+J • You should see the subject in the new layer in the layers palette.
Step 2: Duplicate The Background Layer • select the Background layer by clicking on it in the Layers palette. • To duplicate the background layer type shortcut Ctrl+J • You should be able to see the “background copy” in the layers palette.
Step 3: Invert The Background Copy Layer • with the copy of the Background layer selected, I'll go up to the Image menu at the top of the screen, choose Adjustments, and then choose Invert • The person in the image should remain the original color
Step 4: Change The Blend Mode Of The Inverted Layer To "Color" • Go up to the Blend Mode options at the top of the Layers palette and change the blend mode from "Normal" to Color
Step 5: Merge All Three Layers Onto A New Layer Above The Inverted Layer • To do that, all I need to do is press my Alt key, then, while still holding the key down, I'll go up to the Layer menu and choose Merge Visible:
Step 7: Apply The Gaussian Blur Filter • go up to the Filter menu at the top of the screen, choose Blur, and then choose Gaussian Blur • This brings up the Gaussian Blur dialog box. To adjust the amount of blurring, simply click on the slider at the bottom of the dialog box • a Radius value of around 8 pixels seems to work well
Step 6: Change The Blend Mode Of The Merged Layer To Overlay • select the blend mode • With the merged layer selected, I'll go up to the Blend Mode option once again at the top of the Layers palette and I'll change the blend mode from "Normal" to Overlay