Download
1 / 10
100 likes | 202 Vues
2010 Aerial Survey Instructions April, 15, 2010 FPM, BOF, DCNR, Pennsylvania. April 30, 2010. 0. Boot Tablet & plug Earthmate into left USB port 1. Open GeoLink by dbl-clicking the GeoLink icon. 2. Click [PROJECT], [OPEN]; navigate to the targeted *. prj file in the ‘Sketchmap’ folder

E N D
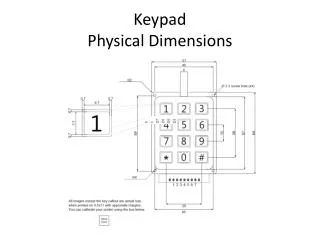
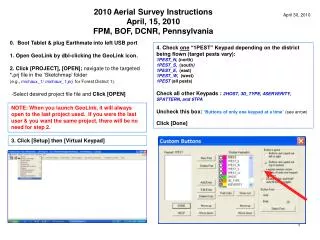
2010 Aerial Survey Instructions April, 15, 2010 FPM, BOF, DCNR, Pennsylvania April 30, 2010 0. Boot Tablet & plug Earthmate into left USB port 1. Open GeoLink by dbl-clicking the GeoLink icon. 2. Click [PROJECT], [OPEN]; navigate to the targeted *.prj file in the ‘Sketchmap’ folder (e.g., michaux_1/ michaux_1.prj for Forest District 1). -Select desired project file file and Click[OPEN] 4. Check one “1PEST” Keypad depending on the district being flown (target pests vary): 1PEST_N, (north) 1PEST_S, (south) 1PEST_E, (east) 1PEST_W,(west) 1PEST(all pests) Check all other Keypads : 2HOST, 3D_TYPE, 4SERVERITY, 5PATTERN, and 6TPA Uncheck this box:‘Buttons of only one keypad at a time’(see arrow) Click [Done] NOTE: When you launch GeoLink, it will always open to the last project used. If you were the last user & you want the same project, there will be no need for step 2. 3. Click [Setup] then [Virtual Keypad]
5. Click [View/Print Maps] button on toolbar 8. Click [Exit] on the toolbar – returns to project window 9. Click [Start Logging] button on the toolbar. - A new toolbar appears 10. Click the [green arrow] button (upper left of toolbar); activates GPS and begins logging. The ‘GeoLink GPS Server’ window pops up and will close automatically when the EarthMate GPS connects. The DeLorme Serial Emulator icon in the “System Tray” (bottom right corner of screen) should be green if satellites are locked in; red if not. 6. Click [Draw Map List] button on toolbar NOTE: display of the background maps should appear to verify that the appropriate ones are pre-loaded 7. Layers that should display: 24k Topo Cnty (county boundary) CFM (forest district boundary) FL (flight lines) GPS Server window Delorme Serial Emulator Icon
11. Click all 6 keypad window buttons; all the attribute buttons will line up vertically along the right edge of the screen. 11b. Adjust the screen scale: clicking the zoom buttons (in or out) or press Ctrl+S and type the desired screen width in miles (start with 6-10 miles & adjust to suit). 12. In the Drop-Down menu box at the lower right: Select [AREA]
13. Create Polygons Make sure ‘Area’ appears in the box at the bottom right corner Manual Selection of Draw Pen The “drawing pen cursor” should automatically activate when AREA is selected. If not, activate the drawing pen manually by clicking the pen icon. Draw a polygon in the targeted areas: if you do not like it, hit ‘New Sketch’ button and redraw. Select the attribute buttonsIN ORDER (important): Method 1: Check the buttons one by one for each polygon. Method 2: use default attributes. How to set default values: click the targeted icon quickly, and then click the same icon and hold for 3 sec - the icon lateral will turn into green. Repeat the same procedure for de-default. Method 3*:copy the attributes if same as the previous polygon. Method 4: leave blank and fill it during post process. c) Click [Enter] button. d) Repeat the same process for additional polygons.
How to delete a polygon after clicking ENTER:: Double click the polygon you want to delete. The polygon starts to flash and a set of buttons appear along the bottom of the map. Click the [Delete] button. Sketch and edit toolbars: Polygon to be deleted Undo: delete the one just drawn Activate Pen to draw polygon Remove verticies New Sketch: redraw if you do not like it Note: To maximize the drawing window, you may uncheck ‘GPS Status Bars’, or/and uncheck ‘Big Toolbars’, or/and re-locate other Toolbars up. You may also want to rotate the window of tablet PC by push the 3rd button at bottom left corner of screen. [Undo], [Remove] & [New Sketch] only work prior to clicking the ENTER button.
17. Share DRAFT data Move data to tablet PC that has ArcView installed. Go to folder: C:\Sketchmap\michaux_1\Translte\041510\094809\ (flight log)094809.dbf 094809.prj 094809.shp 094809.shx (polygons)Area.dbf Area.prj Area.shp Area.shx Note: michaux_1 represents forest district, Translte represents folder of translated files, 041510 represents the date that files were created, 094809 represents a folder named with the time the flight ended (military). RENAME: Copy these files to the tablet with ArcView. Use ArcCatalog to rename the shapefile as follows: District_day_month_sketcher initials_session (am or pm). Example: D01_June21_TP_am 14. When session is complete, click [Stop] button 15. Click [Translate Log Files]: navigate to and select the session file (.DAT file) to be translated (click the detail button to show file size). 16. Click [Translate Selected Files] button. The log files will be translated into ArcGIS files. MIDDLETOWN ONLY: PARSE Column using ‘ShapeTools v1.2’ a) In ArcMap, click Tools, then click Extensions, then check ‘ShapeTools v1.2 b) Click Toolbar ‘ShapeTools v1.2, then click ‘parse a field’ c) Select the layer to be processed d) Select the column to be parsed, at the same window: Specify the delimiting character ‘,’ for this project, Specify the number of field to create, ‘6’ for this project. Create the field name (six) one by one. Namefield1 = DCA1 (Cause Agent) Namefield2 = Host1 Namefield3 = DMG_TYPE1 (Damage Type) Namefield4 = Severity1 Namefield5 = Pattern1 Namefield6 = TPA1 (Number of Trees Per Acr)
18. Data review (with district Foresters). (1) Modify the attributes in the column ‘CODE’ prior to parsing. (2) Specify – all ‘other’ attributes, add missing ones, delete duplicate ones. (3) Reshape the polygon using ArcMAP (against aerial images) 19. Post-data process and review (by Fengyou Jia) (1) Data modification and merging (2) Review by district Foresters (3) Report summary (4) Repot submission (2) How to setup GeoLink GPS device Settings: a) Click ‘Setup, then, click ‘Device’, then ‘click GPS’, then Window ‘GeoLink Device Settings’ show up. b) Under GPS, specify: GPS receiver = NMEA Port = COM2 (left port) or COM3 (back port) BAUD = 4800 Others = unchanged 20. How to setup GPS (1) How to setup ‘Delorme Serial Emulator’: a) Right click the ‘Delorme Serial Emulator’ (DSE) icon at the bottom right corner. b) Click ‘Ports’ and then check all com (2, 3, 4) under NMEA. c)* Sometime you need to stop the device and then re-start the device if the DSE Icon is looking like a satellite receiver.
21. How to load background maps: • Click Setup, then Background Maps, then • Click ‘Add Map’, icon, then go to the appropriate folder to load the targeted *.shp or other files. • Click ‘Change’ and select the correct Coordinate System --- PA_BOF. Then click OK.
21b. Change map display • Select the targeted layer in the window ‘Map list’ and then click ‘Display Settings’ icon • Under Polygon Options window , select ‘Fill style’ and Change ‘polygon outline Color’, ‘Change outline Color’. • Change other settings. 22. How to setup background map toolbars: 1) Click Setup, then ‘Background Maps’, then 2) Click ‘Map Groups’ icon, then click ‘New Map Group’ icon. 3) Name the icon and check the corresponding layer on the right window. 4) Continue the job. 5) Uncheck the ‘Show mapgroups as toolbar button’, then OK.
Abbreviations: Pests: FTC – Forest Tent Caterpillar GM – Gypsy Moth HWA – Hemlock Wooly Adelgid FRO – Frost OTH – Unknown FCW – Fall Canker Worm HOST: OAK – OAK spp. MPL – maple spp. HEM – Hemlock OTH – Others Damage Type: DEF – Defoliation MRT – Mortality DSC – Discoloration Severity HVY – Heavy MOD – Moderate Pattern: CON – Continuous PAT - Patchy TPA – Dead Tree per Acre Miscellaneous: 1. Hide Taskbars: (1) Right click taskbar (empty) and check properties. (2) Uncheck ‘Auto-hide the taskbar’. • Show attribute labels by setting scale • Setup • Features • Features definitions • Area • Edit • Symbol • Upper Zoom Limit Extents = 20 Miles