Welcome to Basic Pump Operations !
Welcome to Basic Pump Operations !. Hardest class to teach and hardest class to learn. WHY ??. Years of doing it one way and unwillingness to change. Lack of training. Not wanting to look like you don’t know what you’re doing. Fear of math.

Welcome to Basic Pump Operations !
E N D
Presentation Transcript
Welcome to Basic Pump Operations ! Basic Pump Operations
Hardest class to teach and hardest class to learn WHY ?? Years of doing it one way and unwillingness to change Lack of training Not wanting to look like you don’t know what you’re doing Fear of math Basic Pump Operations
Who is the most important firefighter on the fireground ? Pump operator, of course ! Chiefs can give orders, officers can direct, but without the pump operator delivering enough water, the fire wont go out and the situation will not get better Are you comfortable with whomever is the pump operator that day or moment ? Basic Pump Operations
The Golden Truth There is a difference between simply being assigned asthe pump operator and being a good pump operator Basic Pump Operations
Learn From Experience • What you should take away from every fire you go to • Whether or not you were the pump operator, find out what the static and residual flow pressures were and how much total water was flowing per minute so next time you have a fire in that area, you have an idea of how much water you have to work with • Take a practical look at how much fire you had on arrival. If you only end up using tank water for extinguishment, take a look at how much water is left in the tank after the fire is out. See how much water you needed to put out the amount if fire you had when you first arrived. • Write down this information in a log of some sort so you remember it months down the line, otherwise you will forget. If you forget, you have lost this information forever. This is something I refer to as ‘negative experience gain’. Don’t let your past experience go to waste. Basic Pump Operations
Learn From Experience What you should take away from every fire you go to • If you weren’t the pump operator, talk to whomever was and find out if they had any problems and what they did to correct them, if they could. • Experiment with your nozzles. Test them under different conditions. Can two of your firefighters hold onto a 1 ¾ line flowing 200 gpm ? Not sure ? You should be ! • These are some of the key points to remember so you can be a GOOD pump operator, engine company chauffer, engineer, or what ever your department calls you. Basic Pump Operations
What will be covered in this presentation Knowing your response area, equipment, and SOP’s How your pump works The basic steps to pump operations Vehicle positioning Engaging the pump Determining and establishing water supply Priming the pump Calculating total engine pressure Nozzles and flow rates Friction loss Troubleshooting Operating relief valves Practice problems Basic Pump Operations
What will not be covered As I mentioned before, this is an introductory course, meant to give you beginning knowledge and add to your current knowledge. There are other topics you should be aware of and know. Some of them I will cover in my advanced class, some I won’t. The following topics will not be discussed in this PowerPoint, I am taking some of these topics out of the IFSTA Pumping Apparatus Driver/Operator handbook, which is an excellent book to purchase: Skills and Physical Abilities Apparatus Testing Maintenance Characteristics Of Water Emergency Vehicle Driving Water Shuttles High Rise/Standpipe & Sprinkler Operation Foam Basic Pump Operations
KNOW YOUR…EQUIPMENT Pump and Tank Manufacturer ? Tank Size ? Pump Capacity ? Pump - Hale Tank size - 500 Gallons Pump Capacity - 1750 gpm Pump - Waterous Tank size - 750Gallons Pump Capacity - 1250 gpm Pump - Hale Tank size - 2600 gallons Pump Capacity - 1250 gpm Basic Pump Operations
KNOW YOUR…AREA Water Supply Hydrants Static Sources Water Flow Capabilities Building Construction Type I,II,III,IV,V Maps Single Family Homes Commercial Multifamily Basic Pump Operations
KNOW YOUR…SOP’s Past practice may apply Who’s getting the hydrant ? Minimum flow rates ? Who’s taking the nozzle ? Who pumps into a standpipe ? LDH or smaller hose ? Forward or reverse lay ? Basic Pump Operations
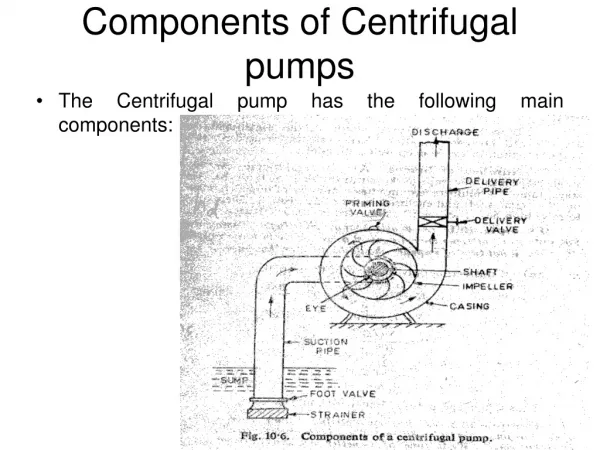
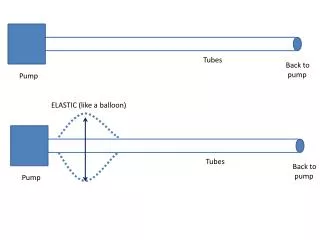
Basic Pump Operations How Your Pump Works There are several styles of pumps. Early fire department pumpers used what’s called a positive displacement pump. There are two types of positive displacement pumps, piston and rotary. However, centrifugal pumps are used as the main fire pump on today’s fire apparatus. Positive displacement pumps are still used today as part of the priming system. Their capability to pump air makes them ideal for that purpose. We will discuss the centrifugal pump in this presentation.
Basic Pump Operations How Your Pump Works Every pump has a plate on it like this one that tells you what the maximum amount of water the pump can flow at 150 psi. All newer pumpers max out their flow at 15o psi. So does that mean that the pump this plate is referring to can only pump a maximum of 1510 gallons per minute ?
Basic Pump Operations How Your Pump Works The answer is NO…because of a simple concept known as ‘net pump pressure’ or NPP. This is probably one of the most unknown concepts pump operators will face. Some operators would look at their discharge gauge and see that it was reading 150 psi and think the pump was maxed out, and its not. When pumps get their ratings, they are rated while drafting at about 6 - 8 feet. When receiving additional pressure from a hydrant or other source, the pump can exceed its rated flow. Even at draft it may be possible to exceed its rated flow if multiple intake lines are used.
Basic Pump Operations How Your Pump Works • NET PUMP PRESSURE (NPP) • NPP is the pressure that the pump is creating on its own, without any additional pressure from hydrants, pumper relays, etc. • It is the difference between intake and discharge pressure • Discharge pressure - Intake pressure = NPP • Example: If discharge gauge reads 175 psi and residual intake pressure reads 50 psi, the NPP is 125 psi. The pump is not maxed out, yet. Once the NPP hits 150 psi, the pump is not at its max flow
Basic Pump Operations How Your Pump Works REMEMBER !!!! An increase in throttle does not always mean an increase in flow. At some point, as your net pump pressure increases past 150 psi, you will actually be flowing LESS water. So monitor your net pump pressure. If your net pump pressure goes above 150psi, you will be at your maximum pumping capacity. Take a look at the pump plate, and you will see how the flow drops as the pressure increases past 15o psi.
Basic Pump Operations PTO Pump How Your Pump Works
Basic Pump Operations How Your Pump Works
Impeller Intakes Basic Pump Operations Intakes How Your Pump Works Single Stage Pump Discharges
Basic Pump Operations How Your Pump Works Dual Stage Pump
Basic Pump Operations How Your Pump Works Video from Waterous Company
Basic Pump Operations How Your Pump Works Video from Waterous Company
The General Pump Operator Steps To Follow • Position Vehicle - Chock Wheels, When Possible • Engage Pump • Determine & Establish Water Supply • Determine Total Engine Pressure (FL+NP+EL+DL) • Open Appropriate Discharge Valve • Throttle Up Or Down As Needed To Set Pressure • Adjust Pressure • Monitor Vacuum Side Of Pump • Monitor Tank Water Level • Monitor Pump Temperature We will follow these steps throughout the presentation Basic Pump Operations
1. VEHICLE POSITIONING Forward Lay What type of lay you use is largely dependent on what and where your water source is. If you’re using a hydrant for supply, and you are going to pass the hydrant en route to the building on fire, a firefighter will wrap the hydrant and either re-board the engine or stay at the hydrant to turn it on. Check your local SOP on how to handle that situation. Supply Line Attack Line Direction Of Travel Basic Pump Operations
1. VEHICLE POSITIONING Forward Lay A major benefit of a forward lay is that the engine will be parked directly in front of or close to the building on fire, allowing for quick and easy access to your equipment. The downside of the forward lay is that you either have to leave a firefighter at the hydrant or wait for a second in company to complete the connection. The firefighter at the hydrant wont be available for attack or any other operation until their return to the scene. Supply Line Attack Line Direction Of Travel Basic Pump Operations
1. VEHICLE POSITIONING Reverse Lay A reverse lay would be a situation where the engine goes directly to the fire building, drops off firefighters and necessary equipment along with a stretch of the attack line, and then proceeds to the supply source. Supply Line Attack Line Direction Of Travel Basic Pump Operations
1. VEHICLE POSITIONING Reverse Lay The major advantage to the reverse lay is that the attack line stretch is expedited. The major disadvantage is that the all of the equipment is still on the vehicle away from the scene. Supply Line Attack Line Direction Of Travel Basic Pump Operations
1. VEHICLE POSITIONING Communications Regardless of what type of lay you use, its vital that the pump operator has good communication with whomever is either making hose connections to the hydrant (as in a forward lay) or when the attack team is ready for water as in a reverse lay. If your department has a standard hand signal, or radio communication code, to acknowledge that everyone is ready, learn what those are. Supply Line Attack Line Direction Of Travel Basic Pump Operations
1. VEHICLE POSITIONING • Some additional vehicle positioning pointers • Try to stay out of the potential building collapse zone. Especially on commercial fires where you are pulling into a parking lot. Eyeball the size of the walls and try to keep at least 1.5 times the distance away. • Have an idea of how long your supply lines are, specifically the lines you use to make direct hydrant connections when the hydrant is close to where you will be operating. You want enough room to make sure the hose plays out without any kinks. • Don’t be nervous about pulling past a building and being ‘too far away’ from the fire because you left the front of the building open for ladder companies to operate. The best thing about hose is that its plenty long and plenty flexible. Its easier to add hose to a stretch than to move fire vehicles around. Basic Pump Operations
2. ENGAGING THE PUMP • 1. Position the truck for the best hydrant hookup • and discharge hose layout. • 2. Bring the truck to a complete stop before you • attempt to shift from road to pump. • 3. Apply the truck parking brake. • 4. Shift the truck transmission to the NEUTRAL • position. Wait for the RPM gauge to drop to zero. • 5. Move the in-cab pump shift control valve from • the ROAD position to the PUMP position. The • shift warning lights should come on in a • second or two, indicating a complete shift. Basic Pump Operations
2. ENGAGING THE PUMP cont. • If the truck manufacturer has used another in-cab • valve to achieve pump shift or has an • electric switch, follow the instructions supplied • with that valve. • 6. After pump shift is completed, put the truck • transmission in the proper pump operating • range or gear. • 7. The speedometer should read 5 to 15 MPH after the • shift has been completed. If the shift does not • seem to be completed, shift truck transmission • to “N” and repeat the entire procedure. Basic Pump Operations
2. ENGAGING THE PUMP cont. • 8. Exit the driving compartment only after all the • above steps are completed and you are sure • that the shift completed lights in the cab and • panel are on. • 9. Chock the wheels • DO NOT OPEN THROTTLE UNLESS ALL • GREEN PUMP INDICATOR LIGHTS ARE ON. Basic Pump Operations
3. DETERMINE AND ESTABLISH WATER SUPPLY • Determine where your water supply is coming from. Either one of the following: • Tank • Hydrant • Tanker Shuttle • Relay • Pond or Other Static Source Basic Pump Operations
3. DETERMINE AND ESTABLISH WATER SUPPLY Tank Water • Typically the initial choice at the scene of a working fire • Available until a more steady source is secured • Does not last long. A 500 gallon tank flowing 150 gpm will only last a little over 3 minutes. Flowing 250 gpm, you have 2 minutes. • Activated by use of tank to pump valve • Tanks allow the ability to have foams placed in them and create a pre-mixed solution in order to save time • Need to continuously monitor tank water level. • Re-fill off hydrant asap to use as back-up Basic Pump Operations
3. DETERMINE AND ESTABLISH WATER SUPPLY • If operating from tank…. • Open tank to pump. Allow 30 seconds for the pump to fill. • Priming the pump may be necessary because of trapped air • Open appropriate discharge valve • Increase throttle to desired pressure • Set relief valves if necessary Basic Pump Operations
3. DETERMINE AND ESTABLISH WATER SUPPLY Hydrants • Hydrants are usually the source of choice for constant water supply. • Flow rates vary, from several hundred gallons to nearly 2000 gpm. • Usually located every 300 feet • Will determine whether you have a reverse or forward lay • Can connect to either front, side or rear of vehicles • Must not let residual pressure drop below 20 psi Basic Pump Operations
3. DETERMINE AND ESTABLISH WATER SUPPLY Transitioning From Tank Water To Hydrant At some point, your tank will run empty and you will need to switch over to your alternative water supply. This is a delicate procedure that needs to be practiced routinely. Of course, you should make the switch BEFORE you run out of water. Pressures from the hydrant will most likely vary from what your current total engine pressure. Usually the hydrant will be higher. It will be important to know if your vehicle’s tank to pump (TTP) valve has a check valve that will not allow hydrant pressure to back fill the tank. This was an NFPA requirement dating back to the early 90’s. If this is the case, you may be allowed to leave the TTP valve open when making the switch. Keeping the valve open will allow there to be an unimpeded flow of water if the hydrant were to fail. It would also give the engineer, OIC, and interior teams time to come up with an alternative option or retreating time. Check your local protocol and pump set up. Basic Pump Operations
3. DETERMINE AND ESTABLISH WATER SUPPLY • Transitioning From Tank Water To Hydrant • Procedure • This procedure assumes you are already in pump gear and that you have been flowing water at the appropriate pressure and now notice that your tank water is low enough to begin the switch • Open the bleeder valve of the supply line to allow air to escape and not enter the pump • Once water is flowing out of the bleeder, close the bleeder • Remove the cap off the intake you are using and connect the hose. If you are using a piston intake valve, connect the hose • Make sure the hydrant you are using has been flushed and the proper fittings attached according to your SOP • Set relief valves Basic Pump Operations
3. DETERMINE AND ESTABLISH WATER SUPPLY Transitioning From Tank Water To Hydrant Procedure 6. Open the hydrant slowly to make the switch. As you are opening the hydrant, you can close the tank to pump, if necessary. You may need to make throttle adjustments. 7. Close tank fill and re-circulating valves after tank has reached full. If tank fill was not open, crack the tank fill until your tank is full, so you have the back-up water if you need it. 8. If discharge lines are shut down at any point after this, re-open tank to pump and tank fill to re-circulate water. Basic Pump Operations
3. DETERMINE AND ESTABLISH WATER SUPPLY • If operating from hydrant…. • Communicate to firefighter making hydrant connection that you are ready for water • Open bleeder valves for the suction line to bleed out air. • Open intake valve and read the static pressure, if possible • Open appropriate discharge valve • Increase throttle to desired pressure • Set relief valves if necessary Basic Pump Operations
3. DETERMINE AND ESTABLISH WATER SUPPLY REMEMBER !!!! There is friction loss in supply lines when connected to hydrants, relays, etc. Know how much total water you are discharging and be sure you are not discharging more water than you know is possible as supply from the hydrant. Basic Pump Operations
3. DETERMINE AND ESTABLISH WATER SUPPLY • Sometimes air can get trapped in the pump and cause you to ‘lose prime’. Fire pumps are good at pumping water, not so good at pumping air ! • Priming is not always necessary • If pump is kept wet, priming should normally not be needed • Head pressure created by onboard tank and hydrant pressure are usually enough to prime the pump. You must have an open discharge or tank fill open in order for this to work • Make sure bleeder valves are open on intake valves to bleed off air. Priming the pump Basic Pump Operations
3. DETERMINE AND ESTABLISH WATER SUPPLY • If you need to use the primer valve • This would be most necessary if you are drafting from a static water source. • Engage the pump • Connect hydrant supply hose to truck • Open hydrant supply bleeder • Close all discharges • Engage primer • Check for prime - when discharge changes from oil and air to oil and water, you have prime. There may also be a sound change • You should a positive change in discharge pressure Priming the pump Basic Pump Operations
4. CALCULATING TOTAL ENGINE PRESSURE TEP = NP + FL + EL + DL So how do we determine our required operating pressures ? There are four pieces of information that are listed below that you will need in order to find out what your operating or, total engine pressure needs to be so that you are delivering the appropriate amount of water out of your nozzles Basic Pump Operations
4. CALCULATING TOTAL ENGINE PRESSURE TEP = NP + FL + EL + DL As much as the 4 parts of the total engine pressure (TEP) pie as listed above and on the previous slide are important, the biggest question to ask yourself as you are determining what your TEP will be, is… “What is my flow rate ?” In other words, how much total water will I be flowing out of nozzles, master streams, etc. ? Remember that question because that will always be your starting point in determining TEP. Basic Pump Operations
4. CALCULATING TOTAL ENGINE PRESSURE TEP = NP + FL + EL + DL When we talk about total engine pressure what exactly are we talking about ? We are trying to figure out what this gauge on the right should be reading. This is the main discharge gauge usually found on the right side of the pump panel. It usually says ‘PRESSURE’ as opposed to ‘VACUUM’ for the intake gauge. The formula above will give you that answer. Don’t get caught up in friction loss only. Friction loss is only one piece of the pie Basic Pump Operations
4. CALCULATING TOTAL ENGINE PRESSURE TEP = NP + FL + EL + DL Nozzles & Nozzle Pressure Nozzles help us determine our flow rate or how much water we are flowing out of the nozzle. ‘Nozzle pressure’ or NP in the formula refers to the amount of pressure required at the nozzle in order for the nozzle to operate properly. Depending on the nozzle, the pressures vary. If a nozzle were to say operate at 100 psi, for example, that means if we put a gauge at the end of the line before the nozzle, it would need to read 100 psi for the nozzle to work right. Basic Pump Operations
4. CALCULATING TOTAL ENGINE PRESSURE TEP = NP + FL + EL + DL • The smooth bore, fog nozzle debate • This is an ongoing debate that will never end. • Each side has good points and bad points • My own personal suggestions: Heavy, advanced fire and a direct attack = smooth bore nozzle • Indirect attack, fog nozzle • Foam applications, fog nozzle • Standpipe operations, smooth bore • Exposure protection, fog nozzle • Let your own personal experience dictate which one you choose Basic Pump Operations
4. CALCULATING TOTAL ENGINE PRESSURE TEP = NP + FL + EL + DL The smooth bore nozzles resurgence in recent years has led to many firefighters believing this is a do all end all nozzle. As good as this nozzle is, remember the previous slide, which suggests choosing the right nozzle for the right job. The smooth bore offers easy tip adjustment if needed (Stacked tips). Low operating pressures are also ideal for low pressure areas and high rise operations. The reach of the nozzles is also excellent. The resistance to become clogged with small rocks and other debris is an added safety feature. One important point to note is that they operate at 50 psi. It should be noted they operate at a minimum of 50 psi, but they will pump more at higher psi’s. You will get more flow, but higher nozzle reaction, so be careful. Smooth Bore Nozzle (Flow rates depend on tip size) 30-300 gpm @ min. 50 psi Basic Pump Operations
4. CALCULATING TOTAL ENGINE PRESSURE TEP = NP + FL + EL + DL Automatic Nozzle Designed to maintain 100 psi (or close to it) at the nozzle and compensate for pressure and flow fluctuations 60-200 gpm @ 100-200 psi Basic Pump Operations