FACSCalibur Training General Information
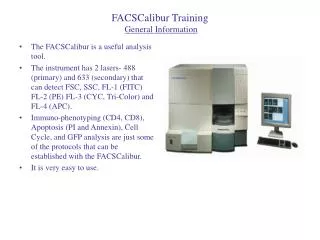
FACSCalibur Training General Information. The FACSCalibur is a useful analysis tool. The instrument has 2 lasers- 488 (primary) and 633 (secondary) that can detect FSC, SSC, FL-1 (FITC) FL-2 (PE) FL-3 (CYC, Tri-Color) and FL-4 (APC).


FACSCalibur Training General Information
E N D
Presentation Transcript
FACSCalibur TrainingGeneral Information • The FACSCalibur is a useful analysis tool. • The instrument has 2 lasers- 488 (primary) and 633 (secondary) that can detect FSC, SSC, FL-1 (FITC) FL-2 (PE) FL-3 (CYC, Tri-Color) and FL-4 (APC). • Immuno-phenotyping (CD4, CD8), Apoptosis (PI and Annexin), Cell Cycle, and GFP analysis are just some of the protocols that can be established with the FACSCalibur. • It is very easy to use.
FACSCalibur TrainingAppointments • All Flow appointments are scheduled through the Flow Facility Manager • Please arrive on time- very important • If you are scheduled for 1pm and do not show until 1:30, the investigator will be billed starting at 1pm. • You are billed for the time that you are on the instrument in 15 minute increments • If you arrive late and there is another appointment after you, you will be asked to leave the instrument and resume at a later time. • Cancellations require at least 24hrs notice. Cancellations without proper notice will be billed accordingly. Some exceptions will be made. • No appointments will be taken by email. Please call x3402 or come to HEB 253 to schedule appointments.
FACSCalibur TrainingGeneral Flow stuff (Instrument) • If there is an issue with the instrument, do not try and fix it. If there is a problem I will check the situation out and take the appropriate actions. • If the instrument is out of sheath fluid or the waste needs emptying please contact me. • If you are using on the weekend and the sheath fluid is empty or the waste is full you will have to take the appropriate actions. • Do not try to fix instrument under any circumstances • I will have the instrument ready for you to use during the weekdays. • If you are running on the weekend, you will have to set it up.
FACSCalibur TrainingFlow Cytometry • Cytometry-The characterization and measurement of cells and cellular constituents • Flow-To issue or move in a stream • Flow Cytometry, then, can be defined as the characterization and measurement of cells and cellular constituents as they travel in a fluid stream
FACSCalibur TrainingScattered and Emitted Light • Flow Cytometry deals with scattered and emitted light • Scattered light in the form of Forward scattered light FSC (Cell Size) and Side scattered light SSC (Cell complexity/Granularity) • There are forward and side scatter detectors that detect the light and photo-multiplier tubes amplify the signal and the computer turns it into a working signal. • FSC and SSC are the 2 most important parameters
FACSCalibur Training Scattered Light 488nm Laser Cell Complexity Cell Size
FACSCalibur TrainingEmitted Light • Fluorochromes and fluorescent dyes etc emit light due to their fluorescent properties. • Fluorochromes emit light in certain spectra not a distinct wavelength • These spectra can “overlap” with one another causing one color to be detected in another spectrum/channel • Spectrum overlap causes a need for “compensation” which reduces this overlap • FITC, PE, PE-CY5 and APC are just a few of the fluorescent stains that can be used.
FACSCalibur TrainingFluorescence CD3 is a T-cell marker CD19 is a B-cell marker
FACSCalibur TrainingLaser Point of Interrogation and Hydrodynamic Focusing Laser Point of Interrogation 488nm and 633nm lasers • Within the flow cell, a slow-moving sample stream is injected into a faster moving "sheath" stream • Surface tension and laminar flow causes the sample stream to be "wicked off" the injection point into a narrow, faster moving stream within the sheath stream (stream within a stream). • Careful control of the velocity of the two streams allow for fine control of the width of the center stream and, therefore, the alignment of the cells within the center stream.
FACSCalibur TrainingLight Scatter Parameters Parameter Detector P1 FSC Forward Scatter P2 SSC Side Scatter Both are 488 excitable The 2 most important parameters
FACSCalibur TrainingFluorescence Parameters Parameter Detector Excitation Emission P3 FL-1 FITC 488 518 P4 FL-2 PE 488 575 P5 FL-3 CYC 488 667 P7 FL-4 APC 633 660
FACSCalibur Training Spectral Overlap Excited by a discreet wavelength from the excitation source (laser), the fluorochrome will not emit a discreet wavelength of light, but rather a spectrum, often a very broad spectrum.
FACSCalibur TrainingFluorescence and Spectral Overlap Spectral Overlap
FACSCalibur TrainingFITC Spectral Overlap into PE FITC+ Control Properly compensated FITC Overlapping into the PE Channel FL-2 (-) % FL-1 ~ 20-30%
FACSCalibur TrainingPE Spectral Overlap into FITC PE+ Control PE overlapping into FITC, but not by much Properly compensated FL-1 (-) % FL-2 ~ 0.1-1.0%
FACSCalibur TrainingInstrument Set up Fluidics • Turn on the fluidics by pushing the green button that is located in the middle right on the fluidics cart. • Check the fluidics status- make sure that there is an appropriate amount of sheath fluid and that the waste container is not full. An alarm will sound when there is a problem with either container. • Turn on the FACSCalibur by pushing the green button located on back right of the instrument • If you are the first user of the day, turn the computer on or restart it if left on from previous night. • When the computer restarts, click Administrator and then type in the password (in all caps) BDIS. This will grant you access to the computer and the BD Cellquest Pro software. • Allow a few minutes for instrument to warm up. • After instrument warms up, it will be ready for use.
FACSCalibur TrainingInstrument Setup Starting Up CellQuest Pro and Connecting to the Cytometer • Go to the bottom of the computer screen where the menu icons are displayed. Click the BD CellQuest software icon which will allow the software to load. • A new blank document will open. Click out of that and do not save changes. • Go to Acquire> choose “Connect to Cytometer”. This will connect the instrument to the computer. • Next, go to Cytometer> and choose “Detectors and Amps”, “Compensation”, “Threshold”, and “Status”. These are the main palettes that allow you to control the instrument. Using the status palette displays if the instrument is ready for use. Once the instrument is warmed up and ready for use, a QC procedure called “Time Delay Calibration” must be performed. This will allow the lasers to fire in their appropriate time in space. This must be done every time a user turns on the machine.
FACSCalibur TrainingInstrument Setup Instrument Quality Control- Time Delay Calibration 1. Go to File> Choose “Open Document” and then look in Data 1> Setup Folder> and choose “Time Delay Calibration”. • Next go to “Cytometer”> choose Instrument Settings and then look in “Data 1> “Setup Folder” and then choose “IS Time Delay Calibration”. Next choose “Set” and then choose “Done”. This will load the instrument setting for the Time Delay Calibration. • Load the beads that will be provided with the label “Time Delay Beads” and click “Acquire”. • Make sure that the mean of the FSC peak is ~400 and the FL-4 peak is ~800 by adjusting the appropriate voltage on the “Detectors and Amps”. • While the instrument is acquiring, go to “Cytometer”> choose “Time Delay Calibration” and then when the message appears and choose “Ok”. • You will hear a sound coming from the computer acknowledging that the Time Delay has been performed properly. • The instrument is now ready for use.
FACSCalibur TrainingUsing the Instrument Now the machine is ready for use. The QC has been performed and you are now ready to use the instrument for your analysis needs. Located below is a brief description of how to set up a protocol and how to label your folders and file names. Creating a New Protocol • Go to “File” and choose “New Document”. A blank document will appear. • You will need to make plots to acquire your data. Go to “Plot” choose “Dot Plot”. Go to “Windows” and choose “Inspector”. The inspector will allow you to format your plot. • With your plot highlighted and looking at the “Inspector” choose Plot Type “Acquisition to Analysis”, choose your parameters (FSC vs. SSC, or FL-1 vs. FL-2 etc) and make the appropriate number of plots that are needed for your analysis. You can also make single parameter plots called histograms and format them the same way that the dot plots were. The plots you choose will solely be based on the analysis that you need.
FACSCalibur TrainingUsing the Instrument 4. You can also highlight a plot and go to “Stats” and then choose “Histogram” or “Quadrant” stats based on the plot type. The software allows you to edit the stat boxes to display any number of items that are pertinent to you. Remember- the simplest experiment is the best experiment. 5. Once you have everything in place and to your liking, go to “File” and choose “Save Document As” and then navigate to your investigators folder and give your protocol a name that you can remember and one that fits the protocols needs e.g. “FITC-PE”, “Cell Cycle”, or “Dendritic Cells with DsRed” or whatever best describes your experiment so you can remember it.
FACSCalibur TrainingNaming of Folders and Files Naming of Folders and files is very important. This will allow you to go to your Investigators folder and find your data easily for future analysis. Naming of Folders and Individual Files • Go to “Acquire” and choose “Parameter Description”. This palette will allow you to control the instrument- naming of folders, acquiring, and naming of individual files (Sample ID) • On the “Acquisition Palette” look for the Directory Line and choose “Change”. Navigate through Data 1> Sample Files C1> and then look for your investigator and click on their folder and then choose “New Folder”. Name the folder C1ATAPR2407 FACSCalibur PI’s initials 3 letter month abbreviation Today's date and year
FACSCalibur TrainingFolder and File naming Folder name= C1WCAUG1108 File name= C1WC081108
FACSCalibur TrainingNaming of Folders and Files • Next, name each file. On the “Acquisition Palette” choose “Change” in the File line. In the “Custom Prefix” line name the File C1AT042007 with the only difference from the Folder name being the number for the month instead of the three letter abbreviation. • Go to File and then manually enter 1. Everything is now in place for you to acquire your data. Take the time to make sure that the folders and files are labeled correctly and that your protocol is exactly the way that you want it. Making sure these things are correct will save you time and frustration later.
FACSCalibur TrainingInstrument Setup In the careful planning of your experiment, you have determined that controls are needed. Controls will allow you to set up the instrument with regards to baseline fluorescence and compensation. Negative and Single Positive Controls- Compensation • In the setup mode, put on your negative or Ig control and click acquire. • Place the negative in the first decade (100 – 101) on both axis of the dual parameter plot or just on the x axis of the single parameter histogram. • Once you have raised or lowered the voltage to get your negative in the first decade, click off the setup box and click acquire. Based on your storage and acquisition criteria, CellQuest Pro will save a file for you. • Next, take a single positive control and make sure that you are in setup mode. Put your tube on and click acquire. Adjust the compensation accordingly to subtract out the % of the control tube out of the other colors. e.g. If you are using a FITC single + control, you would use FL-2-% of FL-1 or if you were using a PE single + control, you would use FL-1 -% FL-2. In other words you are subtracting a percentage of one color from another color.
FACSCalibur TrainingControls needed Unstained Single + Control for each fluorochrome used Ex. If you have a 3 color experiment you need 4 total controls.
FACSCalibur TrainingInstrument Setup 5. As a guideline- the FL-2 - % FL-1 is roughly 20-30%. The FL-1 – % FL-2 is roughly 0.1-1.0%. However, these are just guidelines and vary based on assay being performed, staining technique, antibody concentration, etc. ****You need to have single positive controls for all the colors you are using including a negative. The more controls that you have the better your experiment will turn out. 6. Once you have run all your controls you can proceed and acquire the rest of your data. 7. After you are done with your run place a tube of water on the instrument (sample injection port) and place the machine in standby. You are free to go on about your day. Nothing else is required of you.
FACSCalibur TrainingShutting the Instrument Down To shut the machine down: • Take a tube of water and place on the instrument and run for 2 minutes. • Take a tube of 10% bleach and run for 2 minutes • Take a tube of water and run for 2 minutes and leave tube on instrument. • Place instrument in standby mode. • Turn the computer off by going into the menu and choose shutdown and then proceed to turn the instrument off by pushing the green button located in the back right, and then finally push the green button on the fluidics cart.