Download
1 / 41
410 likes | 428 Vues
This seminar will cover the techniques for taking irreversible hydrocolloid impressions and pouring casts, including proper mixing, tray selection, and evaluation of the impressions. It also includes instructions for handling and storing impressions, as well as disinfection and pouring techniques for stone casts.

E N D
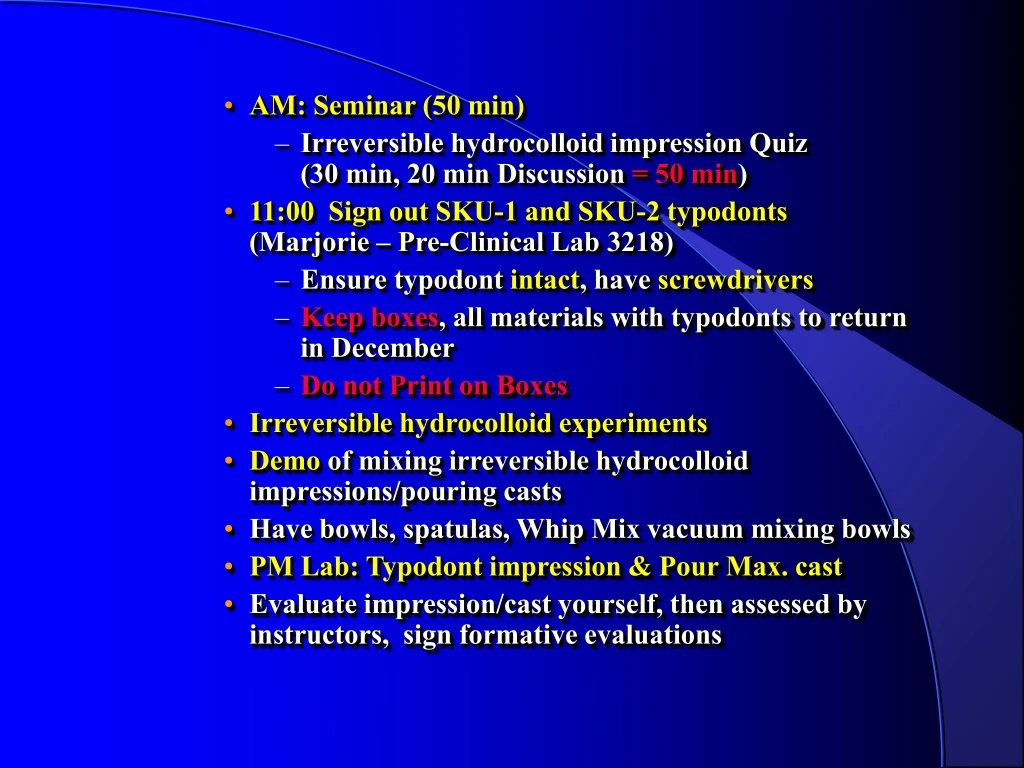
AM:Seminar (50 min) • Irreversible hydrocolloid impression Quiz (30 min, 20 min Discussion = 50 min) • 11:00 Sign out SKU-1 and SKU-2 typodonts(Marjorie – Pre-Clinical Lab 3218) • Ensure typodont intact, have screwdrivers • Keep boxes, all materials with typodonts to return in December • Do not Print on Boxes • Irreversible hydrocolloid experiments • Demo of mixing irreversible hydrocolloid impressions/pouring casts • Have bowls, spatulas, Whip Mix vacuum mixing bowls • PM Lab: Typodont impression & Pour Max. cast • Evaluate impression/cast yourself, then assessed by instructors, sign formative evaluations
Student ____________________ Preliminary Alginate Impressions Date / / Initials_______ Instructor #_____ q Unacceptable q Correctable q Acceptable Student q Unacceptable q Correctable q Acceptable Instructor __________ q Accurate recording of all critical anatomy q Material properly mixed as indicated by impressions q Minimum of voids q Trays properly selected and centered over the ridges q Minimal areas where trays have contacted tissues Diagnostic Cast Evaluation Date / / Initials_______ Instructor #_____ q Unacceptable q Correctable q Acceptable Student q Unacceptable q Correctable q Acceptable Instructor __________ q No significant bubbles or flaws in stone q Base approximately parallel to ridge and approximately l/2 inches thick (minimum) q Evidence of a dense stone surface q Clean and well trimmed q Includes all anatomical surfaces
Today • Questions from last day • Course Outline - online • Manuals Page 97-103 • Readings - excellent • Questions about irreversible hydrocolloid or trimming casts?
Next Week • Surveying • Readings in VS, Manual • In class, sort yourself by row, depending on your seminar leader
Selection of a Stock Tray • 5 -7 mm between tray & tissues • Bulk for strength & accuracy of material • Just short of vestibule • Slightly beyond vibrating line
Stock Tray Selection • Compound on peripheries if needed • Extension only to provide coverage of critical anatomy • Not for displacing vestibular tissues
Pre-Measure Material • Infection control • Do not take containers to your operatory • Do not handle containers with contaminated gloves/hands
Handling the Material • Do not leave containers open in a humid environment • Humidity & high temperatures cause deterioration
Use Separate Bowls Alginate • Gypsum can cause acceleration of setting of alginate • Alginate contamination can decrease strength of casts Stone
Measuring Alginate • Fluff the powder before measuring • Ensure no large voids
Measuring Alginate • Do not tap the scoop more than once or twice • Compacts the powder • Thicker mix
Preparations • Measuring by weight is more accurate than by volume • Ratio of 1 scoop powder : 1 measure water • 3 scoops of powder is sufficient for most arches
Regulating Set Time • Regulate with water temperature • Water/powder ratio can affect tear strength & viscosity
Mixing Alginate • Mix for up to 45 seconds • Smooth creamy consistency • No lumps or powder should remain
Making the Impression • Wipe alginate onto the occlusal surfaces of any teeth
Making the Impression • Don't bottom out on the teeth or the residual ridge • Distort the tissue or move teeth • Stone leaks between alginate & tray & produces distorted cusp
Making the impression • Wait to remove impression until the material is firm • Approximately one minute after initial set
Removal • Lift lip up to break the seal against tissues • Several drops of water • Remove rapidly, to prevent significant permanent deformation
Impression Storage • Wrap in a damp towel • Wring to eliminate excess water • Pour within 12 minutes • Minimizes distortion • Support impression by handle or tray until cast poured
Evaluating Irreversible Hydrocolloid Impressions • Properly mixed • Smooth surface
Evaluating Irreversible Hydrocolloid Impressions • Tray centered over ridge
Evaluating Irreversible Hydrocolloid Impressions • No significant tissue/tooth contact
Evaluating Irreversible Hydrocolloid Impressions • No-large voids in the impression
Evaluating Irreversible Hydrocolloid Impressions • All critical anatomy recorded • Hamular notches • Retromolar pads • Vestibules, etc.
Disinfection • Rinse the impression • Place in zip lock bag, pour in disinfectant to cover all surfaces • Seal for 10 minutes • Remove and rinse prior to pouring stone
Mixing Stone • Weigh powder • Measure water • Vacuum mix • Less time to complete than hand mixing • Stronger cast
Two pour technique • Pour stone into impression • Wait for stone to set (~ 30 minutes) • Invert impression with set first pour onto base stone • Superior surface strength
Two Pour Technique • Use vibrator & flow the stone into the impression slowly • Modulate speed of pouring by tilting the tray back and forth
Two Pour Technique • If impression fills too quickly-voids • To delay filling: • Tilt impression in opposite direction of the flow of the stone • Reduce speed of vibrator • Press impression less firmly against vibrator
Two Pour Technique • Leave rough areas on the exposed surface of the stone • Helps attach base
Two Pour Technique • Make a patty of stone • Invert impression with the first pour onto the base • Adapt new stone to the existing stone
Two Pour Technique • Trim excess stone from the base with the spatula while the stone is still soft
Two Pour Technique • Separate impression from cast after 30 minutes
Trimming Casts • Model moist for trimming • Debris from trimmer will not attach
Trimming Casts • Soak the model by immersing • in slurry water • just base of cast contacting tap water
Trimming Casts • Prolonged immersion in tap water can lead to erosion of the cast
Trimming Diagnostic Casts • Cast should be minimum of 10-12mm (.5 inch) in thinnest part • Trim the base on the model trimmer parallel to ridges • Leave the mucous membrane reflection intact for making a custom tray
Trimming Master Casts • Boxed and trimmed with a 3mm wide by 3mm deep land area • Aids in processing of acrylic • Diagnostic casts (no land area) • Used for making custom trays • Land area omitted so material is easier to trim & remove from the cast
Outline of Bases for Trimmed Casts • Follow the contour of the ridges, with rounded angles