From Scratch: Open CCS
From Scratch: Open CCS. Exit and restart CCS Click Browse to create a new workspace directory. From Scratch: Create a new directory. Navigate to StellarisWareBoards “Make a New Folder” for your board

From Scratch: Open CCS
E N D
Presentation Transcript
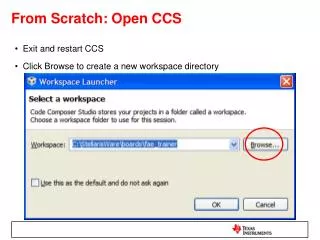
From Scratch: Open CCS • Exit and restart CCS • Click Browse to create a new workspace directory
From Scratch: Create a new directory • Navigate to StellarisWare\Boards • “Make a New Folder” for your board • Even if using a Stellaris board this keeps the StellarisWare folder pristine for later reference. • Keeping this new folder in StellarisWare\boards preserves relative path for easier cut\paste • After creating the new folder make sure the dialog is referencing the folder you created. • Click OK
From Scratch: Workspace Launcher • We now are pointing to our new workspace folder. • When you click OK, CCS looks if a workspace is already there. If not it creates some workspace files for us.
From Scratch: CCS Welcome Screen • If the workspace was empty you will see the black screen below • Click cube at top right to proceed to workspace • The next time you open any workspace CCS will remember the workspace state and restore it.
From Scratch: Import Driverlib • You should now have an empty workspace… • Now we set up as we did in Quickstart… • Select Project -> Import Existing…
From Scratch: Import DriverLib • Root directory StellarisWare\driverlib • Project driverlib • Repeat for StellarisWare\usblib • Not Required for Today’s Training • Repeat for StellarisWare\grlib • Not Required for Today’s Training Do not check copy projects into workspace
From Scratch: Create New Project • Select File->New->CCS Project
From Scratch: Create New Project • Provide a project name • Default location is good • CCS will create a project directory within the workspace directory • Click Next
From Scratch: Create New Project • Select CCS ARM tool chain. • Note: Same CCS installation also supports MSP430 and C2000 • Must get either the eval kit edition or the full edition of CCS • Code size limited versions do not work with Stellaris • Click Next
From Scratch: Create New Project • Select driverlib to show that the new project will reference that project. • Click Next to proceed to project settings dialog
From Scratch: Create New Project • Be sure to select Cortex M and the appropriate Stellaris device from the drop downs • Then click finish • Other options should be left as default
From Scratch: Add new source files • Click File->New->Source File
From Scratch: Add New Source Files • Keep the new source file in the default folder and provide a name. • This associates the new file with the active project • The first file is the startup code. Typical filename in StellarisWare is startup_ccs.c • Click Finish • Repeat previous steps to add another new source file called blinky_real.c • StellarisWare convention is that .c file with same name as the project contains main function • blinky_real.c
From Scratch: Add New Source Files • Workspace now contains two projects • driverlib: • Stellarisware • blinky_real: • our empty project with empty source files
From Scratch: Open Reference Files • File->Open File… • Navigate to StellarisWare\boards\ek-lm3s9b90 • Use CTRL+click to select blinky.c and startup_ccs.c • Click Open to finish opening the files.
From Scratch: Copy Reference Files • Copy and Paste all of blinky.c • CTRL+A, CTRL+C, move focus to blinky_real.c, CTRL+V • Copy and Paste ALL of startup_ccs. • Alternately can copy the files to the new project directory, then right click on the project name in CCS and select “Add files to project” • Once the copy and paste is complete close the reference files that are not a part of the new project • Save the files that have just been modified and are part of the new project
From Scratch: Target Configuration • CCS has our source but now we must tell it how to talk to our chip. • Select Target->New Target Configuration
From Scratch: Target Configuration • Name the new configuration “target_config.ccxml”
Target Configuration • Select “Stellaris In-Circuit Debug Interface” and “Stellaris LM3S9B90” Click Save Button
From Scratch: Project Properties • Click “Project” then ”Properties”
From Scratch: Project Properties • Tool Settings->TMS470 Compiler->predefined symbols • By default should have ‘ccs’ and ‘PART_LM3S9B90’ listed as predefined symbols • For Tempest class devices such as the 9000 series add “TARGET_IS_TEMPEST_RB1” • Tempest C3 also requires CCS Debugger DLL update. • Not required for eval kits currently using B1 silicon
From Scratch: Project Properties • Tool Settings->TMS470 Compiler->Include Options • Add these include paths… • ${PROJECT_ROOT}/.. • ${PROJECT_ROOT}/../../..
From Scratch: Project Properties • Tool Settings->TMS470 Linker->File Search Path • Add include library “${PROJECT_ROOT}/../../../driverlib/ccs/Debug/driverlib.lib”
From Scratch: Project Properties • Select “Build Steps” Tab • Add a Post-Build step to convert CCS output to binary for use by LMFlashProgrammer • Copy/Paste from relevant example project (multiple CCS windows may be open at once) • Click Apply Then OK. This makes permanent all the previous changes "${CCE_INSTALL_ROOT}/utils/tiobj2bin/tiobj2bin.bat“ "${BuildArtifactFileName}“ "${BuildArtifactFileBaseName}.bin" "${CG_TOOL_ROOT}/bin/ofd470.exe” "${CG_TOOL_ROOT}/bin/hex470.exe" "${CCE_INSTALL_ROOT}/utils/tiobj2bin/mkhex4bin.exe"
From Scratch: Build Project • You should now have a complete new project that compiles cleanly
From Scratch: Debug Project • Your new “from scratch” project should now debug and run just like the example project we started with in the previous workspace.