Creating Animations in Alice: Implementing Your Storyboard
In this lesson, we will continue our journey in animation creation using Alice, focusing on the implementation phase. Building upon the storyboard introduced in the last lecture, we'll establish our initial scene by positioning objects and setting up the camera view. You'll learn to write the program (script), translating design steps into code, manage sequential and simultaneous actions, and understand the importance of testing your program incrementally. We’ll also cover the use of comments for clarity and organization in your scripts.

Creating Animations in Alice: Implementing Your Storyboard
E N D
Presentation Transcript
Recall from last lecture • We began the animation creation process • We introduced the concept of storyboard • We will continue using the example presented last lecture
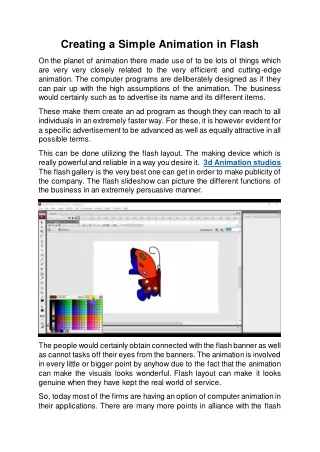
Step 2: Implementation • Implementing an animation requires • Setting Up the Initial Scene in Alice • Writing the Program (Script)
Techniques and Tools • Mouse used to • set up the initial scene • approximately position objects in the scene • Camera Navigation is used to • set the camera point of view • Drop-down menu methods are used to • resize objects • more precisely position objects in the scene • Scene Editor's Layout Manager is used to • obtain specific alignments • position one object relative to another object
Writing A Program • "Writing" a program (script) • a list of instructions to have the objects perform certain actions in the animation
Writing the Program • Our planned storyboard (to-do list) is: • The idea now is to translate the design steps to program instructions. Snowman turns to face snowwoman. Snowman “makes eyes” and calls out to snowwoman. Snowwoman turns around.
Translating the Design • Some steps in the storyboard can be written as a singleinstruction • The snowman turns to face the snowwoman • Other steps are composite actions that require more than one instruction • The snowman tries to catch the snowwoman’s attention is two actions • Snowman says “ahem” • Snowman raises and lowers his eyes
Actions • Sequential • Some actions occur one after the other • first step (snowman turns to face snowwoman) • second step (snowman tries to get snowwoman’s attention) • Simultaneous • Other actions occur at the same time • Snowman says "Ahem" and while simultaneously blinking his eyes
Action Blocks in Alice Sequential Action Block Simultaneous Action Block
Write the Animation Program • Will develop in class.
Coding the first 2 steps • Things to note: • Nesting of DoTogether and DoInOrder blocks • Arguments for the move instruction • direction • distance
Testing • An important step in creating a program is to run it – to be sure it does what you expect it to do. • We recommend that you use an incremental development process: • write a few lines of code and then run it • write a few more lines and run it • write a few more lines and run it… • This process allows you to find any problems and fix them as you go along.
Comments • While Alice instructions are easy to understand, it is often desirable to be able to explain (in English) what is going on in a program • We use comments to explain to the human reader what a particular section of code does
Notes: 1) Comments appear in green 2) Alice ignores comments. 3) Comments make the program easier to read.
In the previous example, the comment described a large block of program code. • Comments also can be used for a small subsection of the program code.
Assignment • Read Chapter 2-2, A First Program • Read Tips & Techniques 2, Orientation and Movement Instructions
Lab • Lab 2-2