Download
1 / 31
310 likes | 516 Vues
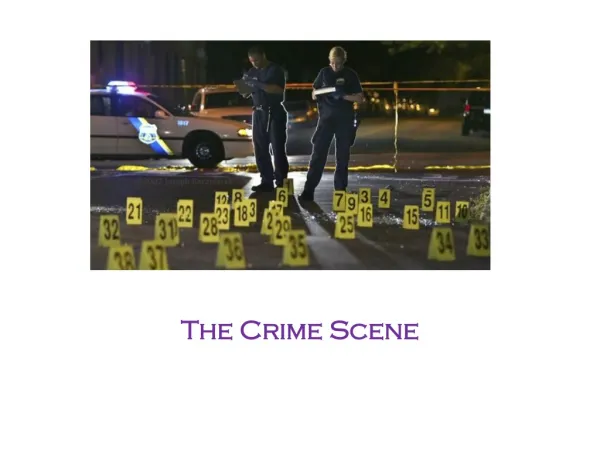
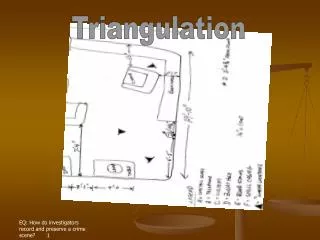
Triangulation. EQ: How do investigators record and preserve a crime scene? 1. Sketches. Required elements: Specific location Date & Time Case Number Full name of preparer & assistants Key or legend. EQ: How do investigators record and preserve a crime scene? 2. Sketches.

E N D
Triangulation EQ: How do investigators record and preserve a crime scene? 1
Sketches Required elements: Specific location Date & Time Case Number Full name of preparer & assistants Key or legend EQ: How do investigators record and preserve a crime scene? 2
Sketches Required elements: Continued Weather conditions “Scale=“ or “Not to scale” North indicated All evidence All Measurements EQ: How do investigators record and preserve a crime scene? 3
Sketches - Order Lay out parameters Draw in fixed objects Insert evidence Record all measurements Indicate North Insert Key or legend EQ: How do investigators record and preserve a crime scene? 4
Sketches Finished Sketches are done later with templates, drafting tools, or CAD EQ: How do investigators record and preserve a crime scene? 5
Sketches: Rough vs. Finished EQ: How do investigators record and preserve a crime scene? 6
Notes Must be taken CONSTANTLY! Detailed description of the scene Must I.D.: Time evidence is found By Whom How and by whom it was packaged Disposition after it was collected EQ: How do investigators record and preserve a crime scene? 7
Notes Tape recording is a good idea Must be transcribed Tapes must be held like other case evidence b/c they are used in court no joking on the tape EQ: How do investigators record and preserve a crime scene? 8
Apply proper procedures for collecting clear and legible latent fingerprints from a crime scene To develop the print, one applies a small amount of fingerprint powder to the area believed to have been touched. Typically, the powder is applied with a small feather brush, spreading the powder very gently to discover the print without destroying the impression
Explain and demonstrate the ability to properly lift and mount a latent fingerprint from a designated item of evidence • Latent Prints • An impression transferred to a surface by sweat, oil, dirt, blood, or some other substance on the ridges of the fingers. • May be visible or invisible. • A latent print not visible without some form of developing.
Lifting Prints • Generally, fingerprints are lifted with a length of clear tape. • One end of the tape is placed just beyond the end of the print, and the tape is then gently pressed over the print with an even pressure. • Once the tape is in place, the tape may be left in place on the object to protect the print, and the entire object may be sent to the crime lab. • If the object is too large or it is not feasible to send it to the lab, the tape may be lifted from the surface of the object and carefully transferred to a card.
Latent prints Latent prints: Impressions left by friction ridge skin on a surface, such as a tool handle, glass, door, etc. Prints may be collected by revealing them with a dusting of black powder and then lifted with a piece of clear tape. Some investigators use fluorescent powder and UV lights to help them find latent prints on multi-colored or dark surfaces. Magnetic powder can also be used to reveal latent prints and works on shiny surfaces or plastic baggies or containers. The cyanoacrylate fuming method (super glue method) is a procedure that is used to develop fingerprints on a variety of objects. invisible prints can be made visible by using cyanoacrylate vapors that polymerize, or bond, with an invisible print, producing a visible chemical reaction in the form of a white deposit on the print. Ninhydrin is a chemical that bonds with the amino acids in fingerprints and will produce a blue or purple color. It works well on paper or cardboard surfaces.
Demonstrate the proper technique for marking a latent fingerprint card Lifted, developed latent prints should be marked or sealed in marked envelopes. Photograph the developed latent prints with and without identifying markings and scale.
Check for legibility of collected prints Fingerprints must be clear and legible. It is best to collect prints that show the ridge characteristics and the patterns. They will be classified by this pattern. Ridge Characteristics or minutiae are used to individualize a print after the pattern has been established.
Demonstrate procedures to arrest and search a subject in a simulated situation • Approach subject safely and professionally and use procedures that insure safety at all times The Danger Zone is within arms length of the suspect The Reactionary Gap is 6-10 feet. This gives the officer time to draw his weapon or move away. 21 feet away from the suspect is the most safe position and allows you to continue to talk to the suspect. Always handcuff THEN search Treat every call as person with a gun call “Plus One” Mentality is important. When encountering a suspect, you should always assume that there is more than the one person that you see. Weaver stance is when you angle your body so that the gun faces away from the suspect and is shielded and protected by you. Always use Clear, Concise, and Convincing verbalizations You want superior positioning Suspect should be at disadvantage
Safe approach of the suspect You want superior positioning Suspect should be at disadvantage 0 is most dangerous 2 ½ is called the escort position and this is used for moving suspects 3 is safest, but limited and this is where searches conducted from here
Obtain identification from subject • Request Identification • May request identification when there is reasonable suspicion of criminal activity • State must set specific standards for the types of identification that may be required. Based on Terry v Ohio, you can take fingerprints from the suspect in the field. You cannot take the suspect to the station to get prints.
Identify and describe probable cause prior to arrest • Probable cause requires more than mere suspicion. • It requires facts or proof that would lead a person of reasonable caution to believe a crime has been committed. Officers may use the following to decide probable cause. • Officer observation-what he sees or hears • Officer expertise • Circumstantial factors • Information communicated to officers-info from roll call, from witnesses, victims
Probable Cause PC justifying officer’s arrest without warrant has been defined as situation where officer has more evidence favoring suspicion that person is guilty of crime than evidence against such suspicion, but there is some room for doubt.
Check for active warrants through dispatcher Universal Prowords SEND: Initial call received, continue with the rest of your message. SAY AGAIN: I have not understood your transmission, please repeat. OVER: This is the end of my current transmission and I am now expecting a response. OUT: This is the end of my transmission. No answer is needed or expected. (Note that "OVER" and "OUT" have mutually exclusive meanings and so should never be used at the same time in a single transmission). ROGER, RECEIVED, COPY: Your last transmission has been received and understood. WILCO: Your last transmission has been received and understood and I will comply. (Note that "ROGER" and "WILCO" should never be used together since "WILCO" already includes the acknowledgement of the last transmission). AFFIRM, AFFIRMATIVE: I confirm, or "Yes". NEGATIVE: I do not confirm, or "No". RADIO CHECK: What is my signal strength? Can you hear and understand my transmission? LOUD AND CLEAR: Your transmission has been received clearly. BROKEN AND UNREADABLE: Your transmission has been received, but cannot be understood.
Phonetic Alphabet A=Alpha B=Bravo C=Charlie D=Delta E=Echo F=Foxtrot G=Golf H=Hotel I=India J=Juliet K=Kilo L=Lima M=Mike N=November O=Oscar P=Papa Q=Quebec R=Romeo S=Sierra T=Tango U=Uniform V=Victor W=whiskey X=X-ray Y=Yankee Z=Zulu
NUMERICAL PRONUNCIATIONS NumeralSpoken As Ø ZE-RO 1 WUN 2 TOO 3 TREE 4 FOW-ER 5 FIFE 6 SIX 7 SEV-EN 8 AIT 9 NIN-ER
Place subject under arrest and notify subject of reason for arrest Advise the suspect that he is under arrest for ?????? and give him verbal commands as to what you want him to do. Turn around, do not face me, place your hands behind your back with palms out. You may then approach to handcuff.
Use safe handcuffing procedure to secure subject Identify yourself as a police officer. Command the suspect to turn around and put their back to you. Do not face me! “Set up” the handcuffs correctly in your hand. Key holes should be placed on the bottom and the bow(single blade) of the cuffs should be facing out and the bow should be pivoted to the smallest size. Command the person to spread their legs and bend over at the waist. Command the person to place their hands behind their back, (the exception a medical condition), thumbs up and palms out. Upon placement of the cuffs, turn your hand and place the cuffs on the suspect’s right wrist first. Push-HIT the "bow” against the left wrist of the person, which will pivot the bow and allow securing through the various tracks in the bow. . Use the double locking mechanism to "double lock" the handcuffs to prevent them from being tampered with. Leave a pinkie finger’s worth of room between the cuff and the wrists. Handcuff with backs of hands facing each other
Pat down or search subject using safe procedure • When a custodial arrest is made the officer may conduct a thorough search of: • the person arrested and • the area under his/her immediate control (“arms reach” or “wingspan” rule)
Search of the suspect Must be done immediately (“contemporaneous”) after the arrest Items seized do not have to be related to the crime the person was arrested for committing
Find and remove weapons from subject • A terry stop allows the officer to search the person’s outer clothing for weapons for officer safety with Reasonable suspicion. • After handcuffing the suspect, a thorough search of the person must be conducted. • If suspect is in a car at time of arrest the passenger compartment of the car may be searched.
Secure removed weapons Found weapons may be placed in the patrol car after discovery. Initially found weapons may be placed in the officers waistband until the search is completed. The weapon may be handed to another officer if found. It may placed on the floor and kicked away until the suspect is secure.
Describe the operations of home and commercial security systems • Identify types of security systems • Explain the operation of various types of security systems