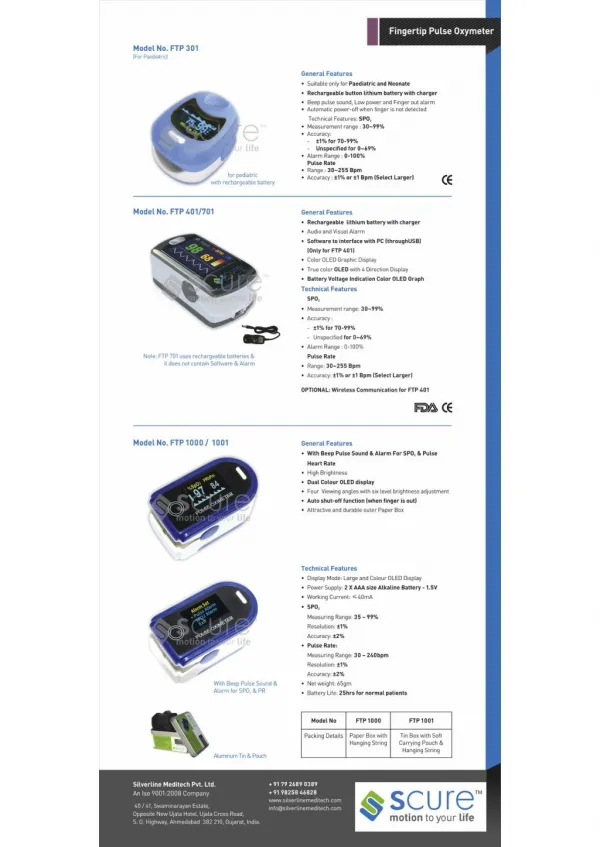
Download
1 / 26
260 likes | 420 Vues
Adjusting online product catalog. www.districtenergy.danfoss.com. Tasks involved in the adjustment of the online product catalog. Removing child file from product overview ( CMS ) Removing entire product group content from left menu ( Site settings )

E N D
Adjusting online product catalog www.districtenergy.danfoss.com
Tasksinvolved in the adjustment of the online productcatalog • Removingchild file from productoverview (CMS) • Removingentireproductgroupcontent from left menu (Site settings) • Removingproductpresentations from left menu (Site settings) • Creatingproductpresentationwhichdoes not existlocally (Product Management) • Addingproductpresentation to leftmenu (Site settings) • Translate data in new productpresentation (Product Management) • Addingproductprensetationto CMS overview (CMS) • Adjust links on CMS pages (CMS) • Adjustingcombinationmatrixes (Product Management) How to perform thesetasks is described in the following slides Link to master pages – clickhere
Removingproductpresentations (CMS) • Go the Content Management and find the Product overview file in the folder structure • Open the ‘Parent_DEN_products’ CMS file and click the ‘child files’ tab. Now remove the butterfly valves from the list • Go back to the ‘file content’ tab and click save • Task 1 done! • Open the Site settings for your test site and go to the ‘menu navigation’ • Open the ‘Products’ menu item and right-click on ‘Butterfly valves’ and choose ‘delete’ • Task 2 done! • Removeproductgroup‘Butterfly valves’ from: • Product overview • Left menu
Screen shots Content Management - CMS Site List / Menu Navigation Parent CMS file – childoverview
Removingproductpresentations (type presentation) • Open the Site settings for yourlocal site and go to the ‘menu navigation’ • Open the ‘Products’ menu structure and find and right-click on ABV and thenchoose ‘delete’ • Task 3.1 done! • Open the Content Management and find the MCV files in the folder structure • Open ‘Parent_hea-coo_appl_act’ and remove ‘ABV’ from the child files list • Return to ‘file content’ and click save • Task 3.2 done! • Remove a productpresentation(e.g. ABV) from: • Left menu and • CMS overview
Screen shots Site List / Menu Navigation Content Management - CMS Parent CMS file – childoverview
Creatingproductpresentations from scratch (type presentation) • Go the Product Management and choose ‘Presentation’ on the function drop down for productgroupmotorizedcontrolvalves • Scroll to the buttom of the page and click ‘create new productpresentation’ • Scrolldown in the template and choose VFM 2 on the ‘products included’ drop down – add it • TranslateHeadline (ifneeded) and Description and selectpicture from master – scrolldown to click save • Task 4 done! • Create new productpresentation(VFM 2) in: • ‘Presentation’ area of Product Management
Screen shots Product Presentation Template
Implementingproductpresentation online (type presentation) • Go to the Site Setting for yourlocal site and click on ‘menu navigation’ • Open the menu item ‘Products’ and the seatedvalves subfolders • Right-click on ‘district heating’ under ‘seatedvalves’ and choose ‘new’ and ‘type presentation’ • Find VFM 2 on the second drop downafterhavingchosenMotorizedcontrolvalves on the first drop down • Set a vieworder and click save • Task 5 done! • Add new productpresentation(VFM 2) to: • Left menu on the local site
Screen shots Site Settings – Menu Navigation Adding a Type Presentation from the Product Group Motorized Control Valves
Translatingproduct data • Go the Product Management and choose‘Data’ on the function drop down for productgroupmotorizedcontrolvalves • Find VFM 2 on the list and click the green plus to open up for itscodenumbers – translatedirectlyhere and click save • To see the entire list of data for eachcodenumber, click the editiconnext to eachcodenumber to enter the codenumber data • Translate the missing data and scrolldown to click save • Repeat for eachcodenumber • Task 6 done! • Translate the product data for VFM 2 in: • ‘Data’ area of the Product Management
Screen shots Product Data Management
Implementing new child file in parent file productoverview • Go the Content Management and find the ‘Products’ and the ‘Motorizedcontrolvalves’ folder in the folder structure • Open the ‘Range Overview’ folder and the ‘Level2_files_valves’ and the folder with child files • VFM2 does not existyet, so we right-click on VB2 and choose ‘duplicate’ • Open the copy and rename it to VFM2. Change the headline to VFM 2, update the link and adjust the technical data to fit for VFM2 and thenclick save • Open the Parent file and insert the new VFM2 child file. Click save and preview • Task 7 done! • Addingproductpresentation for VFM 2 in: • CMS overview for ‘SeatedValves’ for ‘District Heating’ applications
Parent CMS file VFM2 child CMS file CMS folder structure Screen shots
Adjustinglinks on CMS pages • Adjusting links on the CMS index page for Motorized Control Valves: • Content Management – folder structure for MCV products • Go to the Content Management area and choose the ‘MCV_index NEW’ CMS file – right-click to open it • Scrolldown to the ‘sub story 3’ area and change the links • If youwish to keeplinking to the English content – adjust the link text and let usersknowthey’llsee pages in English iftheyclick • If youdon’twant to link to English content, think of anotherway to utilizethisarea • Task 8 done!
MCV Index CMS page CMS folder structure Screen shots
Adjustingcombinationmatrixes • Adjustingcombinationmatrixes: • Product Management – combinationgroup ‘Valves & Actuators’ • Go to Product Management and choose ‘combinationgroup’ on the area drop down, ‘valves & actuators’ on the next drop down and ‘matrix’ on the ‘function’ drop down • Scrolldown to find the matrix where VFM2 needs to beadded (district heating, DN 15-250) • Find VFM2 on the Y-axis drop down, insertheadline and position and clickadd • Enter the technical data in the table and enter the combinationpresentations (dots) one by one to translate the descriptions • Task 9 done!
Copy the Master Matrix Product Management - Matrixes Screen shots Or add VFM2 to the existing matrix
To open or edit pages you have to right-click on the file and choose ‘edit’ • Give folders and files English names! No local letters • Enteryourcontent in the fieldsprovided in the CMS template • Duplicateexisting files whenyouneed to create new pages – or choose ‘new file’ from the menu to get the full list of available templates • Right-click on the folder whereyouwant a new page and choose ‘new file’ • If youinsertyourownpicturesrememberthey must becropped and resizedbefore upload! • Standard picturesize is 188 x 188 pixels (72 dpi) Basic priciplesabout CMS page 1/2(Content Management)
To create links use the predefined link fields and click ‘get link’ • Youcan link to other CMS pages, static files you have uploaded, productpresentations, combinationmatrixes, documentation and forms you have built • Whenlinking to another CMS page, choose folder and file via the drop downs • Whenlinking to static files, open the folder structure til you find youruploaded file and choose it (the file has to beuploaded in site settingsfirst! - don’t upload .docx, .xlsx and .pptx) • Type presentations is whereyou find yourproductpresentations • Combinations is whereyou find the existingcombinationmatrixes • Doc is whereyoucanmake links to datasheets, leaflets, instructions etc. • Forms is whereyoucan find existingcontact forms or sign-up for seminars thatyoucreated and link to them Basic priciplesabout CMS page 2/2(Content Management)
Basic priciplesabout News 1/3(Site Settings – News Handling) • Go to Site settings and News handling ifyouwant to create a newsarticle and/or a newsletter • Click the colorfuliconnext to the relevant newsgroup to create a newsarticle • Enteryourcontent in the fieldsprovided in the newsarticle template • Insert a ‘headline’, ‘picture’, ‘intro text’, ‘maintext’ and ‘links’ or ‘files’ • If youinsertyourownpicturesrememberthey must becropped and resizedbefore upload! • Standard picturesize is 188 x 188 pixels (72 dpi) for currentnews layout • If you upload a file to the newsarticleremembernot to uselocal letters in the file name and replacespacesbetweenwords with ”_”. The file namegetsshown in the actualnewsarticle New features for new Danfoss Update newslettercannotbe usedyet!
Basic priciplesabout News 2/3(Site Settings – News Handling) • Go to Site settings and News handling ifyouwant to create a newsletter • Click the envelopiconnext to the relevant newsgroup to create a newsletter • Scrolldown and choosewhich template to use: ‘Danfoss 2009 design’ • Insert a headline, banner picture, top text, footertext and yournewsarticles • If youinsertyourownpicturesrememberthey must becropped and resizedbefore upload! • Standard picturesize is 662 x 249 pixels (72 dpi) • Click on the News articles tab to addyourexistingnewsarticles
Choose the newsgroupyouwant to addnewsarticles from and find yournewsarticle on the second drop down – click the addbutton • If youadd more thanonenewsarticleyoucanuse the ‘up’ and ‘down’ links to chagetheir position • Whenyouare done youcan send a preview of the newsletter to yourself to check how it looks (links will not work in a preview!). Enteryouemailaddress in the field and click the ‘send previewbutton’ • In the top textareayou must remove the template instructiontext – but let [NEWSUSEREMAIL] stay and write ‘dear’ in front of it. This way the subscribers’ name is insertedautomatically • Enteryour intro to the newsletterbelow the salutation – keep it short! • Click the ‘Save & Send’ buttonwhenyouareready to send to yoursubscribers Basic priciplesabout News 3/3(Site Settings – News Handling)
ChooseLiterature and Search to search for master version of a piece of literature • There is always a master version of a piece of literature – 90% are English masters • The literaturenumber system is based on one master from whichwecreatenumerouslanguage versions • To create a new literaturenumber, search for the master version, open it and go to ‘localize’ and click the ‘createlocal version’ button • Fill in the data in the new window: headline, searchkeywords, descriptionifneeded, responsiblelocal editor, status, release date • Headline and searchkeywordsshall, of course, be in locallanguage! • When done, click save – and move on to ‘Files’ tab to upload yourlocallanguage PDF Basic priciplesaboutLiterature1/3(Documentation) If youwant to create a literaturenumber for a piece of localliteraturewhich has no English master, you have to contactone of the literature administrators to get a local master lit no!
To upload a PDF, click browser, searchyourown drives for the file and click ‘upload’ • Remember! The file namecannotcontainanyspecialsigns or letters! Keep the file name as short as possible and don’tusespaces (replacespace with a ”_”) • Mark the check boxes ‘Intranet’ and ‘Internet’ (low res PDF) • If youwantyourliterature to be part of an iPapercatalog, you must upload 1 high and 1 low resolution PDF – mark the ‘High res’ check box for the high res PDF you upload • Remember to generate an iPaper of both PDF versions! Basic priciplesaboutLiterature 2/3(Documentation)
Youcanmakeyourliterature file availabledirectly from a relevant productpresentation – ifyou go to the ‘Product’s tab youcancreatesuch a relation • Choose the relevant department on the first drop down – the relevant productgroup of the secondone - and finally the product type on the third drop down – thenclick the ‘addproduct type’ button • Use the red icons with the whitecrossifyouneed to delete a productgroup or product type from the list again Find guidelines for literature handling directly on the search page inside PCM! Basic priciplesaboutLiterature 3/3(Documentation)