Download
1 / 4
40 likes | 51 Vues
In the above pdf file,We are explaining how QuickBooks pro 2018 can be remotely done in simple steps.If still you are facing problem then, you can directly call our QuickBooks technical department at 1844-313-4856.<br>

E N D
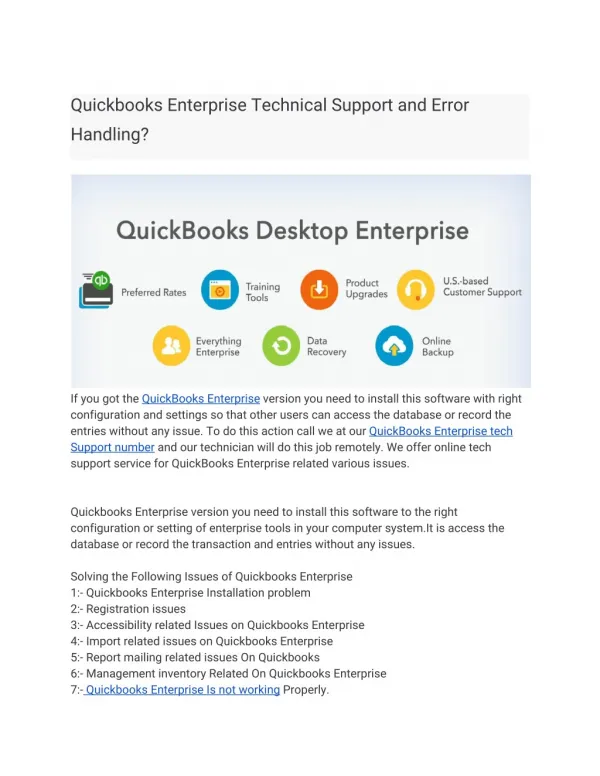
How to Access QuickBooks Pro 2018 Remote? How QuickBooks Pro 2018 can be accessed remotely? The following steps have to be taken if the QuickBooks Desktop company file has to be accessed from the host or server computer. Prior to accessing the company file, users must do the following: The server or host computer must be mapped as a network drive to all the workstations. NOTE: If users are unable to map the network drive with the UNC, they must try doing so with the IP address of the server. In case of any difficulty, they should consult an IT expert. Windows 8/10: After pressing the Windows logo, users must type This PC in the search bar and then choose This PC from the results. Next, choose Map a Network Drive from the Computer tab. Now, users must choose a drive letter that’s not used and then choose Browse. Then, users must navigate to the network location where the company file is saved. If there’s any problem in mapping the network drive with the UNC, the IP address of the server must be used. Once this is done, choose OK and Finish. Now, the company file must be opened from the new mapped drive. Windows 7: First, choose Computer from the Start menu, followed by choosing the Tools menu and then Map Network Drive. If the Tools menu isn’t visible, the Alt key must be pressed for displaying the menu bar. Now, an unused drive letter must be chosen, followed by choosing Browse. Then, users must navigate to the network location where the company file is located. Once done, choose OK and then Finish. The new drive letter will be seen in the previous window in the form of a network drive. Now, the company file must be reopened from the new mapped drive. The computers that will access files must be set up for multi-user mode- -Multi-user setup for QB Desktop can be configured in 2 ways: Recommended mode: -In this multi-user setup, the company file is stored on the host computer.
Turning on hosting: NOTE: Hosting must be turned on only for the host computer or wherever the company file is saved. If a server is being used to host the company file, one computer must be the host. Hosting must never be turned on for other workstations. First choose Utilities from the File menu and then select Host Multi-User Access. Now, choose Yes in the confirmation window. Alternate mode: If this mode has to be enabled, users must check resources on multi-user access changes in QB 2016 and QuickBooks latest versions. Users can also contact the Accountinghub QuickBooks Tech Support Team for this. The folder storing the company file must be set up: The following must be ensured: The installation directories must have correct permissions. IF Windows Home is installed, the security tab might not be available in normal mode. The computer must be rebooted in Safe Mode for completing the steps: After restarting the computer, F8 must be pressed till the Advanced Boot window opens. Here, choose Safe Mode and press Enter. QBDataServiceUserXX is dependent on the QB version used. For example: QB Desktop 2018– QBDataServiceUser28. All workstations where multi-user hosting access is enabled might switch to Alternate Hosting mode and take control of the company file. If this happens, other users won’t be able to access the file. Setting up folder permissions: 1. Checking if permissions are correct. 2. After right-clicking on the folder containing file, choose Properties. Then choose Advanced from the Security tab. 3. Next, choose QBDataServiceUserXX and then edit. Now, it must be ensured that these settings have been set to Allowed: Traverse Folder/Execute File. List Folder/Read Data. Read Attributes. Read Extended Attributes. Create Files/Write Data.
Create Folders/Append Data. Write Attributes. Write Extended Attributes. Read Permissions. In case the permissions haven’t been set correctly, these steps must be taken: 1. After right-clicking on the folder containing the company file, choose Properties. Then, choose Security, followed by Edit. 2. Next, select QBDataServiceUserXX and then Full Control, followed by Allow. Finally choose Apply and then OK. Changing folder permissions: Open the File Explorer by pressing Windows + E. Then, go to the parent folder and after right-clicking choose Properties. These steps must be completed for every folder on the list. But every folder might not be applicable to every installation, as they refer to specific versions of QuickBooks. Contact our Accountinghub QuickBooks experts for details. Next, choose everyone from the Security tab. If everyone is not in the Group or User Name box, choose Add and type everyone and then select OK. Next, choose Full Control and then select Apply, followed by OK. Installing QBDBSM on remote computer: -First, QB must be downloaded and installed in the main computer. Then, choose Switch to Multi-User Mode from the File menu in QB. Next, choose Yes in the Multi- User Hosting Setup Required window. NOTE: QBDBMgr.exe is installed and run by QuickBooks in the form of a background service. Even if QuickBooks is closed, this service must keep running in the computer that contains the company file. Now, users must choose OK in the Multi-User Setup Information window. Next, the required users must be added by navigating to Company -> Set up Users and Passwords -> Set up Users -> Add User. Network Discovery needs to be switched on for the server and it must be visible for opening the file via a UNC path. In case password Protected Sharing is
switched o, Windows will seek a network password. If this occurs, user can log in with the network password or switch of this feature. This process must e completed on the server/host computer and all systems that must access the file across the network. After opening Control Panel, select Network Sharing Center, followed by Change Advanced Sharing Settings. Next, the Profile type being used must be expanded. Then, choose Turn on Network Discovery under Network Discovery. Then, choose Turn off Password Protected Sharing under Password Protected Sharing. Finally, choose Save Changes. Locating and opening the company file: Choose Open Or Restore Company from File menu. Then, choose Open a Company File, followed by Next. Then, users have to find the location of the company file. Then, the company file (with .qbw extension) must be chosen from the list, followed by choosing Open. If there’s a prompt, the user name and password must be provided. For further queries, please call our Accountinghub QuickBooks Technical Support Team anytime on +1844-313-4856.